We recommend using the Postman app to test and develop your xAPI integrations. We regularly update our collections with the latest endpoints that we are developing. You can download current and past collections on our Postman download page.
2. Create a User Account to Log Into the xAPI
Logging into the xAPI requires a user account in EPASS with API User selected as the type.
To Add a xAPI User Account in EPASS:
Start EPASS and log in.
Go to Tools > System Maintenance > User Security.
Click Add.
Enter an ID and Password, and then select API User from the Type dropdown.
Click OK, and then exit the User Security window.
Read the Session Management and Configuration topic for additional information on how the xAPI validates user access with EPASS User Accounts and Web tokens.
Note
Access to xAPI endpoints is dependent on the security options that are enabled for your EPASS User Account.
3. Set Up Your Environment Variables
In Postman, create a new Environment with these variables:
Variable Name
Description
BaseUrl
EPASS xAPI server address.
Version
xAPI version number.
UserID
The name of your xAPI user account you created in EPASS.
Password
The password for your xAPI user account.
OrgID
Your organization identification code.
Token
Leave this blank.
RefreshToken
Leave this blank.
Protocol
http
4. Create a Test Message
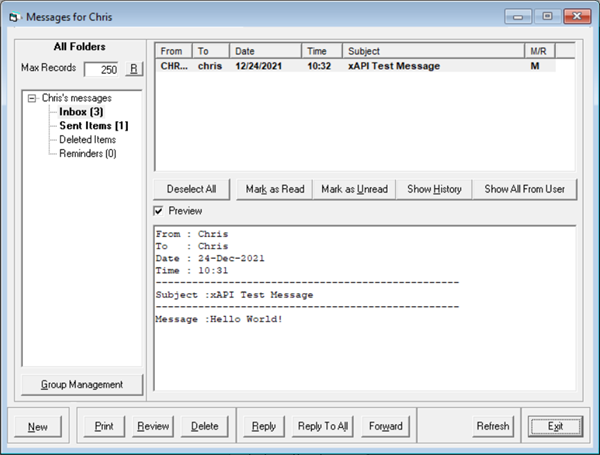
Verify that everything is working by adding a message to EPASS.
POST{{Protocol}}://{{BaseUrl}}/api/{{Version}}/system/services/messages/message{"MessageType":"Message","Subject":"xAPI Test Message","UserFrom":"<Enter your username here>","UserList":["<Enter your username here>"],"Message":"Hello World!"}
You should receive a successful response. If not, review the list of common errors.
Log in to EPASS with your user account and verify that the message was created.
Congratulations! You are ready for development.
1 - Postman Collections
We recommend using our collection files with Postman to help you learn, develop, and test your integration.
- Added the ability to change the JobStatusCode - Ignore email fields in the web order end point for a quote. - Two new fields added to models/search: Serial Type Code and Model ATS value
Understading session management and configuring xAPI settings.
Session Management
The External API (XAPI) uses a token-based access model in order to authorize access to its endpoints. Understanding the security and session management architecture ensures that the least disruptions occur while using the XAPI.
Users, Tokens, and Sessions
The three main components of the XAPI security framework are:
EPASS Users
Web Tokens
Web Sessions
EPASS Users
The user name and password to be used to login to the XAPI are maintained within EPASS. The users are maintained in the same area as all of the standard EPASS users except that they must be of type: “API User”. This “API User” type is permitted access to the XAPI; however, it cannot be used to login to the EPASS Windows application.
Note
A single session in the XAPI is mapped to one “API User”. This means that if there is more than one application logging into the XAPI, each application should use its own EPASS “API User” account. This is because when a XAPI login occurs, any previous logins are cancelled and replaced with the next session information.
EPASS XAPI accounts are configured in the standard admin area of EPASS:
The XAPI uses JSON Web Tokens (JWT) to permit access to its web methods. In summary, an application logs into the XAPI using the EPASS user and password and then receives a JWT token. Subsequent calls to the XAPI require the calling application to pass the JWT token in the BEARER authorization header.
The session process involves two tokens: the session token (referred to just as the token), and the refresh token. As far as the application is concerned the session token is the only token; however, in the case that the token expires the application can quickly re-establish itself with a new session token without having to resent the user/password credentials.
An XAPI session is simply a high-level abstraction of the XAPISession table, session token, and refresh tokens. Each session has a corresponding row in the XAPISession table of which there are some details about the session. At any given point, deleting a record in the XAPISession table will result in the immediate invalidation of the session and all access will be revoked, including the ability to use the refresh token.
Configuration
The EPASS External API (XAPI) is configured through a single JSON config file: “appsettings.json”. This file is located in the root of the installation folder and contains a variety of important settings.
Set to ‘true’ if you want to enable logging. If the value is ‘false’, all other logging settings are simply ignored. The system will write log entries to the “ErrLog” table in the EPASS database; however, if the database cannot be accessed then the error is written to a log file in the root of the WebAPI installation folder.
LogFileLocation
string
The name of the file that a log entry is written to only if the application cannot access the database. This log file should typically be empty or non-existent.
Token/Session
Attribute
Type
Description
TokenExpiryinMinutes
Integer
When a user logs into the XAPI they are granted a session token. This value dictates the duration of time that the session token is valid. After a token expires, the refresh token can be used to generate another token. It is recommended that this is a fairly short-lived token. The actual number of minutes is relative to the risk of a data breach.
RefreshExpiryInMinutes
integer
This indicates the number of minutes a refresh token should be valid. This can be a long duration and should be considerably longer than the TokenExpiryInMinutes value. This token is explained more in the Session Management section of this wiki.
Statistics
The statistics feature allows the recording of requests and responses which provides programmers with the ability to view the raw request data that was received by an endpoint and the raw response data sent back to the caller. The ‘track statistics’ feature is not intended for production usage but rather for debugging a particular issue.
Attribute
Type
Description
TrackStatistics
boolean
Enable or disables the tracking feature.
TrackStatisticsSize
integer
The maximum number of rows allowed to exist in the statistics table. Rows oldest are deleted as this limit is reached.
TrackStatisticRequest
boolean
Writes the quest raw data to the XapiSessionStatistic row.
TrackStatisticResponse
boolean
Writes the response raw data to the XapiSessionStatistic row truncated to 1,500 characters.
Cached LookUps
To reduce stress on the database and increase access speed, the system can locally cache the data for commonly used tables containing data that doesn’t change very often. You can designate which data tables should get cached by including their name in appsettings.json. The tables that support caching are mostly found in EPASS under System Maintenance > Tables.
Note
Refer to the System topic to refresh changes to the cached lookup settings as well as refresh cached data.
Attribute
Type
Description
CachedLookupThreshold
string:integer
The table names that the system should cache and the threshold amount. If the amount of records returned from the table exceed the threshold amount, the data won’t be cached.
CachedLookupsTimeinSeconds
integer
The window of time (in seconds) that the xAPI extracts data from the cache rather than the database. Once this time limit expires, the xAPI re-caches data from the database at the next request.
ConnectionStrings Object
The ConnectionStrings sections may have an unlimited number of databases configured. During the login process, the calling application supplies a user, password, and organization id (known as the database name). Each database name must be unique. The following is a sample database string for a database called “DEMO”:
"DEMO": "Server=127.0.0.1;Port=12345;User=User1;Password=abcdef;Namespace=DEMO;Max Pool Size = 5;Min Pool Size = 1;"
Server: IP address to DNS Name of the database server.
Port: Port number permitted for connections to the database server.
User: This is a database user and not an EPASS user.
Password: The password field is unique; it allows a person to type in a plain text password such as “MyPassword123” and once the application starts it will encrypt the password and write the cipher text back into this connection string.
Max Pool Size: This will throttle the maximum number of database connections permitted by the XAPI application. If this number is reached, subsequent requests will be delayed while waiting for a free connection.
Min Pool Size: This is the initial size of the application pool. This will only make a difference in situations where the application is requiring quick responsiveness after an application restart.
3 - Searching, Paging and ExtendedInfo
Building a Search Query
Most EPASS records can be retrieved using a SEARCH endpoint and sending a query in the payload.
For example, to search for and retrieve a customer record by it’s ID (or code), you would send:
Paging is a core component of endpoint searching provided by the xAPI. Paging prevents overconsumption of resources for a single query, and allows the calling application to control their response speed to payload size ratio.
Each time a search is executed it returns an indicator which informs the calling application whether or not there are more records after this page.
For example, if the search returned 1,000 rows and the page size was set to 100, the calling application would need to call the endpoint 10 times to return all 1,000 rows of data.
Here’s an example of a search endpoint with paging:
The results of this query will return the highest unique record key on this given page, as well as provide a Boolean value indicating if there are more pages.
The larger the page size the longer the query takes; however, the less method calls are required. There isn’t a magic ratio, but rather it is recommended a tool like Postman is used to try different combinations until the desired balance is reached.
ExtendedInfo
To include fields from related tables in your search query, you have to include them in an ExtendedInfo object. The ExtendedInfo object is added to the end of your search query.
For example, to return the details of an invoice, including the details of the primary Salesperson that’s attached to the invoice (which is contained in the Salesperson table), you would send the following endpoint and query:
The response would include data from all the invoice fields, as well as the data from the Salesperson table. This data is included at the end of the response, within an ExtendedInfo object:
You can also specify which data fields are returned by entering the field names in the table array. Using the above example, if you wanted the query to return just the Salesperson’s ID and Description, you would send the following endpoint:
Common error responses you may receive when sending requests to the xAPI.
The xAPI uses common HTTP response codes to indicate successful or unsuccessful request attempts. Generally, any 2XX response codes indicate a successful request, while errors are indicated with a 4XX code. In most cases, error messages are supplied that explain why the request failed.
The following are common errors you may receive when sending requests to the xAPI.
Code
Error
Resolution
400
Bad request.
Check the payload to confirm that objects have required fields and data.
401
Unauthorized login.
• Send the Login request to refresh your authorization tokens. • Verify that the user account has been created in EPASS and the user type is set to API User. • Verify that you are using the correct user and password.
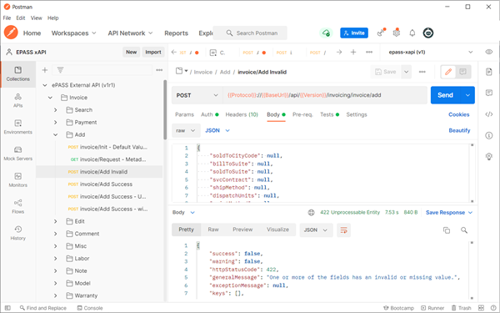
422
Invalid field or missing value.
• Verify that a required filed hasn’t been missed in the payload or that an incorrect value type has been used.