AP Posting
AP > Post Transactions
The AP Posting procedure is the step that writes all the transactions to AP Current, AP History and the GL Holding file. This is normally done after a batch of AP transactions have been keyed in so you can balance the entries and put the paperwork away. You do not need to post daily; transactions will not be lost if they are left unposted until the next day. In AP, transactions are generally posted when the person is ready. Transactions will not appear on reports, the check run or other procedures until they have been posted.
Accounts Payable can be posted to the GL using either the transaction date or the EPASS sign-in date (report date). When using the transaction date, you need to be very careful with the invoice date as that is the date that will go to the AP History and the GL. This can cause a problem if you have already closed a month and receive an invoice for the prior month as it will go the GL as the prior month. Some companies do not wish to re-open a financial period once it is completed; they prefer to put AP transactions into the month they arrived, no matter what the invoice/transaction date is. Although report date is the preferred method, both are correct, it is personal preference. This is controlled by the AP variables option “Post Detail to GL with:”.
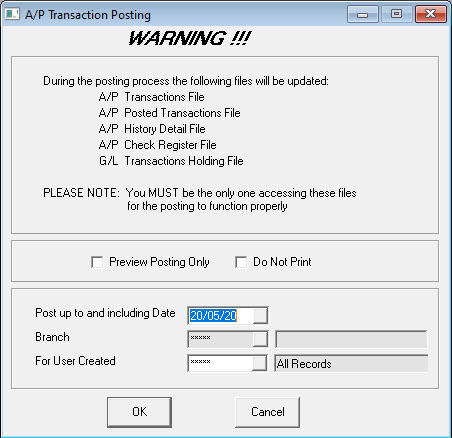
Preview Posting Only
When checked, the AP Posting reports go to the screen and can be printed if desired. There is no option to post when the Preview checkbox is checked. When unchecked, the reports will go directly to the printer and then you will have the option to accept or cancel the posting. The Preview option on the posting is there specifically so you can take your time, review the reports and make sure the transactions are correct.
Do Not Print
Will prevent the posting report from printing. This report can still be accessed in AP > Posting History.
Post up to and including Date
Transactions up to and including the selected transaction date will be included in the posting.
Branch
The branch selection is disabled unless you have AP Posting by Branch turned on in AP variables.
For User Created
If you have multiple AP entry people, this option will let each person post their own transactions independent of the other users.
Accepting the Posting
After pressing OK with Preview Posting un checked, the following windows will appear.
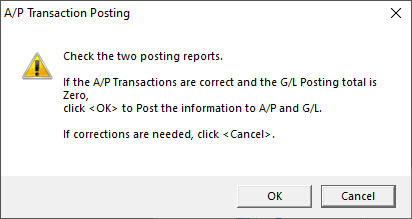
At this point, nothing has been updated. The reports have been printed, and the posting has been prepared.
Do not click OK on this screen until the posting reports have finished printing and you have reviewed the documents. You cannot reverse a posting once it has been accepted. Take your time and make sure everything is correct.
If everything is correct you can click OK to accept the posting, or click Cancel to stop the posting. Upon clicking OK, the posting will occur. Once the posting is completed, the following window will appear:
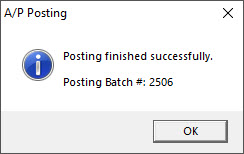
This is the Posting Batch Number your posting has been assigned. This batch number is stored with all your transactions in AP Open Item, Supplier History, GL Transactions, and GL Posting History. Posting reports can be re-printed from both the AP Posting History and the GL Posting History but we still highly recommend keeping the original paper copies of the posting reports.
Posting Failure and Recovery
If the posting failed after you clicked OK to accept the posting and the system returned an error message, EPASS should automatically recover from the posting and you should be able to continue normally. Simply exit EPASS, go back in and re-run the posting. If you do not understand the error message, or the same error message occurs again, please contact technical support for assistance.