Printing Checks
Checks can be printed one at a time directly from AP Transaction Maintenance for individual or manual checks or through the check run process for printing a batch of checks.
AP Transaction Maintenance
The AP Transaction print check procedure will print checks for both Quick Pay and check transactions. This button is available only if AP Variables - Print Checks in AP Transactions is checked. If the supplier for the transaction selected is ‘MISC’, the screen below will appear, otherwise EPASS will proceed to print the check unattended.
![]()
The name and address entered on this window will be used to print the payee information on the check.
OK: Print the check with the name and address shown, then save the name and address into the note field. This way it will be in AP History and can be searched for in the future.
Cancel: Close the screen, do not print a check.
Hold from Payment
If you use Hold From Payment, you may want to go back and release the hold or print the AP-11 Open Item List to see all invoices on hold prior to continuing. The AP hold from payment form can be reached from the Accounts Payable menu.
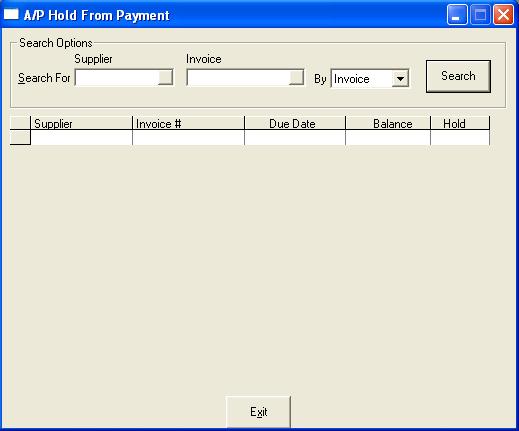
Search For: This is the information we are searching for.
Supplier: Which supplier code you wish to change the hold status on.
Invoice: Which invoice code you wish to change the hold status on.
By: This is what field we are searching by and this will change the options available after clicking search.
All: All suppliers and invoices will be selected. When All is selected, you cannot change the supplier or invoice fields.
Supplier: Searching will be by the supplier code entered.
Invoice: Searching will be by the invoice number entered. When searching by invoice, an invoice code is recommended but not mandatory.
If you selected By: All
You have chosen to place all suppliers and invoices on or off hold.
- Hold All: Place all suppliers and invoices on hold.
- Remove All: Remove the hold from all suppliers and invoices.
- Cancel: Exit.
If you selected By: Supplier
You have chosen to place all invoices for the selected supplier on or off hold.
- Hold: Place all invoices for the selected supplier on hold.
- Remove Hold: Remove the hold from all invoices for the selected supplier.
- Cancel: Exit.
If you selected By: Invoice
You have chosen to place individual invoices for the selected supplier on or off hold. You can double click, press F2, or type Y/N on the selected line to change the hold.
- OK: Save all changes made to the hold status of these invoices.
- Cancel: Exit without saving.
AP-12 Cash Requirements List
The AP-12 Cash Requirements List will show all invoices that need to be paid by the date selected. You want to make sure that all invoices/suppliers the system indicates it will pay are correct.
If you made a mistake on the due date of the invoice or a discount, you can change due dates.
Do NOT proceed to the next step unless the Cash Requirements List is correct.
Change Due Dates
The AP Change Due/Discount Dates Search form can be reached from the Accounts Payable menu.
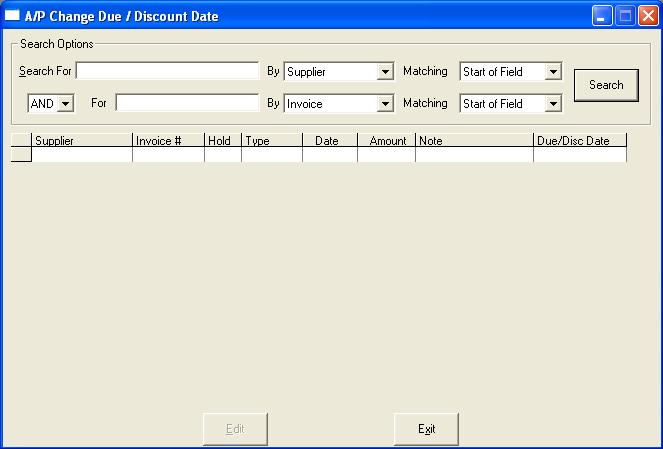
Search For: This is the information we are searching for.
By: This is what field we are searching by.
Supplier: Searching will be by the supplier code.
Invoice: Searching will be by the invoice number.
Matching: Start of Field: When the search is done, EPASS will return all records where the value typed into Search For is at the beginning of the By field.
- End of Field: When the search is done, EPASS will return all records where the value typed into Search For is at the end of the By field.
- Anywhere: When the search is done, EPASS will return all records where the value typed into Search For is anywhere in the By field.
Search: When clicked, EPASS will search according to the criteria filled into the Search For/By/Matching. If this is left blank EPASS will return all suppliers/invoices.
Edit: The edit button is only activated once a supplier/invoice has been selected. This will edit the selected supplier/invoice. The only field that can be changed through this form is the invoice due date or discount due date. You can type in the date or press F2/click on the icon to open up a calendar. Once all editing is complete, you can click OK to save the changes or Cancel to abort.
Exit: Close the screen.
AP Checks or Vouchers
The Checks or Vouchers procedure will print the checks and post them to AP History/General Ledger. Make sure that the dates and options used on the checks or vouchers are the exact same as the Cash Requirements List or you will not be printing the checks you expect.
The print checks/vouchers routine is used to either print a batch of checks or vouchers. A voucher is used when computerized checks are not available, and you will be hand writing a check to match the voucher EPASS is printing.
Steps in Preparing to Print Checks
On a weekly or semi-monthly basis, you will probably be ready to pay your suppliers. To find out the status of your Accounts Payable, use the AP-11 Open Item List to print all amounts owing to each supplier. The information on this list should be checked, so that if there are any incorrect due dates, you can use Change Due Dates to correct them. The due dates are very important in the payment process because you tell the check program which items to pay by indicating the latest due date to be paid during the payment process. If any items show on the Open Item List as being held, the hold should be cleared. You can also check for invoices which may be in dispute and therefore should not be paid. The AP-12 Cash Requirements List is then printed to list all invoices which would be paid if you printed checks according to the parameters entered. If the total on the Cash Requirements List is more than you can pay at this time, you can hold certain suppliers or change the due date used for payments until the total is within the scope of your bank account.
Invoices on hold will not be selected for payment.
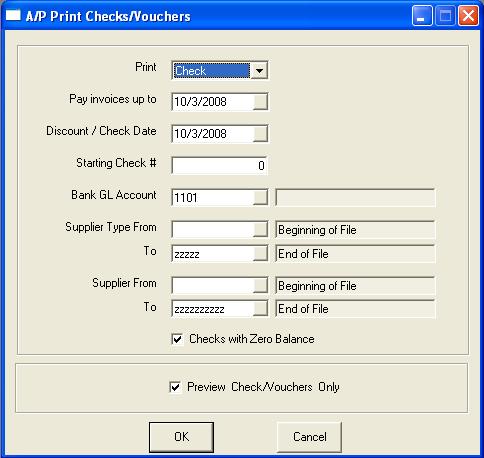
Print:
- Check: Checks will be printed based on the check style selected in AP Variables.
- Voucher: A plain paper voucher will be printed so a hand written check can accompany it.
- None: This option is only used when check printing already occurred and it was cancelled, so you need to re-run checks. With this option, no check printing occurs, but all other aspects of print checks/vouchers occur, including posting.
Pay Invoices Up To: Select invoices where their due date is not past the selected date.
Discount/Check Date: This is the date that will print on the check. If you have used early payment discounts, invoices with a discount due date not past the selected date will be included on the check run. If the discount due date is before the selected date (has expired), but the invoice due date is after the Pay Invoices Up To date, then the invoice will not be included on the check run.
Starting Check #: This is the starting (next) check number.
Bank G/L Account: What bank GL account is this check run for. This is defaulted from AP Variables.
Supplier Type From: Defaulted as ‘Beginning of File’.
Supplier Type To: Defaulted as ‘End of File’.
Supplier From: Defaulted as ‘Beginning of File’.
Supplier To: Defaulted as ‘End of File’.
Checks with Zero Balances (Checkbox): Defaulted checked. Do you want a zero check to print? In the case where all the credits and debits all zero each other out, but you wish to send the supplier a check to show why you are not ‘paying’ them, this can be very helpful.
Preview Check/Vouchers Only: When checked, the checks, vouchers, and check & vouchers check register reports will go to the screen and can be printed if desired. There is no option to post the checks when the preview checkbox is checked. When unchecked, the reports will go directly to the printer and then you will have the option to accept or cancel the posting. The preview option on the posting is there specifically so you can take your time, review the reports and make sure the checks are correct.
OK: Start the check printing in either preview or real mode.
Cancel: Do not process the checks. Close the screen.
Accepting the Check Printing and Posting
When Preview Posting is unchecked, the reports will be sent directly to your printer. There is a preliminary posting procedure that completes first. At this point, nothing has been updated. The checks and reports have been printed, and the posting has been prepared. Do not click OK on this screen until the checks and posting reports have finished printing and you have reviewed the documents. You cannot reverse a posting once it has been accepted. Take your time and make sure everything is correct.
If everything is correct, you can click OK to accept the posting, or click Cancel to stop the posting. If you click Cancel, nothing has been posted or updated, you will be free to correct the problem and run checks again. Upon clicking OK, the posting will occur. Once the posting is completed, the system will return to the EPASS main menu.
A posting batch number is assigned and this batch number is stored with all your transactions in AP Open Item, Supplier History, GL Transactions, and GL Posting History.
Posting Failure and Recovery
If the posting failed after you clicked OK to accept the posting, and the system returned an error message, it should automatically recover from the posting and you should be able to continue normally. Simply exit EPASS, go back in and re-run the posting. If you do not understand the error message, or the same error message occurs again, please contact technical support for assistance.