Credit Approval Process
The credit approval tools included in EPASS can help you establish a fully-functioning credit approval process that can mitigate your financial risk, protect your cash flow, ensure compliance, support sales growth, and help maintain transparency with a documented and auditable trail of decisions.
This guide will walk you through the steps of setting up a credit approval process within EPASS and provide examples of what that process can look like from the staff and customer viewpoint.
If you don't already have an established credit approval process, you can use this guide as a template to create one unique to your business needs. If you already have an established process, use this guide to help you integrate the EPASS credit approval tools into your existing process.
Initial Set Up
Enabling Security Options for Credit Managers
You need to enable two security options to the credit management staff that will approve credit requests. Follow the steps below to enable these options.
You should only enable these security options for users or groups that have the authority in your company to approve or deny credit requests.
Steps
-
Go to Tools > System Maintenance. On the Tables tab, select User Security, and then click open.
-
Select a User or Group, and then click Security.
-
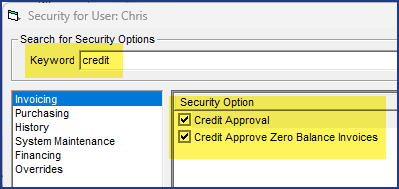
In the Keyword field, enter
credit. -
Under Invoicing, select Credit Approval and Credit Approve Zero Balance Invoices. These security options grant the user permission to approve or deny credit requests for all invoices.
-
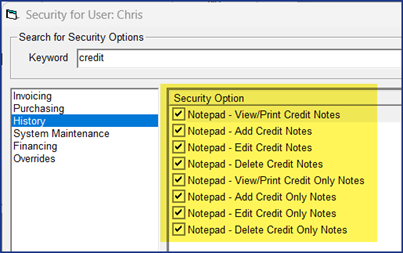
Click History. These security options grant the user permission to view, add, or delete credit notes in the customer's Notepad. Select the appropriate security options for the user.
-
Click OK.
-
Repeat steps 2–5 for additional users or groups.
Requiring Credit Approval for Invoice Types

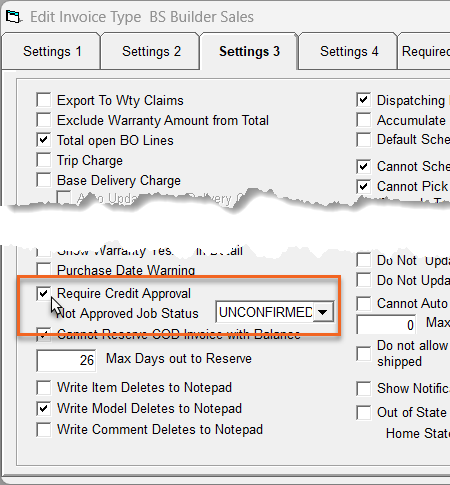
Decide which Invoice Types will require credit approval. Typically, these are Invoice Types that you use for your commercial clients, or builder sales. For each of these Invoice Types, you'll need to enable the Require Credit Approval setting and select a Job Status that the invoice will change to if the credit request is not approved (this would be a non-dispatchable Job Status).
Steps
-
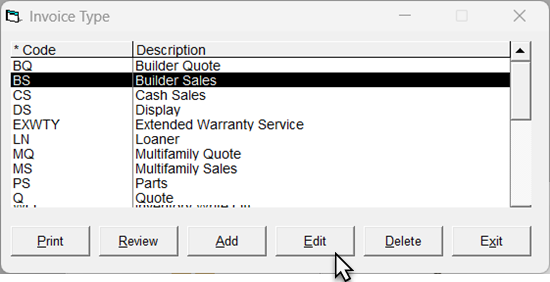
Go to Tools > System Maintenance. On the Tables tab, select Invoice Type, and then click open.

-
Click an Invoice Type, and then click Edit.
-
Click the Settings 3 tab.
-
Near the bottom of the window, select Require Credit Approval. In the Not Approved Job Status dropdown, select the Job Status that the invoice will default to if the credit request is declined. (This should be a non-dispatchable Job Status.)
-
Click OK to close the Edit Invoice Type window.
-
Repeat steps 2–5 for additional Invoice Types that require credit approval.
Customer Credit Limit
After completing the initial setup in EPASS, the next decisions you need to make revolve around the credit limits for your customers.
Start by answering these questions:
- During the credit limit check, do you want to include ALL open invoices or only open invoices that have been approved with a dispatchable Job Status (that is, open invoices that are ready for shipping)?
- If the customer goes over the credit limit by a small amount, should it still be approved? If so, what should that amount be?
- Do you want to include builder allowances (BAs) in the credit check?
Andersons Appliances decided to bring in a new Director of Finance, to oversee implementing their new credit approval process. They reviewed the proposed process flow and made decisions on the credit limit check for customers:
- They decided only to include approved open and dispatchable invoices in the credit check.
- They decided that if the total invoice amounts are over by a small amount, they want to allow shipment. This small amount will be capped at $1,000.
- Since Andersons does a lot of business with builders, it was decided to include open BA amounts in the credit check.
Setting Up Credit Limits in EPASS
In EPASS, you'll need to set up your limit options based on how you answered the questions above. You'll have to perform these steps for each of your branches.
Steps
-
Go to Tools > System Maintenance, and then click the Variables tab.
-
Select Accounts Receivable, and then click open.

-
Select a branch from the list, and then click Edit.
-
Click the Customer 1 tab.
-
Do the following:
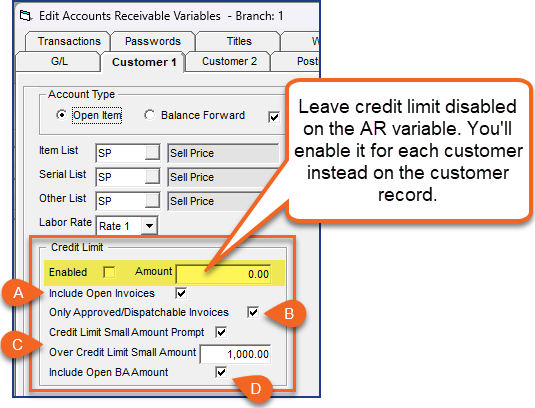
A and B Include open Invoice and Only Approved/Dispatchable Invoices: If you decide to include ALL open invoices in the credit check, select only the Include Open Invoice checkbox. If you want to only include open invoices that are approved with a dispatchable Job Status, also select Only Approved/Dispatchable Invoices. C Credit Limit Small Amount Prompt and Over Credit Limit Amount: If you decide to allow customer's to exceed their credit limit by a specific amount, select the Credit Limit Small Amount Prompt checkbox and enter the dollar amount in the Over Credit Limit Amount field. D Include open BA Amount: If you decide to include open builder allowances, select this checkbox. -
Click OK.
-
Repeat steps 3–6 for additional branches.
Adding Credit Limits to a New or Existing Customer
A customer's credit limit amount is entered in their customer record, as well as several credit options that you need to configure. For new customers, these steps need to be part of your customer account creation process.
These instructions assume that you are adding credit limits to an existing customer.
Steps
-
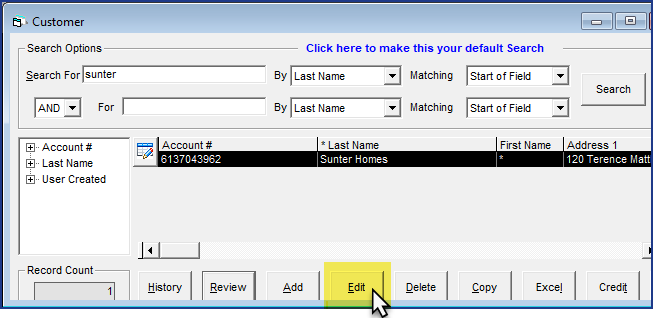
Go to Customer > Maintenance and search for the customer's record. Select the record in the list, and then click Edit.
-
Click the Credit tab.
-
Do the following:
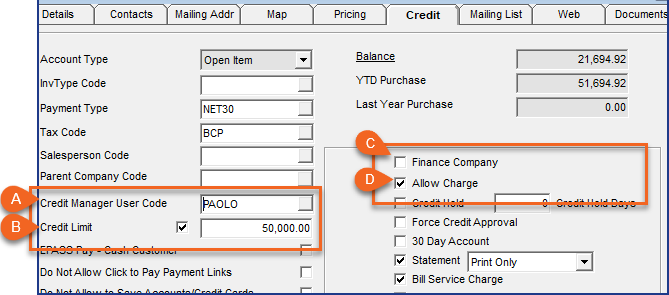
A Credit Manager User Code: Select an EPASS user code from the dropdown. This is the user that EPASS messages when the customer has any invoices that require credit approval. Credit approval would be required if a customer has reached their credit limit or has Force Credit Approval selected. If needed, you can have EPASS send the "credit approval needed" message to additional users by creating a Message Event. B Credit Limit: Select the checkbox to enable a credit limit for this customer, and enter the credit limit amount in the field. The credit limit settings in Accounts Receivable variables controls whether the customer's credit limit includes ALL open invoices, or only open invoices that have been approved and are dispatchable. C Finance Company: Although this is not directly related to credit approval, by selecting this checkbox, when a salesperson is writing an invoice and they select the Financed option, only customers with the Finance Company checkbox selected can be picked as the Bill To customer on the invoice. See Creating a Sales Invoice for more info. D Allow Charge: Select this to allow invoices to be charged to the customer's account. When this is cleared, invoices can no longer be charged to the customer's account and the Barcoding system prevents shipping product to the customer if the invoice is a charge invoice.
Viewing a Customer's Available Credit
The customer's A/R Balance screen displays their current credit limit and current A/R balance.
Steps
-
Go to AR > Balance.
-
Enter the account number in the Customer field, and then click Search.
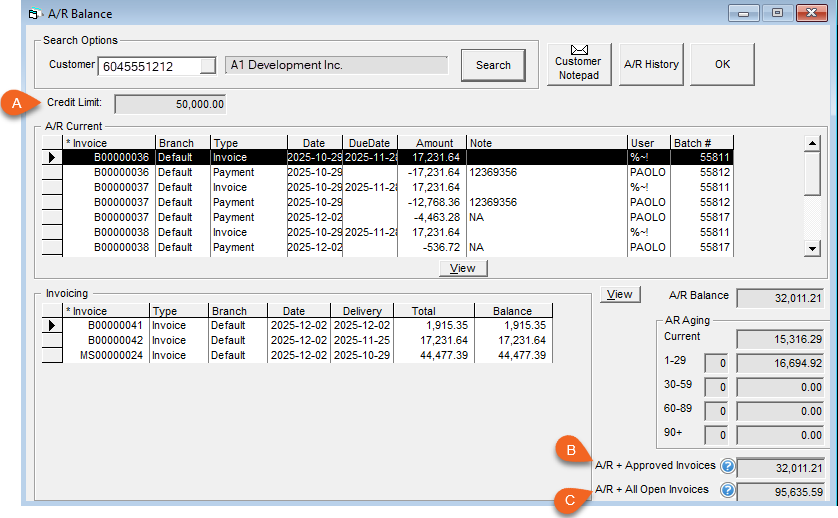
A The customer's credit limit, which is set in their customer record. B If the Only Approved/Dispatchable Invoices checkbox is selected in A/R Variables, then this field will calculate the customer's current A/R balance plus all approved or dispatchable invoices. Otherwise, the field will calculate the A/R balance plus all open Invoices. C The customer's current A/R balance plus all open invoices.
The Credit Approval Process
Invoice Credit Status
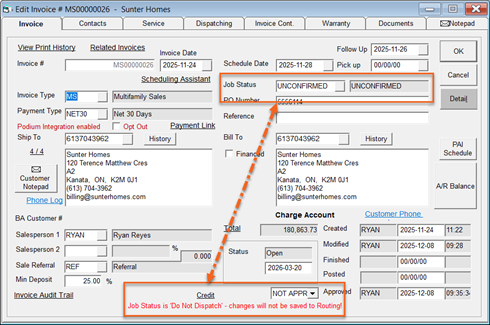
The current credit status of an invoice is displayed at the bottom of the Invoice Header window.
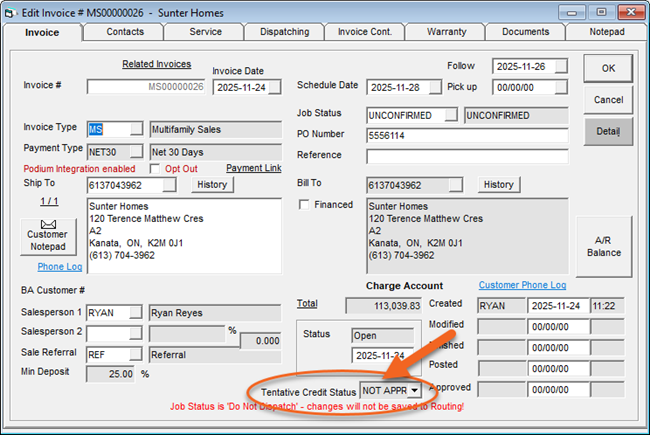
A tentative credit status is one that's automatically generated by the EPASS system based on a set criteria (for example, EPASS will automatically credit approve an invoice where the customer has available credit and is in good standing). The 'Tentative' title is used and the Approved date field is left blank to identify that this status was applied by EPASS, and not a staff member.
All new invoices automatically start with a Tentative Credit Status of NOT APPROVED.
Approving Credit Requests
If a customer has available credit and their account is in good standing (there are no credit holds), then EPASS approves the credit request automatically once the invoice Job Status has been set to a dispatchable status. The invoice's tentative credit status changes to Approved.

If the customer is over their credit limit or credit has been temporarily disabled on their account, the credit request needs approval from an authorized EPASS user. When the EPASS user attempts to change the invoice Job Status to a dispatchable status, EPASS prevents the change and notifies the user that the customer requires credit approval. The credit manager assigned to the customer is notified with an EPASS reminder message.
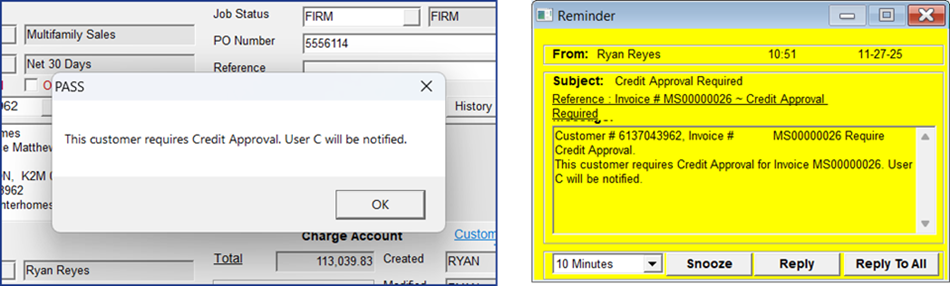
The credit manager (or another authorized EPASS User) can approve the request by following the steps below.
Steps
-
Go to Customer > Maintenance and search for the customer account.
-
Click Credit.
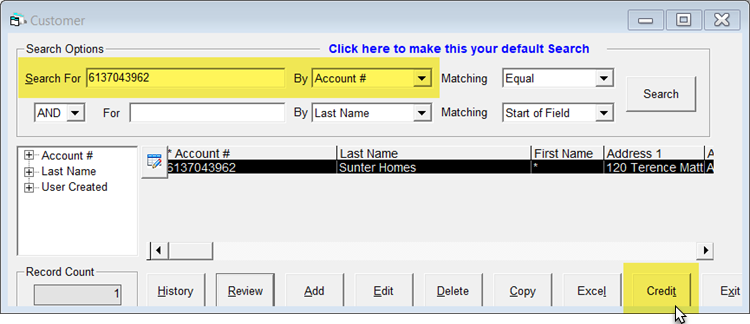
-
The Credit Approval Status window opens. This window lists all of the customer's invoices and each one's current credit status.
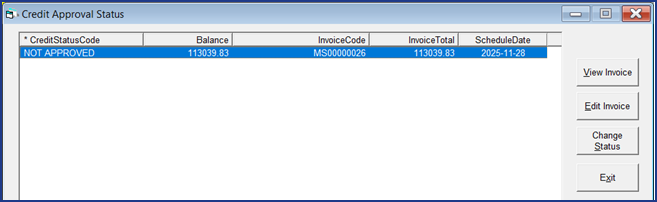
-
Click the invoice that requires approval, and then click Change Status.
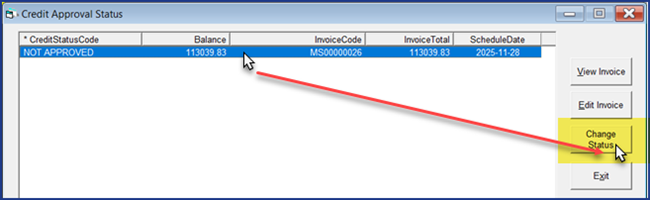
-
Click the APPROVED status, and then click OK.

-
Click Exit to close the Credit Approval Status window.
Once the Credit Approval Status window closes, the invoice's credit status is updated. The 'tentative' tag is removed (because the approval was made by an authorized EPASS user) and the Approved date field is updated with the user account of the approver and when the approval was granted.

Now the invoice Job Status can be updated to a dispatchable status.
Documenting Credit Status Activity in the Customer Notepad
EPASS automatically documents credit status activity in the customer's Notepad. These notes are viewable by credit management staff who have the matching security options (see Enabling Security Options for Credit Managers).
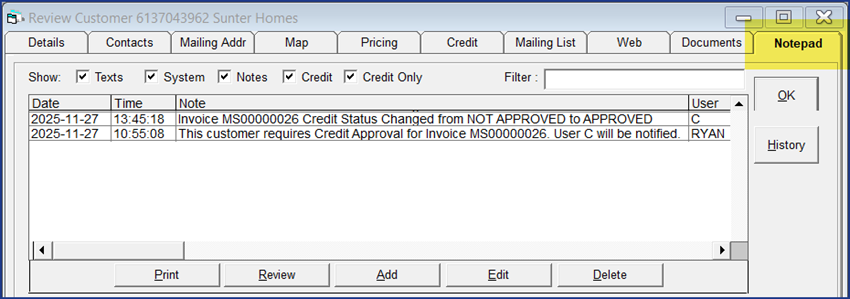
Credit management can also add custom notes to fully document the customer's credit approval process as needed.
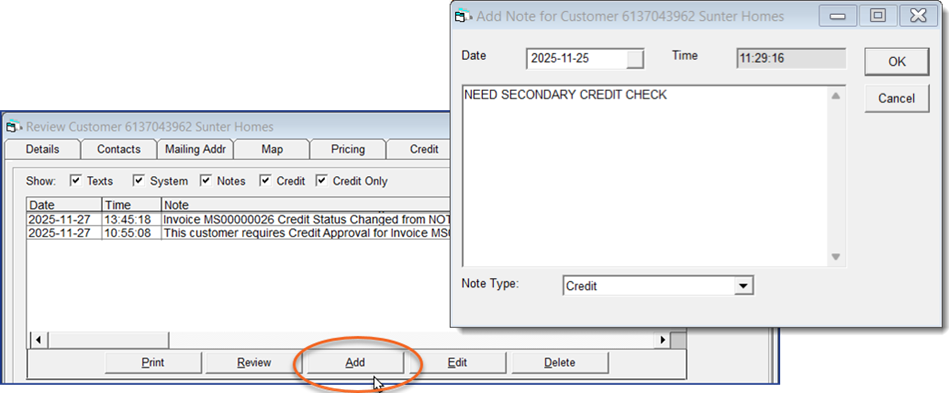
-
Approved invoices that are split retain their
APPROVEDcredit status. -
If an approved invoice is copied, and the new invoice amount puts the customer over their credit limit, the new invoice's credit status is set to
NOT APPROVEDand the original invoice remainsAPPROVED. -
If the balance of an approved invoice is increased and takes the customer over their credit limit (for example, additional product is added to the invoice) the credit status is set to
Not Approvedand the Job Status is changed to the Not Approved Job Status.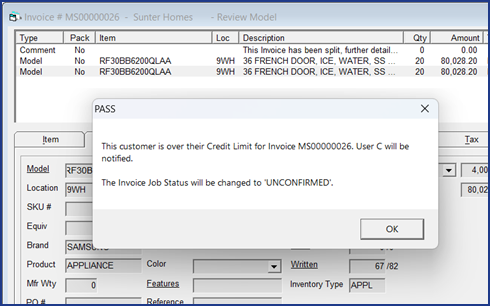
Forcing Manual Credit Approval
For customers on questionable credit terms, or for third-party financing companies, you can force manual credit approval regardless of the customer's current credit limit. Invoices for the customer will require manual approval before anything is dispatched.
Follow these steps to force credit approval for a customer:
Steps
-
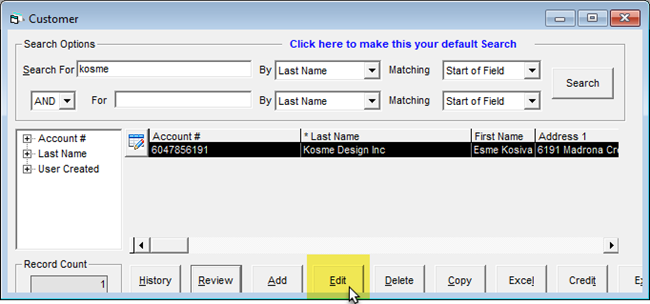
Go to Customer > Maintenance. Select the record in the list, and then click Edit.
-
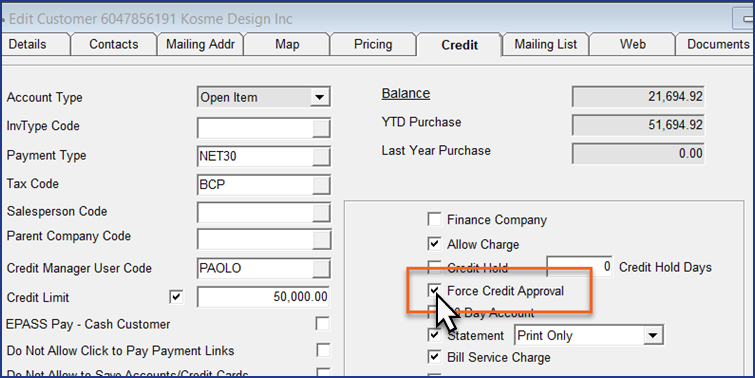
Click the Credit tab.
-
Select the Force Credit Approval checkbox.
-
Click OK to close the Edit Customer window.
Manual credit approval is now required for this customer.
Andersons Appliances has a builder customer that has a history of struggling to pay off their account on time. Currently, they still have a large amount of available credit, but the credit department is concerned that the customer might have a hard time paying what they already owe if they take on too much additional debt. The credit department decides to go into the customer's account in EPASS and set it to Force Credit Approval so that each new invoice can be thoroughly evaluated by the credit manager before credit is approved.
Putting a Customer on Credit Hold
When necessary, you can put a delinquent customer account on a credit hold. Once a customer is on credit hold, the following occurs:
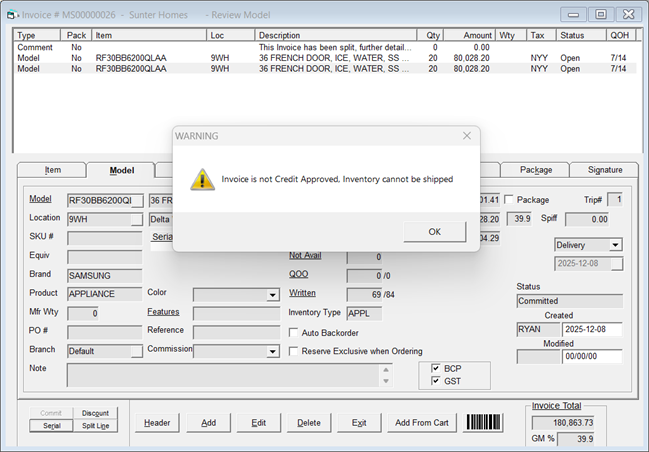
- You can't dispatch invoices or ship product.
- You can't scan product through the Wireless Inventory or the EPASS Warehouse Management System.
- You can't manually add serial numbers to an invoice.
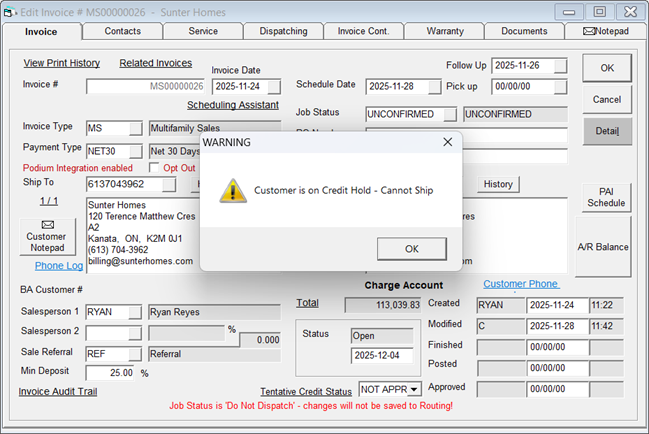
- The Job Status of an invoice can be changed to a dispatchable status while on credit hold, but EPASS will prevent the invoice from being shipped.
- Invoices keep their
Approvedstatus when a customer goes on credit hold. Once the issue with the account is resolved and they are taken off credit hold, all the invoices will automatically go back to their original state.
Follow these steps to put a customer on credit hold:
Steps
-
Go to Customer > Maintenance. Select the record in the list, and then click Edit.
-
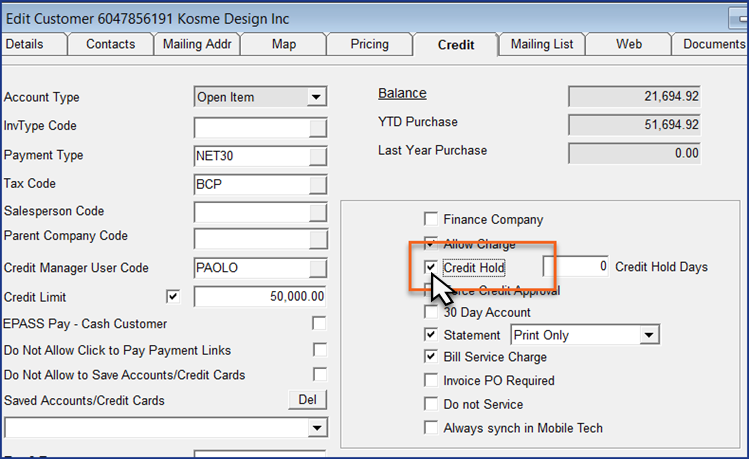
Click the Credit tab.
-
Select the Credit Hold checkbox.
 Note
NoteThe Credit Hold Days field is currently not used. It's a feature that will be active in a future EPASS update.
-
Click OK to close the Edit Customer window.
The customer is now on credit hold and no invoices can be shipped or dispatched until the credit hold is removed.
Andersons Appliances has a builder customer that is severely behind on payments to their account. They currently have several open invoices, but the credit department wants to put a temporary hold on any further business until they can meet with the customer and settle the account. The credit department decides to go into the customer's account in EPASS and turn on the Credit Hold feature.
All current invoices are prevented from being dispatched or shipped, new invoices can no longer be charged to the customer's account, and serial numbers can't be added to invoices.
Routing Screen and Routing Sheet
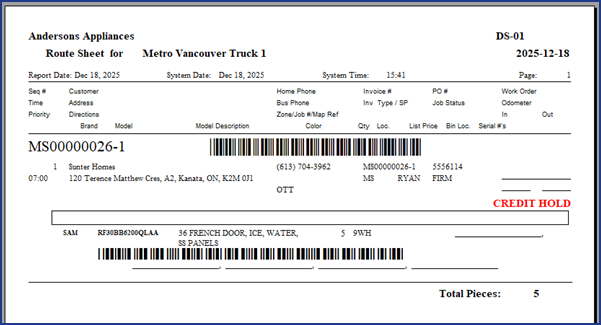
The Routing screen and the Route Sheet both show the credit status. In this example, the invoices were previously approved but the account was put on credit hold after the approval. The Route Sheet shows the credit problem and the barcoding will not allow the product to be shipped.
See Also
Updated June 25, 2026