DS-01 Route Sheet
Use this report to print a route sheet along with route map and neighborhood maps for technicians and delivery drivers on the road. You can also use this report to pull inventory for the next day, although larger warehouses will commonly use the Invoicing > Reports …1 > OE-09a Picking Report. The route sheet prints the customer’s name, address, phone number, and special instructions. It also prints the model number, product code, serial number, item number, miscellaneous, comments, etc. based on selection criteria.
This report does not include pickups. If you wish to print details for pickups, use Invoicing > Reports …1 > OE-08 Pickup Report.
To Run the Report
- Go to Invoicing > Dispatching > Reports > DS-01 Route Sheet.
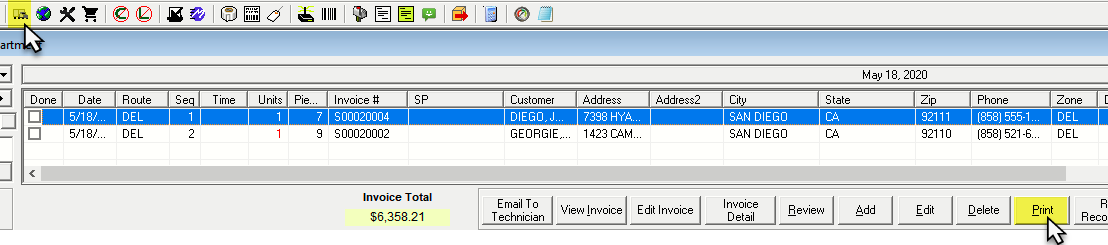
You can also run the report from the Routing screen. Select the date and technician, and then click Print.
Format
You can select either a “Sales” or “Service” format. Both formats have different selection criteria and will print the route sheet based on the selection.
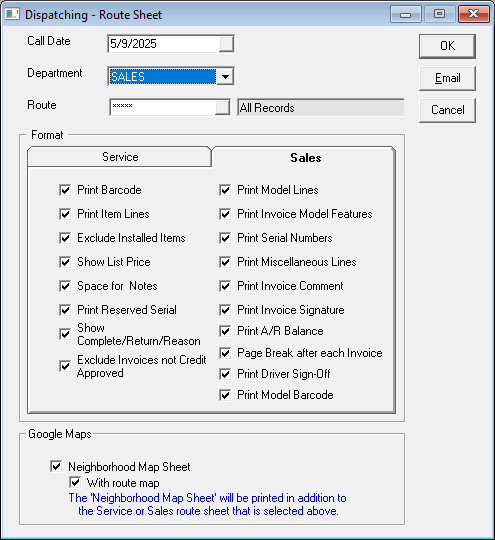
Sales Format Report Parameters
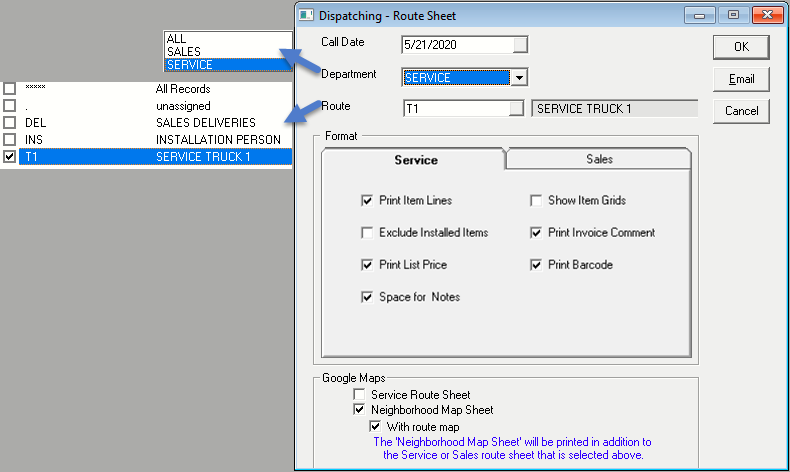
| CALL DATE | This is the scheduled date which is set on the invoice header |
| DEPARTMENT | This option will let you select All, Sales or Service department |
| ROUTE | This option will let you select one or multiple routes. |
| PRINT BARCODE | Selecting this option includes the barcode for each model or item on the report. |
| PRINT ITEM LINES | If this box is checked, it will print items from Item > Invoice Detail on the report. |
| EXCLUDE INSTALLED ITEMS | If this option is checked, it will not include installed items in the report. |
| SHOW LIST PRICE | If this option is checked, it prints the list price from the invoice detail line on the report. |
| SPACE FOR NOTES | If this option is checked, it will leave space for notes; the whole purpose of this is so that the technicians and delivery drivers can add notes and, later, the office staff can add those notes to the invoice. |
| PRINT RESERVED SERIAL | If this option is checked, it will show the serial numbers that are reserved to an invoice on the report making it easier for the warehouse staff to pull the inventory. |
| SHOW COMPLETE/RETURN/REASON | Selecting this option adds a COMPLETE and RETURN checkbox, as well as a REASON line for each model or item on the report.  |
| EXCLUDE INVOICES NOT CREDIT APPROVED | If this box it checked, it will exclude “Not Credit Approved” invoices. See Credit Approval. |
| PRINT MODEL LINES | If this box is checked, it will print models from Model > Invoice Detail on the report. |
| PRINT INVOICE MODEL FEATURES | Selecting this option includes the model's features on the report. |
| PRINT SERIAL NUMBERS | If this option is checked, it will print taken serial numbers from Invoice Serial > Model > Invoice Detail on the report. This feature is generally used if you re-print the route sheet after the serial inventory has been scanned out so the drivers will see which pieces belong to each invoice avoiding problems when two of the same fridges are next to each other on the truck to determine which fridge belongs to which customer. Using the Batch Print button after the product is scanned will also print the serial numbers on your invoices, giving you the same result. |
| PRINT MISCELLANEOUS LINES | If this box is checked, it will print miscellaneous from Misc. > Invoice Detail on the report. |
| PRINT INVOICE COMMENT | If this box is checked, it will print comments from Comment > Invoice Detail on the report. This will help delivery staff see job related notes and comments. |
| PRINT INVOICE SIGNATURE | If this box is checked, it will print signatures from Signature > Invoice Detail on the report. |
| PRINT A/R BALANCE | If this box is checked, it will print the AR balance on the report. |
| PAGE BREAK AFTER EACH INVOICE | Selecting this will insert a page break and start each invoice on a new page. |
| PRINT DRIVER SIGN-OFF | Selecting this will insert a signature line for the driver on the report. |
| PRINT MODEL BARCODE | Selecting this will include the model barcode under each model number in the report. |
| Click Email to email the report to the delivery drivers and technicians. The email address to send to is setup in Tools > System Maintenance > Tables > Route; select the route and click Edit and click the Address Info tab. |
Google Maps
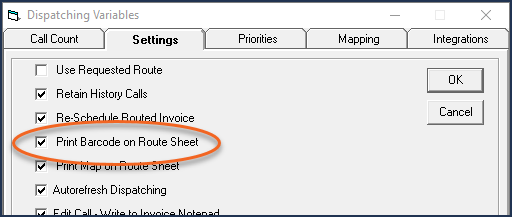
To use these settings, you need to enable the Print Map on Route Sheet setting in Dispatching variables (Tools > System Maintenance > Variables > Dispatching > Settings tab.)
| NEIGHBORHOOD MAP SHEET | If this box is checked, it will print small maps for each invoice; it will fit 9 maps per page. This option is only visible if “Print Map on Route Sheet” is enabled in Tools > System Maintenance > Variables > Dispatching Variables. |
| WITH ROUTE MAP | If this box is checked, it will print an overall route map for the day. This option is only visible if “Print Map on Route Sheet” is enabled in Tools > System Maintenance > Variables > Dispatching Variables. |
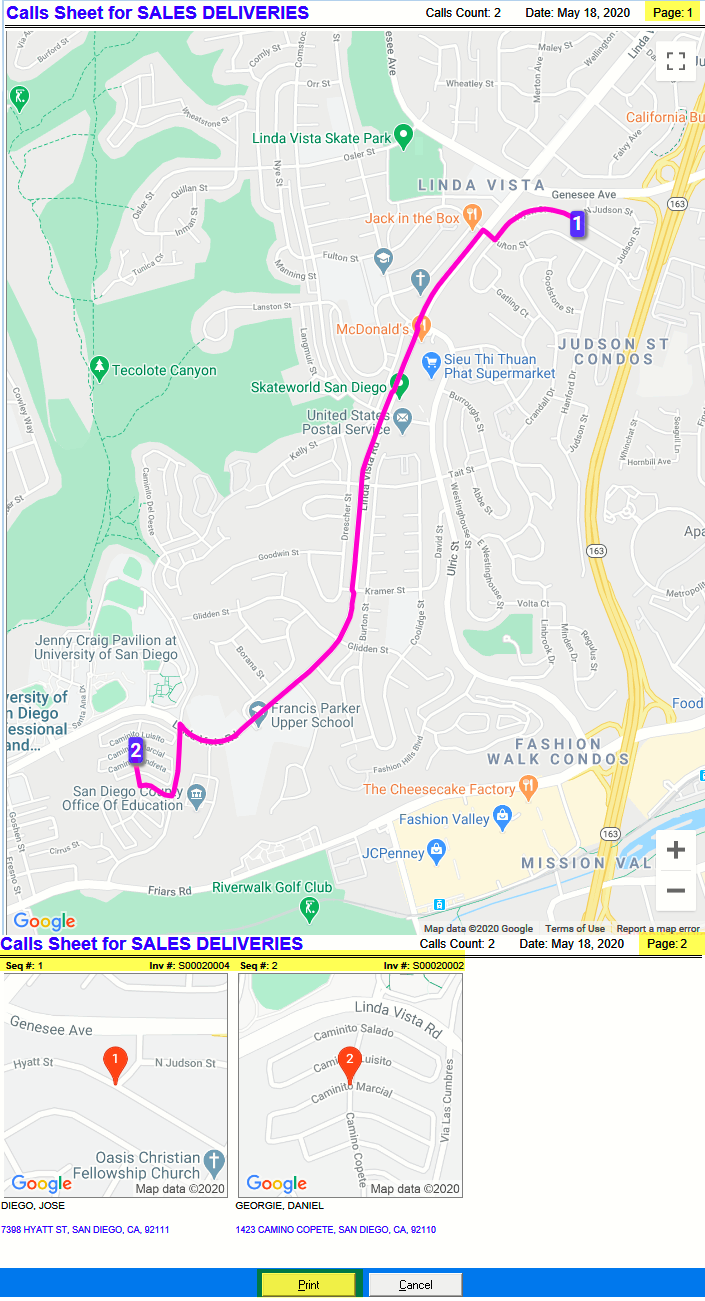
In the above image, page 1 is the overall route map which shows a calls count on the top right hand of the report for the technician or delivery driver and shows them the sequence and route for the day. Page 2 shows neighbourhood maps. I.E. it will print small maps for each invoice, along with the customer’s name and address. It will also fit 9 maps per page.
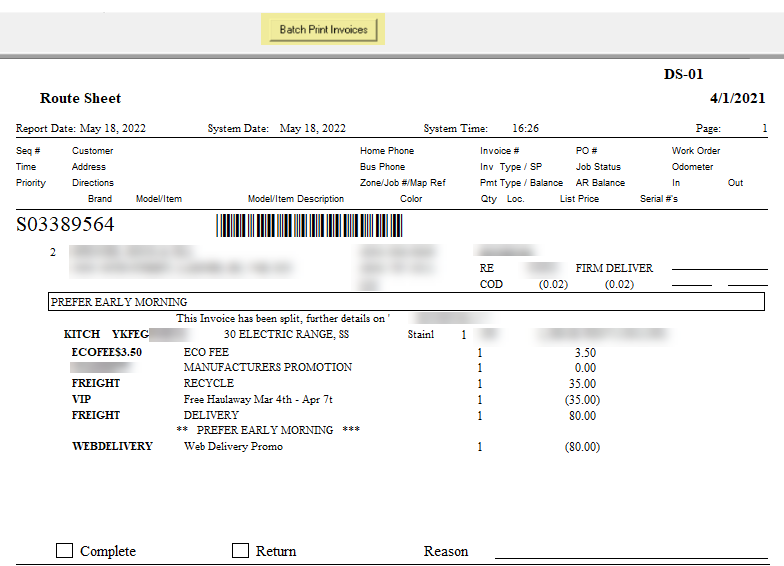
At the top of the report, there is Batch Print Invoices option. This option will print invoices or packing slips for the delivery driver along with a route sheet and route map. It is recommended to batch print the invoices after the serial inventory has been scanned to each invoice so the serial numbers will print on each invoice making it easier for the drivers and also appealing to the customer.
Also, looking at first invoice as an example, it prints the priorities and special instructions in a box on a separate line so they stand out for the delivery driver. The first model prints a taken serial number but the second, forth and fifth models print reserved serial numbers. It also prints a piece count at the bottom of the report to accumulate the total quantity of models.
Service Format Report Parameters
| CALL DATE | This is the schedule date which is set on the invoice header. |
|---|---|
| DEPARTMENT | This option will let you select All, Sales or Service Department. |
| ROUTE | This option will let you select one or multiple routes. |
| PRINT ITEM LINES | If this box is checked, it will print items from Item > Invoice Detail on the report. |
| EXCLUDE INSTALLED ITEMS | If this option is checked, it will not include installed items in the report. |
| PRINT LIST PRICE | If this option is checked, it prints the list price from invoice detail on the report. |
| SPACE FOR NOTES | If this option is checked, it will leave space for notes; the whole purpose of this is so technicians and delivery drivers can add notes and, later, the office staff can add those notes to the invoice. |
| SHOW ITEM GRIDS | If this option is checked, it will print an item grid after each invoice which will include 3 of each column. I.E. PART #, QTY and WTY columns across the page and it will have 5 rows. It will also print a grid at the end of report for parts not used but transferred between the warehouse and the truck; it will include 3 of each column. I.E. QTY, PART#, NS, INV# across the page. This grid helps with inventory control. |
| PRINT INVOICE COMMENT | If this box is checked, it will print comments from Comment > Invoice Detail on the report. |
| PRINT BARCODE | If this box is checked, the barcode will print on the report. |
| SERVICE ROUTE SHEET | If this option is checked, it will print the Service Route Sheet on its own. |
| NEIGHBORHOOD MAP SHEET | If this box is checked, it will print small maps for each invoice; it will fit 9 maps per page. This option is only visible if “Print Map on Route Sheet” is enabled in Tools > System Maintenance > Variables > Dispatching Variables. |
| WITH ROUTE MAP | If this box is checked, it will print an overall route map for the day. This option is only visible if Print Map on Route Sheet is enabled in Tools > System Maintenance > Variables > Dispatching Variables. |
| Click Email to email the report to the delivery drivers and technicians. The email address to send to is setup in Tools > System Maintenance > Tables > Route; select the route and click Edit and click the Address Info tab. |
Report Styles
There are two report styles you can choose from:
- Service route sheet with route map and neighbourhood map
- Service route sheet on its own
Service Route Sheet with Route Map and Neighborhood Map
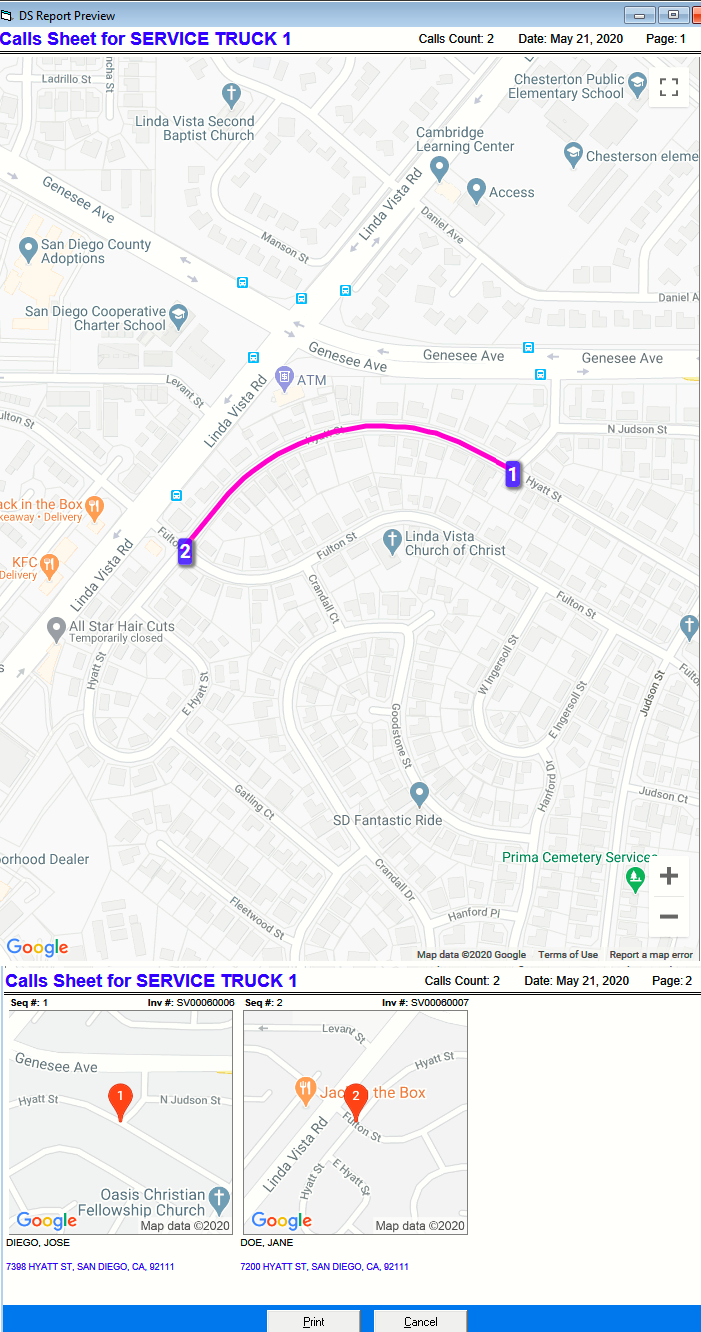
In the above image, page 1 is the overall route map which shows a calls count on the top right hand of the report for the technicians and shows them the sequence and route for the day. Page 2 shows neighbourhood maps. I.E. it will print small maps for each invoice, along with the customer’s name and address. It will also fit 9 maps per page.

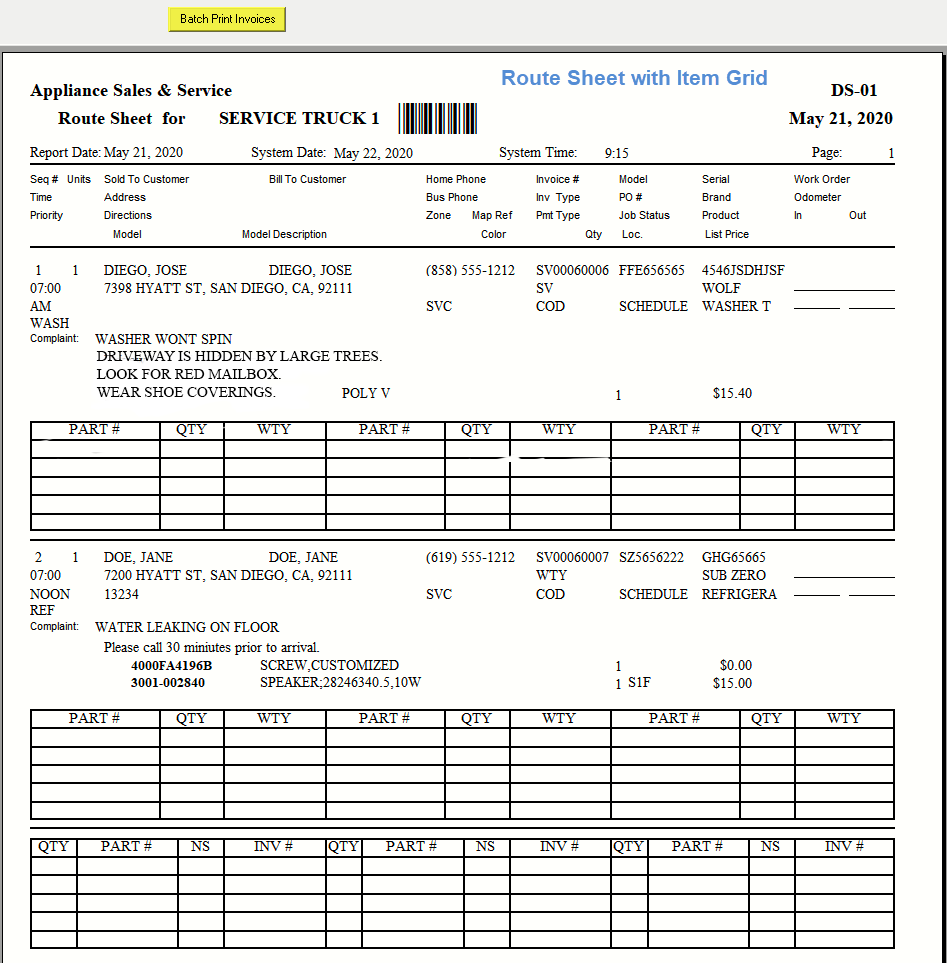
At the top of the report, there is Batch Print Invoices option. This option will print the service invoices for the technician along with the route sheet.
Also, looking at the first invoice as an example, along with invoice number, customer’s information, and complaint, it prints the priorities and qualifications from the Invoice Header> Dispatching Tab > Priorities and Qualifications. It also prints special requests from Invoice Header> Dispatching Tab > Special Request. And it prints the part number along with location and the list price. If option “Show Item Grid” is checked, it will print the route sheet report like the second image which includes 3 of each column. I.E. PART #, QTY and WTY column across the page and it will have 5 rows. It will also print a grid at the end of report for parts not used but transferred between the warehouse and the truck; it will include 3 of each column I.E. QTY, PART#, NS, INV# across the page.
Service Route Sheet
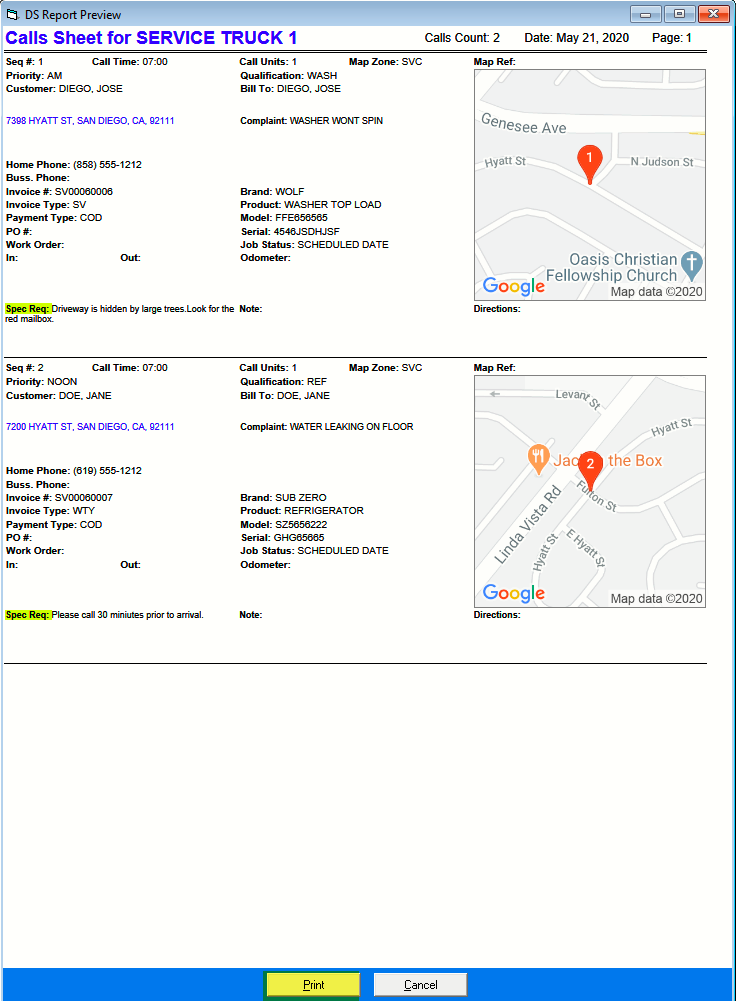
The above image is the service route sheet. Along with the invoice number, customer’s information, and complaint, it also prints priorities and qualifications from the Invoice Header> Dispatching Tab > Priorities and Qualifications. On the right-hand side, it prints small maps for each invoice and, under the map, it prints the directions from Invoice Header > Service AT > Directions, it is commonly used for difficult addresses or building access codes.
It prints special requests from the Invoice Header> Dispatching Tab > Special Request. It is highlighted so it stands out for the technicians if a customer requested anything special and it also prints the note field from Dispatching- Routing > Edit Call (not the invoice) > Note. At the bottom of the report, there are Print and Cancel buttons; Click Print to print the report or Cancel to cancel the report.
See Also
May 9, 2025