Configuring Click to Pay
Click to Pay requires some initial configuration steps before it can be used to generate payment links.
Before Starting
You'll need:
- The full URL address of your Click to Pay page.
- Your Click to Pay Profile ID. This was provided to you by EPASS. If you don't have this ID, contact EPASS Support.
Activate Click to Pay Security Options
-
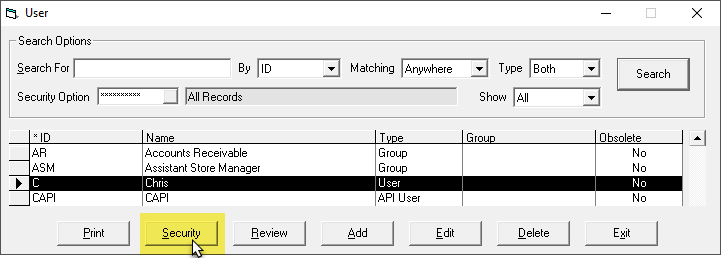
Go to Tools > System Maintenance. On the Tables tab, select User Security, and then click Open.

-
Select a User or Group from the list, and then click Security.
-
In the Keyword search box, enter
CLICK TO PAYand select the following options:
Click to Pay - View Payment Link Enables the Click to Pay link in the Invoice Header. Without this option, the EPASS User can not generate a payment link. Click to Pay - Allow Requested Amount Allows the EPASS User to generate a Click to Pay link that forces the customer to pay a specific amount. If this is not enabled, the Click to Pay link will request the amount owing on the invoice, but the customer can choose to pay a lesser amount. 
-
Click OK.
Add Click to Pay Variables
-
Go to Tools > System Maintenance.
-
Click the Variables tab.

-
Click EPASS Pay, and then click Open.

-
Click the Click to Pay tab and do the following:
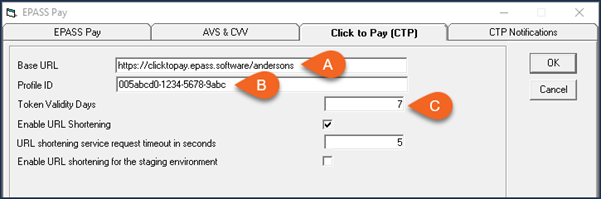
A Enter the URL address where your Click to Pay page is hosted. B Enter your Click to Pay Profile ID. C If necessary, change the default number of days the authentication token is valid for. If the authentication token expires, the user can still follow the link to pay their invoice, however, they will need to manually enter their name and invoice number at the payment portal. infoIf you set the Token Validity Days to 0, the Click to Pay link is generated without an authentication token.
About URL Shortening
Click to Pay URL links are “shortened” using the TinyURL service. You can choose to disable this service and instead have Click to Pay generate an “expanded” URL link.


Some network services and business block shortened URLs. If your Click to Pay recipients are having trouble receiving shortened URL links, you may need to disable URL shortening.
Select URL Shortening Variables
-
Select the following:
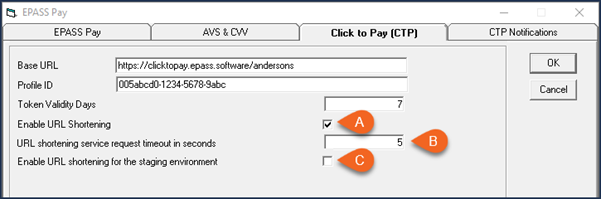
A Click to enable or disable URL shortening. B This is how long EPASS will wait for a response from the TinyURL service. If a response isn’t returned in time, an error is generated. We recommend leaving this set to 5 seconds, but if you have a slower internet connection or are experiencing multiple timeout errors, you can try increasing the time C Select this checkbox if you want to use shortened URLs in your staging environment.
Activate Click to Pay for Invoice Types
By default, Click to Pay is disabled for all Invoice Types. You'll need to decide which Invoice Types can generate Click to Pay payment links and then activate the Click to Pay feature in each one.
-
Go to Tools > System Maintenance.
-
On the Tables tab, click Invoice Type, and then click Open.

-
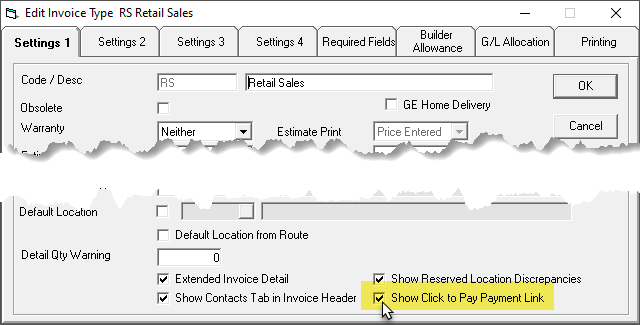
Click an Invoice Type, and then click Edit.

-
On the Settings 1 tab near the bottom, click Show Click to Pay Payment Link.
-
Click OK.
-
Repeat steps 3–5 for each Invoice Type that will use Click to Pay payment links.
Add a Click to Pay Payment Type
A unique Payment Type for Click to Pay payments must be added to EPASS. EPASS links all payments received through Click to Pay to this Payment Type code.
Follow these instructions to add a Click to Pay Payment Type.
-
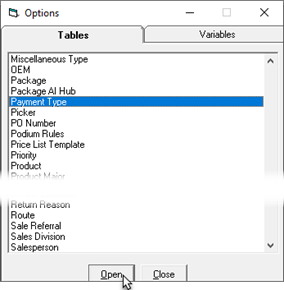
Go to Tools > System Maintenance. On the Tables tab, click Payment Types, and then click Open.
-
In the Payment Type window, click Add.
-
Fill in the following fields:
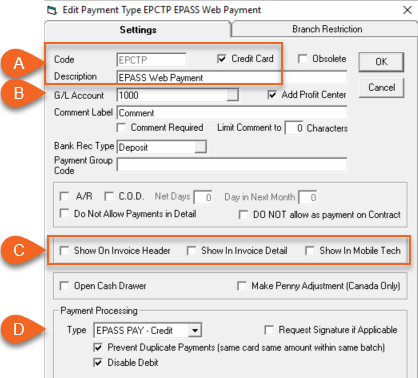
A Enter a Code and Description. We recommend using code EPCTP. Select the Credit Card checkbox. B Select the G/L Account that this payment type should link to. C Clear all of these checkboxes so that EPCTP isn’t an available payment option in the Invoice Header, Invoice Detail, or Mobile Tech. D Select EPASS Pay – Credit from the Type dropdown and select the Disable Debit checkbox. infoPrevent Duplicate Card Payments is used for fraud prevention, and we recommend that this setting is always selected.
Adding a Credit Card Upcharge
Credit Card Upcharges are used to recoup credit card fees charged by the payment processor. If you want to add an upcharge to Click to Pay payments, do the following:
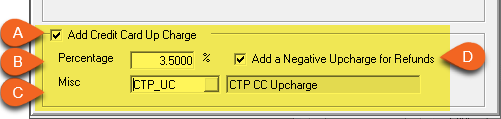
| A | Select Add Credit Card Up Charge. This will automatically calculate and add a credit card upcharge to the Click to Pay transaction. |
| B | Enter the upcharge Percentage. |
| C | In the Misc dropdown, select the miscellaneous code that you use for Click to Pay upcharges. If you need to create one, follow the instructions in Applying a Credit Card Upcharge. |
| D | (Optional) Select Add a Negative Upcharge for Refunds if your policy is to reverse the credit card upcharge on refunds. With this checkbox selected, a negative amount equal to the original upcharge amount is added to the invoice when the payment is refunded. |
Configure Click to Pay Messaging
EPASS can send a message or notification to a list of EPASS users or groups when a Click to Pay payment is successfully made or declined by a customer. These messages, and the list of users that receive them, are configured in the EPASS Messaging System.


To Configure Click to Pay Event Messaging
-
Go to Tools > System Maintenance, and then click the Variables tab.
-
Click Message, and then click Open.

-
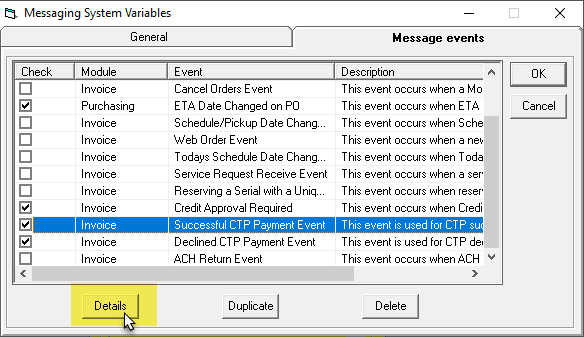
Click the Message Events tab.

-
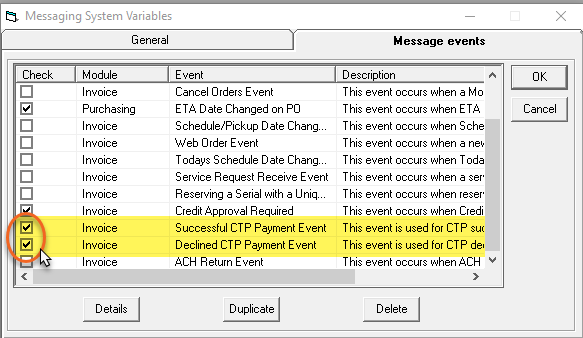
In the Message Events list, scroll down until you see Successful CTP Payment Event and Declined CTP Payment Event. Select their checkboxes to activate these events.
-
Select the Successful CTP Event and then click Details.
-
Do the following:
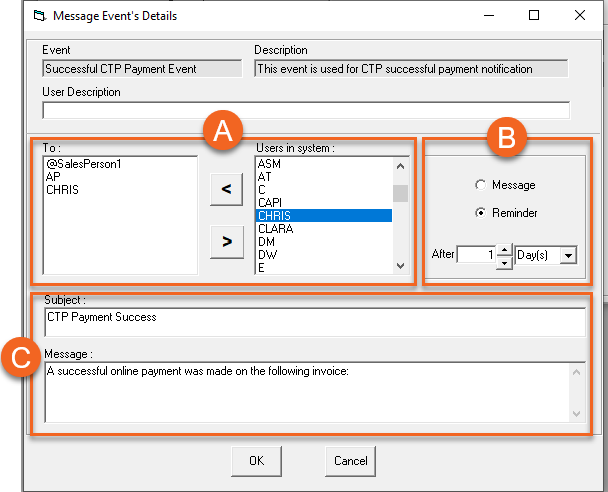
A For each user or group that should receive this message, click their name in the Users in System list, and then click the left arrow  to move them into the To list.
B Select whether the recipients receive a message in their EPASS Messaging Inbox (select Message) or a notification reminder pop-up when they log in (select Reminder). If Reminder is selected, enter the number of hours or days that will pass before the user receives the pop-up notification. C If necessary, edit the default Subject line and Message body. -
Click OK and repeat step 6 for the Declined CTP Message Event.
See Also
July 8, 2025