Configuring Custom Dashboards
The custom dashboards feature is part of the 3.0.0.2 update. If your EPASS Reports installation has been updated to this version or later, then the custom dashboard feature is ready for set up. Follow the steps in this guide before first time use.
If you are using an older version of EPASS Reports, contact an EPASS Support representative who will help you with the update.
An EPASS User with admin-level security access is required to complete these steps.
Configure Admin Security Options
Before you can access and use custom dashboards, you'll need to grant security access to the EPASS Users and Groups that will be creating, editing, and viewing custom dashboards.
Steps
-
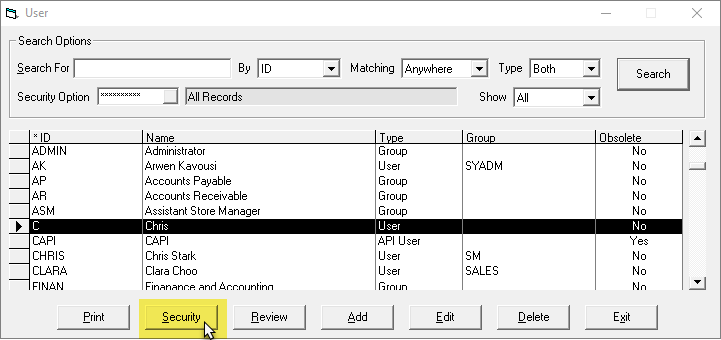
Log into EPASS and go to Tools > System Maintenance.
-
On the Tables tab, select User Security, and then click Open.

-
Select a User or Group, and then click Security.
-
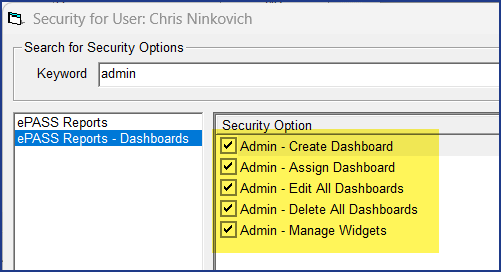
On the left side of the window, click EPASS Reports - Dashboards.
-
Select from the following security options:
- Admin - Create Dashboard: Grants the User the ability to create a new custom dashboard.
- Admin - Assign Dashboard: Grants the User the ability to assign a dashboard to EPASS Users or Groups. See Assigning Users or Groups for more information.
- Admin - Edit All Dashboards: Grants the User the ability to edit dashboards created by other EPASS Users. This also includes the ability to save Widget filters.
- Admin - Delete All Dashboards: Grants the User the ability to delete dashboards created by other EPASS Users.
- Admin - Manage Widgets: With this option, new Widgets (if available) are automatically downloaded when the User logs into EPASS Reports. It also grants the User the ability to enable or disable Widgets on the Manage Widgets screen. Widgets that are disabled are hidden from the Dashboard Editor menu and can't be used. (See Organizing Your Widgets for more information.)
-
Click OK.
-
Repeat steps 3–5 for additional Users and Groups. When finished, Exit the User Security window.
Initialize Widgets
Widgets are the modular components that display specific reporting data on the dashboards. EPASS Reports has a large library of widgets that you can use to create your custom dashboards, but they need to be initialized and registered with the database first. This is a one-time step and will not need to be repeated.
Steps
-
Log into EPASS Reports.
-
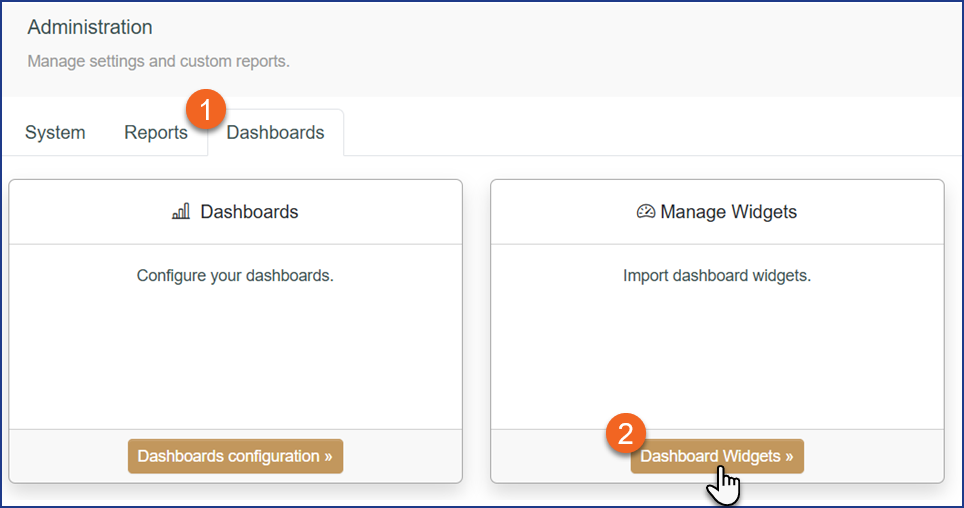
Click Admin.

-
Click the Dashboards tab, and then click Dashboard Widgets.
-
The Widget Management screen opens. This initializes the available widgets and registers them with the database.
-
Exit the Widget Management screen.
Configure Widget Security Options
Now that widgets have been initialized, you will need to go back into User Security in EPASS and activate widget groups for each User or Group that will be creating dashboards.
-
Log into EPASS and go to Tools > System Maintenance.
-
On the Tables tab, select User Security, and then click Open.
-
Select a User or Group, and then click Security.
-
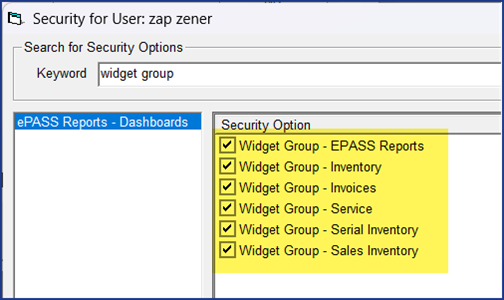
On the left side of the window, click EPASS Reports - Dashboards.
-
Select all the Widget Group security options. This will give the User access to all currently available widgets when they are creating a dashboard. See Managing Dashboard Security for more information on controlling what each User has access to.
-
Click OK.
-
Repeat steps 3–6 for additional Users and Groups. When finished, Exit the User Security window.
The custom dashboard feature is now configured and ready for use.