Scanner Configuration
This topic covers the initial configuration needed to get your scanner working. This follows the installation of the hardware utilities offered by Worth Data and the voice command configuration. There are a few options that need to be programmed into a scanner before it is ready for use. Please only change the options mentioned in this guide; changing other options could cause unexpected results.
Always install the latest utility from the Hardware Utilities link first.
Wireless Terminal
Tools > System Maintenance > Variables > Wireless Terminal
Enable either 'enable voice prompt' and/or 'enable voice error message'
Upload Voice Commands – THIS MUST BE DONE FIRST
There are 2 input ports on the scanner; 1 for power and 1 for uploading media like voice and firmware. Please ensure you are using the correct port and transferring voice data should be the port on the left.
-
Using the Worth Data CD install the T7001 utilities
-
Run the Worth Data Utilities
- Select 7000 series Terminal
- Voice Manager
- Import All Audio
- Browse and select "EPASS Updates\Wireless Inventory\VOICE PROMPTS\Single WAD file" (this is on the server that hosts the EPASS Updates folder)
-
Connect the Scanner to the Antenna Server using USB Cord.
-
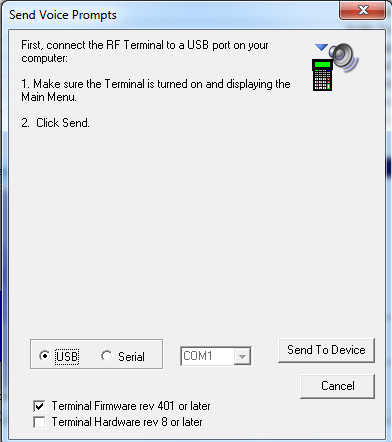
From the left side menu, click ‘Send to device’, then follow screen instructions as to what to do on the scanner. This will detect new hardware and install it. Once drivers are finished, click ‘send’ on screen and press a key on the scanner as directed. Once finished, press 0 on scanner. Continue onto scanner setup below.
The below screen is an old one and is missing Step 5: “Press 1 to select download file”. If you get it, simply check the SERIAL button, then check the USB button again. It will change the screen to a small screen with fewer options.
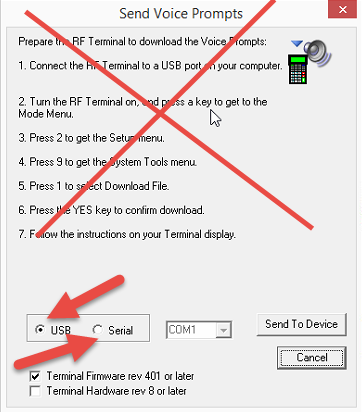
This is what the screen should look like:
If voice prompts won't load, try unchecking the Terminal Firmware rev 401 or later box
Setup
- Turn the scanner ON. (Small green button in top left corner of keypad)
- Press the F1 key (Next to On/Off button)
- Press 2 for Setup
- Press 1 for RF Configuration, then change the values to the following:
- RF CHANNEL (0-5) ---------- 0
- TERMINAL ID ---------------- 0 (unless you have more than one scanner)
- SECURITY CODE ----------- OFF
- SKIP OPENING SCREEN – 2WAY
- CONTROL KEYS ONLY -- ON
- AUTO CHECK BACK ------ 00
- RELAY EXISTENCE ------- NO
- Press 0 to go back to Setup Menu
- Press 2 for Barcode Options
- Press 5 for “2 of 5 Codes”, then change values to the following:
- INTERLEAVED 2 OF 5 – ON
- CHECK DIGIT – OFF
- TRANSMIT CHECK DIGIT – OFF
- STANDARD 2 OF 5 – OFF
- 2 OF 5 CODE LENGTH – 00
- Press 0 to go back to Barcode Setup menu
- Press 0 to go back to Setup Menu
- Press 3 for Date & Time Settings
- Change Shut Down Time to 10 or 15 minutes, or whatever you prefer. This is how many minutes before the scanner shuts down when not being used.
- Press 0 to go back to Setup menu
- Press 7 for LCD Settings
- Press 4 for Brightness. Set At High
- Press 5 for Brightness time out. Set to 30
- Press 0 to go back to the Setup menu
- Press 0 to go to Mode Menu
- Turn scanner off, then on. It should go to the EPASS Wireless sign in menu.