Open Sales Invoice
All open invoices that will be delivered or picked up after the go-live date must be manually entered into EPASS. It is best to do this over the weekend before going live. This means you might have to work a Sunday, but it’s better than entering them too early and having to remember to update two systems when the customer calls and changes their mind about something. We recommend having each salesperson enter their own invoices, this way each person will get some additional practice before going live.
This guide will focus on the things that are unique to entering the open invoices from your previous system. For a general guide on how to create a sales invoice see the Creating a Sales Invoice how-to guide.
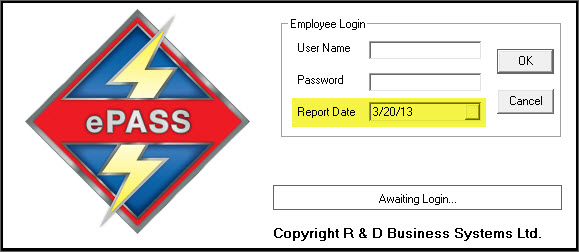
Report Date
If you haven’t noticed the report date yet, it is on the EPASS login screen. The report date is important for the people who do invoice postings and end of day balancing, but it’s also important when entering your open invoices. You need to sign into EPASS with a report date that is before your go-live date. This will allow you easily identify these initial invoices, but it also very important from an accounting perspective. All payments were made in previous system be entered on opening we make sure they don’t actually go general ledger. In order do this the by created.
If after you’ve gone live you find an old invoice that someone forgot to enter into EPASS (and it will likely happen), make sure you follow the same report date rule and sign in with a date before the go-live date. This will allow the payment to be cleared out before it hits the general ledger.
Invoice Header
Everything on the invoice header is entered the same as it would be for a regular invoice after you’ve gone live, with the exception of the reference field. You should put the invoice number from your previous system in the reference field of EPASS so you can cross reference if needed. All invoices will have new EPASS invoice numbers so it’s important to have a searchable field for the old invoice number.
Also, before you create your first invoice make sure your invoice numbering series is set to where you want it to start. You can decide what number to start with, but many companies go with 1,000 or 10,000.
Make sure you are putting in accurate pickup or delivery dates when you enter the open invoices, along with an accurate job status. These are key fields in EPASS so it is important to get off on the right foot.
Invoice Detail
All product, miscellaneous charges, comments, payments, etc need to be entered into EPASS. It is important for everything to be entered into EPASS so that the total and balance of the invoice is the same as it was in your previous system.
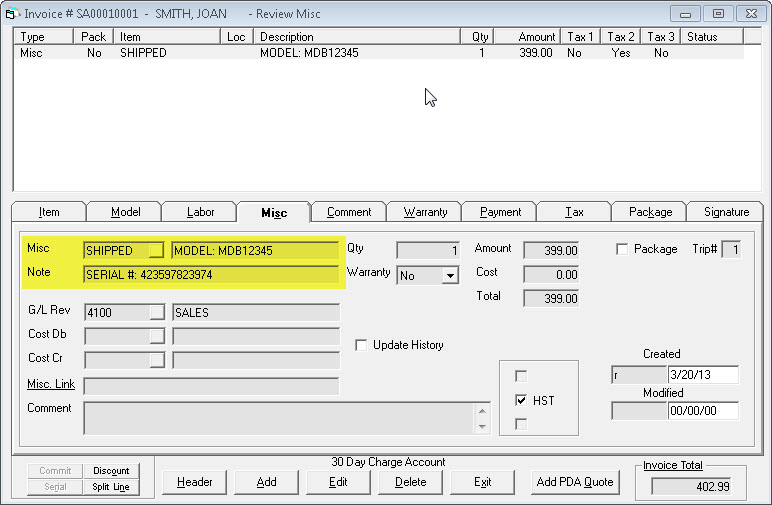
One special circumstance could be partially shipped invoices. In EPASS, you will split partial deliveries so that each portion gets finished as the product is delivered but, if your previous system did not operate this way (some systems allow you to ship just one line and keep the invoice open until everything is delivered), then you will need a special way to enter the product that has already shipped. You do not want to enter it as a model line because then EPASS will expect you to ship a serial number. No, in this case you will have to create a miscellaneous code in System Maintenance specifically for shipped product on open invoices. The code can be whatever you want (“MODEL” or “SHIPPED” are common) but it is important that when you add the miscellaneous line to the invoice you change the description to be the model number. Adding the serial number as the note is also recommended.
Minimum Selling Prices
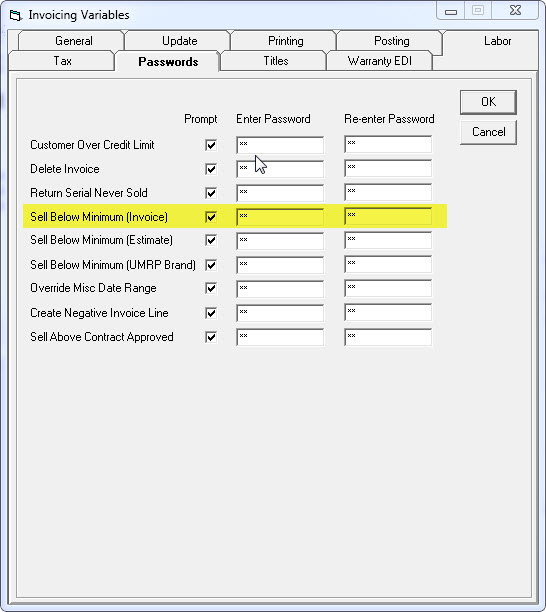
At this early stage of using EPASS, it is quite possible that your selling prices are not yet where you want them to be. This is common is you are starting with a clean inventory in EPASS, though if your inventory was converted the pricing should be good. If you know your pricing is not completely set up then you may want to turn off the Sell Below Minimum password override for the duration of going live, and possibly even for the first week or two after going live (until you get your pricing where you want it to be). To turn this option off go to System Maintenance > Variables > Invoicing > Passwords and uncheck the highlighted option:
Printing Invoices
We recommend that you print a copy of each invoice after it has been entered into EPASS and staple it to the copy from your previous system. This step just makes it easier to review each other’s work. Have someone go through salesperson’s invoices and confirm that the total, tax, balance match up.
Checking for errors
One common issue we see during this process is that someone will create two invoices for the same customer. Either one is blank or they are exact duplicates. When a salesperson is done entering their invoices, have them go to invoicing maintenance, click on their initials on the left side of the screen, then sort the list of invoices by customer name or account number. This will allow them to quickly scroll through their invoices to ensure there are no duplicates. If you do find a duplicate, just delete the detail from the invoice, put a comment in detail that it was a duplicate, then finish it.
