This guide assumes you have already keyed in the GL Chart of Accounts into EPASS. If this has not been done yet please refer to the GL Master Maintenance section.
It is quite common that the general ledger beginning balances are not
converted from your previous system into EPASS. This will show you
how to enter the beginning balances.
This guide is based on the fiscal year being 2013, the fiscal year beginning
in January and the go live date for EPASS is February 1 2013.
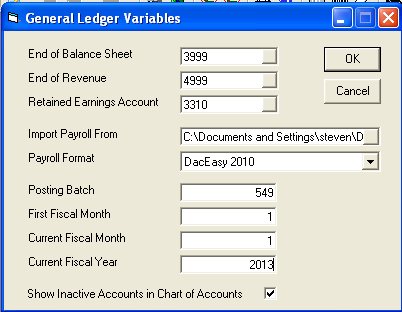
Here is how the GL variables should be set based on these points: notice
that the current fiscal month is 1.
Assuming you were going live February 1st 2013, it will take you a few weeks to close your previous GL system so you can key in the beginning balances into EPASS. During this period you can do anything needed in the other modules but no GL journal entries should be made prior to the beginning balances being keyed in and verified. Any entries being made in the sub modules of EPASS that need to be cleared out of the GL, should be cleared out prior to this step and it is easiest of all entries that need to be cleared out are dated prior to the go live date. I.E. January 31, 2013.
It is quite important to clear out the other beginning entries prior
to making these journal entries because the beginning GL balances will
be keyed into EPASS as of January 31, 2013 so that you will be able to
produce a beginning Trial Balance and do a month end close for January
31, 2013 prior to any of the valid February 1, 2013 entries.
You can contact
EPASS technical support to clear out the beginning GL entries dated prior
to the going live.
Remember that you will need to keep your previous GL system data because we are only keying in the beginning balances into EPASS, All detail and prior history will only be in your previous GL system, EPASS will only be starting as of now.
Sign-in and Transaction
Date:
It is very important to sign-in as a date prior to going live when
processing these beginning transactions. This will post these transactions
to the GL as a prior period allowing us to produce a beginning Trial Balance
in EPASS that will match the Closing Trial Balance of your previous system.
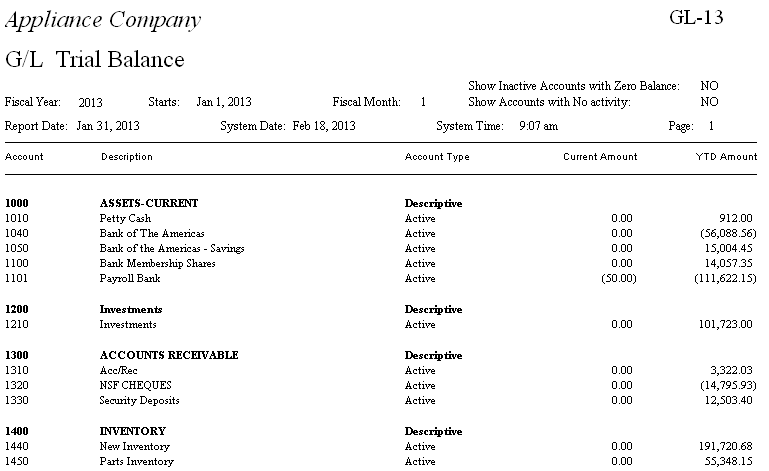
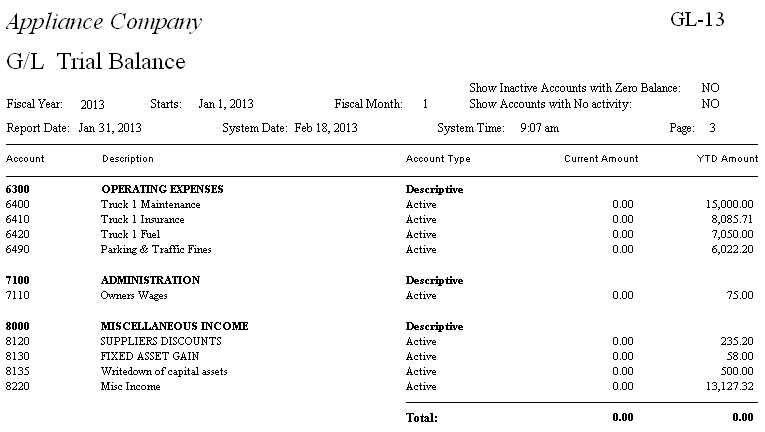
These two images simulate the balances that were exported out of your previous accounting system and will be keyed into EPASS during the next step.
To keep things simple we are only showing the beginning and end of the GL Trial Balance data exported.
GL > Transactions > Add
The beginning balances are keyed into EPASS as one long journal entry. You start with the balance of the first GL account on the top portion of the screen and continue with all remaining GL accounts in the distribution section of the screen. After you have keyed in all GL accounts it should balance out to zero and the ‘To Be Allocated’ will show zero if you have done all entries correctly. You can scroll up and down through the distribution, if needed, to find and correct any mistakes made. In the next screen shot, you will see us reaching the last GL account on our Trial Balance and the ‘To Be Allocated’ balances out to zero.
![]()
Amount: The balance of the very first GL account on your Trial Balance.
G/L Account: The first GL account on your Trial Balance.
Date: The date of this transaction. In our example it is January 31, 2013, one day before going live.
Reference: A simple note or keyword indicating the beginning entries.
Note: A simple note to remind you this was startup is always helpful.
To Be Allocated: The system will show the amount of money left to be distributed.
G/L Account: The next GL account on your Trial Balance.
Amount: The balance of the GL account currently being keyed in.
When you have reached the bottom of your Trial Balance and ‘To Be Allocated’ is zero, you can click OK.
GL > Reports > Trial Balance
The Trial Balance report gives you the ability to verify the entries are correct prior to running the GL posting.
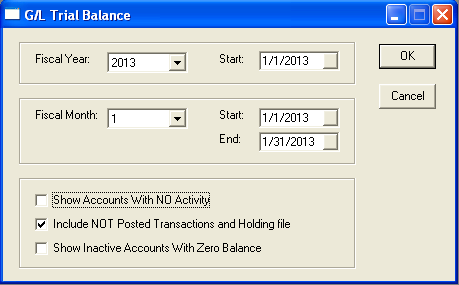
You must select the ‘Include NOT Posted Transaction and Holding File’ for the Trial Balance to include the figures you just keyed in but have not posted yet. Below is a sample of what the Trial Balance looks like. You now need to verify that the EPASS Trial Balance matches the Trial Balance you exported out of your previous accounting system. If you find errors you can key in additional journal entries to fix the problem through GL > Transactions.
GL > Post Transactions
Make sure you are signed in as the correct date prior to posting
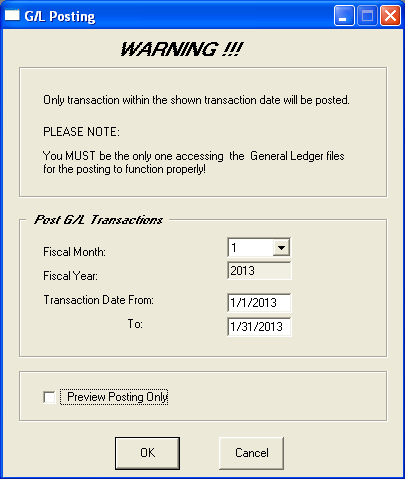
Uncheck the ‘Preview Posting Only’ option so that EPASS will print your beginning entries and give you the option of accepting or cancelling the posting.
GL > Reports > Trial Balance
You can run the Trial Balance report again except, this time, you do not need to check ‘Include NOT Posted Transaction and Holding File’. The report should give the exact same balances as it did prior to running and accepting the GL post transactions.
GL > Month End/Year End > Month End Close

At this point you have now verified that EPASS has the correct beginning balances and you are ready to put the GL into the current period. Assuming you have verified the balances are correct click OK to close the month. The EPASS GL is now live and up to date.