Adding Contacts to an Invoice
The Contacts tab in the invoice header enables you to add additional contact information to an invoice. This may be useful for your commercial customers who have contractors working with them, such as designers and supervisors, and you need quick access to their contact information.
Invoice contacts are different from Customer contacts in that they are only retained on the invoice that they are added to. If an invoice is split, the contacts are carried over to the new invoice. Invoices that are copied, however, do not copy the contact information over to the new invoice.
If you are setting up Invoice Contacts for the first time, read through the Before Starting section first.
If you already have Invoice Contacts set up, jump to instructions for adding and editing contacts by clicking here.
Before Starting
To use this feature, there are three initial setup steps that you need to complete first:
- Enable the Tables: Contact Type security option.
- Add one or more contact types to the Contact Types table.
- Activate the Contact Tab feature for each Invoice Type that requires it (for example, your commercial sales Invoice Type).
Enable the Tables: Contact Type Security Option
-
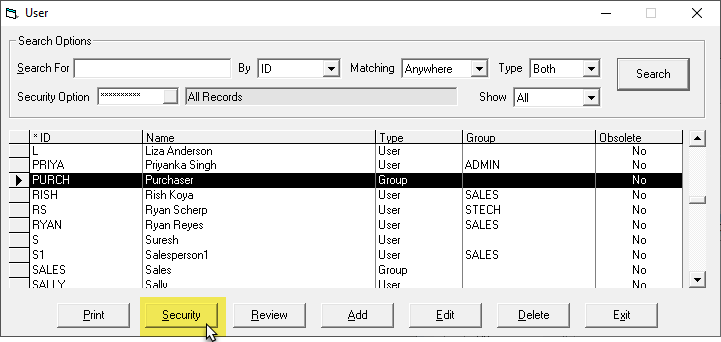
Go to Tools > System Maintenance. On the Tables tab, select User Security, and then click Open.

-
Select a User or Group from the list, and then click Security.
-
In the Keyword search box, enter contact type. Select Tables: Contact Type.

-
Click OK.
-
Sign out and restart EPASS.
Add Contact Types
Contacts are organized by contact type, which are custom tags created in the Content Type table. When you add a contact to an invoice, you assign it one of these pre-determined contact types.
-
Go to Tools > System Maintenance. On the Tables tab, select Contact Type, and then click Open.

-
Click Add.

-
Enter a name for the contact type, and then click OK.

-
Repeat steps 2 and 3 to add additional contact types. When finished, click Exit to close the Contact Types table.
Activate the Contact Tab Feature
-
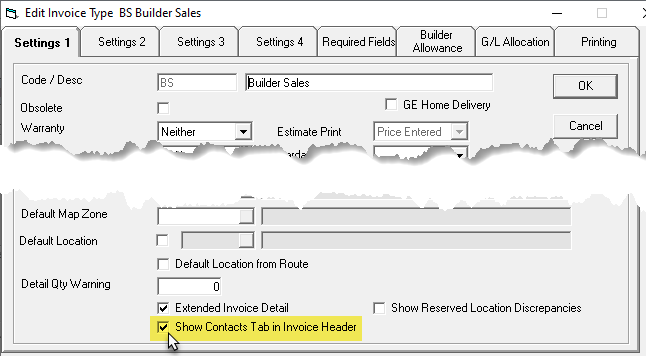
Go to Tools > System Maintenance. On the Tables tab, select Invoice Type, and then click Open.

-
Select an Invoice Type from the list, and then click Edit.

-
On the Setting 1 tab, located at the bottom, select the Show Contacts Tab in Invoice Header checkbox.
-
Click OK.
-
Repeat steps 2-4 to enable the Contacts Tab for additional Invoice Types. When finished, click Exit to close the Invoice Type table.
To Add Contacts
-
Add a new invoice or open an existing one. (If adding a new invoice, the Contacts Tab appears once an Invoice Type with the activated Contacts Tab setting is selected.)
-
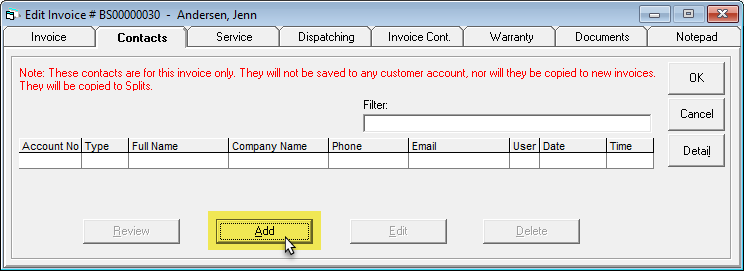
Click the Contacts tab.

-
Click Add.
-
Select a Contact Type from the dropdown.

-
Enter the Customer Code. Alternatively, you can click the Browse button to search for an existing customer or to add a new one.

-
Once a Customer Code is entered, EPASS auto-fills the additional fields. If necessary, you can edit each field. When finished, click OK.

-
Repeat steps 3–6 to add additional contacts.
infoYou can't edit or review the contact until you close the invoice.
To Edit Contacts
-
Open the invoice.
-
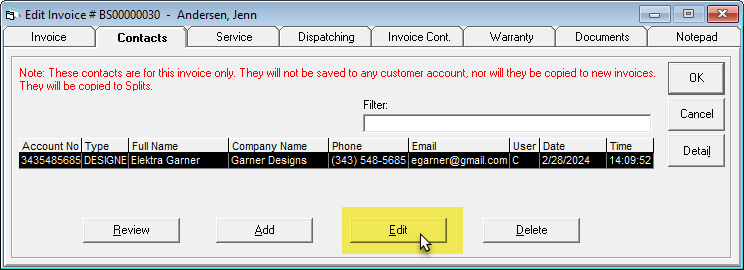
Click the Contacts tab.
-
Click a contact line, and then click Edit.
-
Edit the contact's information. When finished, click OK.
tipTo review a contact's details without editing them, select the contact and click Review. To delete a contact, select the contact and click Delete.