Prompt Configuration
Prompts allow EPASS users to capture additional information during sales order, service request, or product related workflows. A prompt presents the user with predefined response options and can automatically attach comments or notes based on the selected response.
For example, a Gas Verification prompt can require a user to indicate whether a gas appliance requires a Natural Gas hookup, LP hookup, or no gas hookup. The selected response can then add a predefined comment to the transaction.
Prompts are commonly used to capture:
- Fuel type (Natural Gas / LP)
- Electrical requirements
- Delivery restrictions
- Installation prerequisites
- Warranty registration information
- Customer acknowledgements
Using prompts ensures important information is collected consistently during order entry and automatically recorded on the invoice.
Prompt configuration consists of three steps:
- Create the prompt and response options.
- Assign the prompt to a Product Category.
- Assign the Product Category to a Model.
Once configured, the prompt becomes available whenever the associated product model is used.
How Prompting Works
Once setup is complete:
- A user selects a model associated with a Product Category.
- EPASS identifies the prompt assigned to that Product Category.
- The prompt is displayed to the user.
- The user selects one of the available responses.
- The associated comment or note is automatically added to the transaction.
This ensures important information is collected consistently and reduces manual data entry.
Prerequisites
Before configuring prompts, ensure:
- You have access to the following tables: Product, Prompt, Comment.
- The Product Category that will use the prompt has been created.
- The Model(s) requiring prompting have been created in Model Maintenance.
- The Prompt has been created.
- The Comment has been created.
Create a Comment for Use with Prompts
Comments are used by EPASS prompts to automatically add predefined text to an invoice when a user selects a prompt response. Before configuring a prompt, the required comments must be created.
To Create a Comment
-
Navigate to Tools > System Maintenance > Comment
-
The Comment window opens displaying existing comment codes and descriptions.
-
Click Add.
-
Enter a unique Code.
ExampleGASINT -
Enter the Description that should be added to the invoice when the comment is selected.
ExampleNatural gas hookup required.
-
Select the departments that should have access to the comment.
-
Configure any additional options as required:
-
Update History
-
Obsolete
-
Show on Parts Distributor Returns
-
Signature Comment
-
-
Click OK to save the comment.
Example: Comments for Gas Verification PromptCode Description GASINTNatural gas hookup required. GASLPLP gas hookup required. GASNAGas hookup not required. 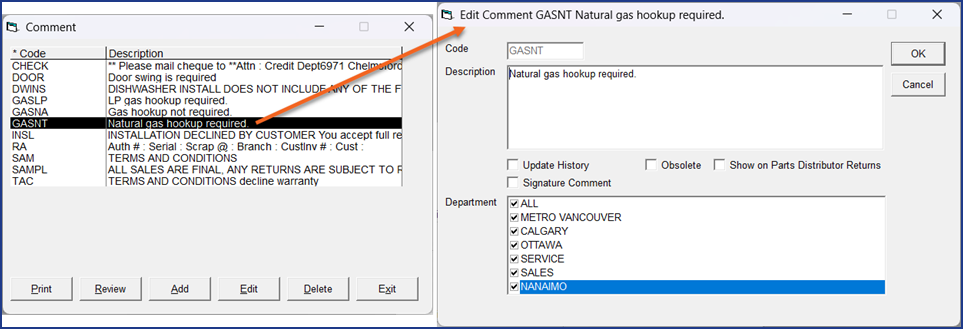
Create a Prompt
Define the prompt and available response options in the System Maintenance > Prompt table.
To Create a Prompt
-
Open Tools > System Maintenance > Prompt.
-
Select Add.
-
Enter a unique Code.
-
Enter a descriptive Description.
-
Configure the response buttons:
- Enter a caption for each button.
- Optionally assign a comment code.
- Enter the comment text to be added when the option is selected.
- Select OK to save the prompt.
Example: Gas Verification PromptThe example below shows a prompt that captures gas hookup requirements.
Prompt Code: GAS
Description: Gas Verification
Available responses:
Response Comment Added N/A Gas hookup not required. Natural Natural gas hookup required. LP LP gas hookup required. 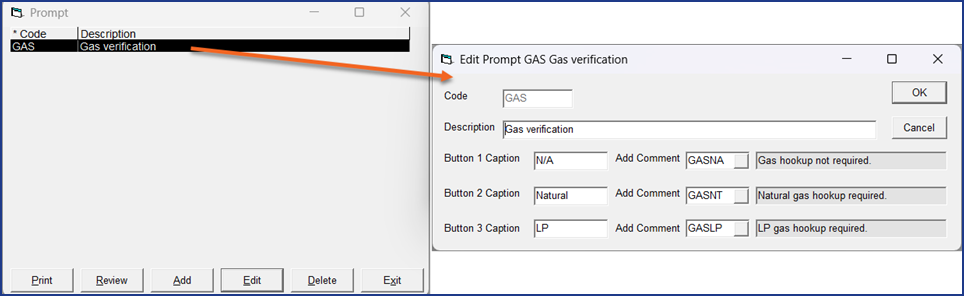
Assign a Prompt to a Product Category
After creating the prompt, assign it to the appropriate Product Category.
To Assign a Prompt
-
Open Tools > System Maintenance > Product.
-
Locate and select the Product Category.
-
Choose Review or Edit.
-
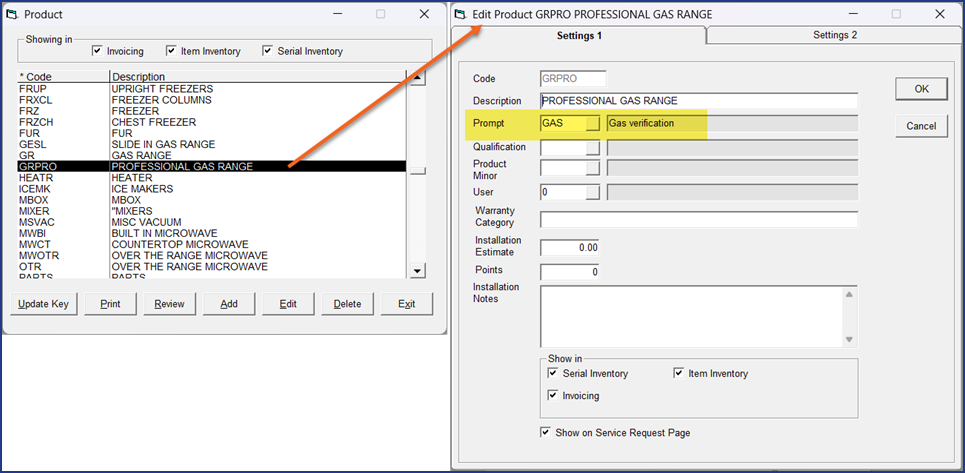
In the Prompt field, enter or lookup the prompt code.
-
Save the Product Category.
ExampleThe Product Category GRPRO – Professional Gas Range has been assigned the GAS prompt.
When products within this category are selected, users will be prompted to provide gas verification information.
Assign the Product Category to a Model
The final step is linking the Product Category to the model.
To Assign a Product Category
-
Open Serial Inventory > Maintenance.
-
Locate the model.
-
Select Edit.
-
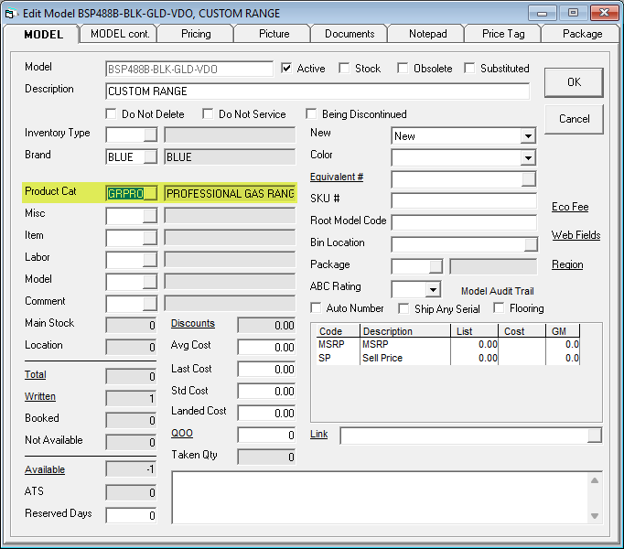
In the Product field, enter or lookup the Product Category.
-
Save the model.
ExampleModel BSP488B-BLK-GLD-VDO is assigned to Product Category GRPRO – Professional Gas Range.
Because the Product Category contains the GAS prompt, the model automatically inherits the prompting requirements.
Prompt Display During Model Entry
When a model is added to an invoice, EPASS automatically checks for prompts associated with the product category and model.
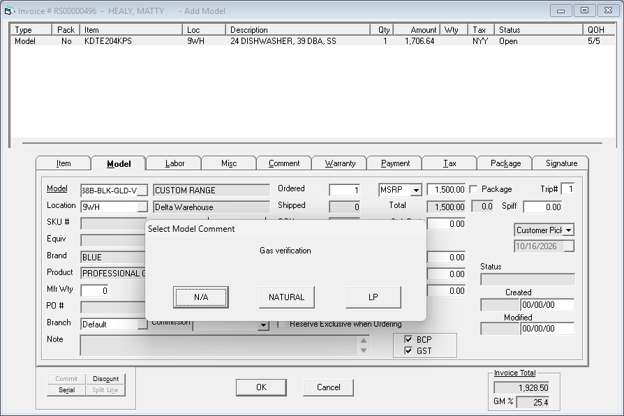
In this example, the prompt requires the user to identify the gas type for a custom range installation.
Gas Verification Prompt
-
The user adds the model to the invoice.
-
EPASS displays the Select Model Comment prompt window.
-
The user must select one of the available options:
- N/A
- Natural
- LP
The selected option determines the comment that will be added to the invoice. For example, selecting Natural adds a model comment indicating that a natural gas hookup is required.
Prompt Response Creates a Model Comment
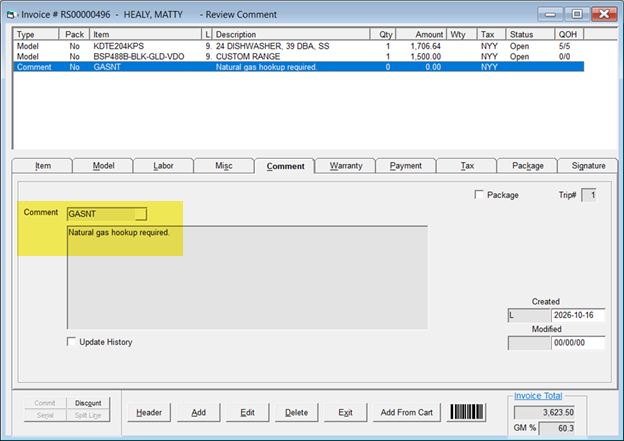
After the prompt response is selected, EPASS automatically creates the associated invoice comment.
- The model remains on the invoice.
- A separate comment line is automatically created.
- The generated comment reflects the prompt selection.
Natural gas hookup required.
This ensures installation requirements are documented and visible to sales, warehouse, and delivery personnel.
Final Model Record
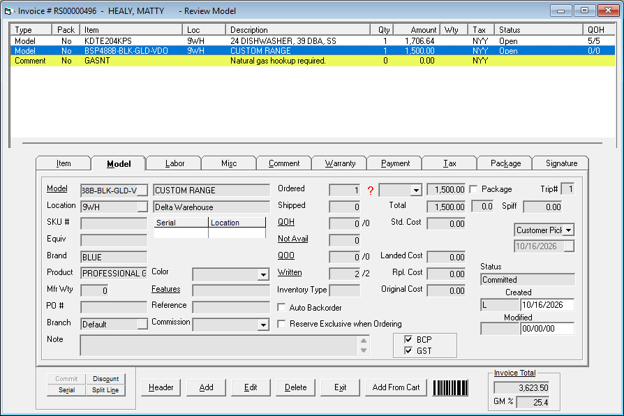
After the prompt has been completed, the model is saved with all required information.
-
The prompted information has been captured.
-
The model can now proceed through the normal sales and fulfillment process.
-
Required installation notes remain attached to the invoice for future reference.
Best Practices
-
Use clear and concise button captions.
-
Keep response options limited to the most common choices.
-
Use comment codes when standardized notes are required.
-
Assign prompts at the Product Category level rather than individual models whenever possible.
-
Review prompts periodically to ensure they remain relevant to current business processes.