Wireless Inventory Physical Count
The first step before doing a physical inventory is to create an image of your inventory. This image will be used by ePASS to compare what you scanned with what was actually in your warehouse or store. Typically, the reconciliation process does not start until there is movement in your inventory again, and that is why we do our comparison against your inventory as it was when it was scanned. It is very important to create the image after all receiving and shipping has been completed.
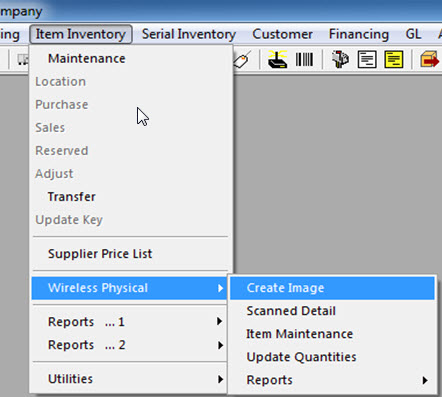
If this is your first time doing a physical inventory in ePASS, after clicking on the Create Image option in the menu, you will see an hourglass for 1-2 minutes while the image is created. If this is not your first time doing a physical inventory in ePASS, then you will see the following prompts:
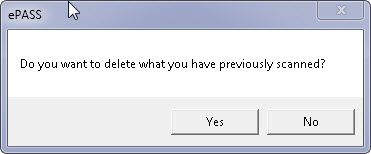
If you are scanning your inventory over multiple days and you only want to create a new image, make sure you click No here so you do not delete everything that you have already scanned. If you are really starting a new physical inventory, click Yes and it will clear out all of the previously scanned items.
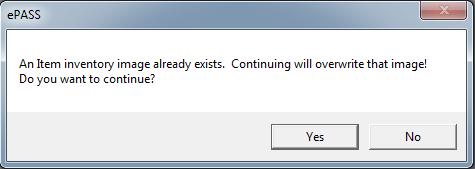
This is just a final warning that your previous image will be replaced by a new one.
Scanning Inventory
Now it is time to start scanning. On the scanner, press the number 8 on the keypad (8. Physical Count) and then press enter. If you use both item and serial inventory, you will see the first screen but, if you only use item inventory, it will go straight to the second screen.


Pressing the right arrow (->) key on the keypad will display all of your locations or, if you know the location, punch it in on the keypad and press enter. If you are scanning Main stock, you can either type ‘MAIN’ or leave it blank and just press enter. Next, you should see the following screen:

If you are scanning a quantity other than 1, you can change the quantity by pressing the down arrow before scanning the part and type the quantity on the keypad, hit enter, then scan the part. Alternatively, you could just scan the part multiple times.
Now, start scanning your product in this location. If you are scanning multiple locations, once you are finished with this location, just hit the left arrow key on the scanner to go back, enter the next location, and start scanning.
If you find any product that does not have a label on it, you can type the part number in using the keypad.
If you scanned something that you did not intend to scan, you can press the up arrow key (^) to delete the last item scanned. This will take you to a confirmation screen to confirm that you want to delete this item. Press the right arrow key on the scanner to delete. If you do not want to delete it, press the left arrow key to cancel and go back. Whichever option you choose, you will be taken back to the scan barcode menu and you can continue scanning.
Discrepancies
Once all of the product has been scanned, it is time to analyze what was scanned and see what the discrepancies are. The first step would be to run the Discrepancy report to see the inventory problems.
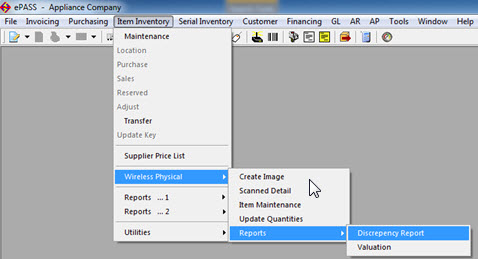
You will see the following options when running the Discrepancy report:
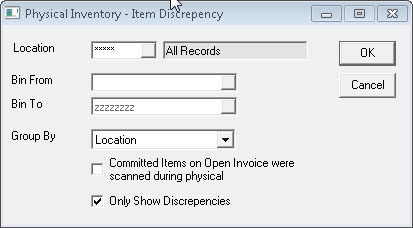
The easiest way to reconcile this report, would be to run it once for each location that you scanned. If you only scanned certain bin locations within one location, choose the range of bins after you have selected the location.
The option ‘Committed Items on Open Invoices were scanned during physical’ is used if you have a shelf for each technician and the items on those shelves are committed in ePASS. If you are going to scan those parts as part of your inventory then make sure you check this option so ePASS will include those items when determining discrepancies.
Once you have run the Discrepancy report, you should first go through it and see if there is anything that you just forgot to scan. If so, you can either find the items and scan them or you can go to the Scanned Detail option (under Item Inventory > Wireless Physical) and you can add the item there. Either option will add that item to the count. If you scanned too many of an item, you can also delete or adjust the quantity scanned in Scanned Detail.
Updating your Inventory
Once you have corrected any items that were not scanned, or the wrong quantity was scanned, it's time accept the discrepancies and tell ePASS to fix your quantities. To do this you'll need to run the Update Quantities utility, which can be found in the following menu:

Make sure you only choose the location that was scanned; if you scanned everything, you can choose All Records. If you didn't scan all locations but you did scan more than one location, you'll need to run this once for each location that was scanned.
If you only counted a range of bin locations within one location, after you have selected a location, you can choose the range of bins that were scanned.
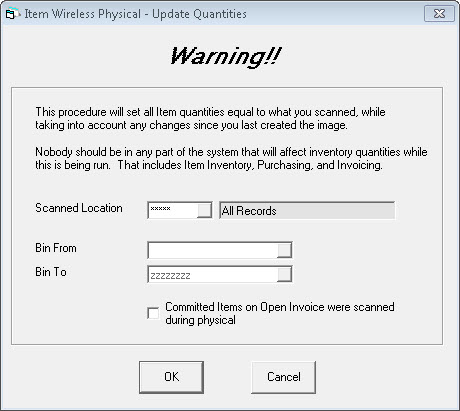
As previously mentioned, if you keep stock in the shop that is currently on invoices that are marked as Committed to the invoices and you scanned that inventory, then you want to check ‘Committed Items on Open Invoices were scanned during Physical'. This will recalculate the QOH by taking the total scanned less the committed items from open invoices to become the true QOH.
Once you click OK, this utility will adjust inventory quantities to match what you scanned. If you did not scan an item the utility will bring the quantity down to zero. It will also take care of any negative quantities you might have by adjusting them to zero, with one exception. If you had committed items on open invoices and you did not scan them, ePASS will adjust those items to negative quantities. This is required to give you a true discrepancy amount.
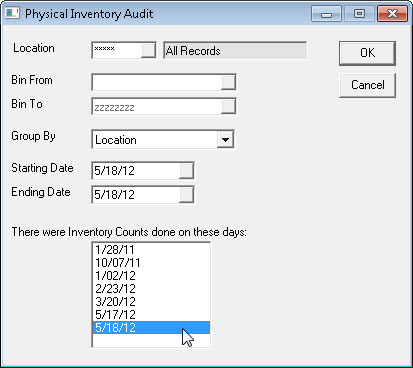
Audit Report
After the Update Quantities utility has been run, you'll want to run the Physical Audit report and give a copy to your bookkeeper/accountant. This report will show the dollar amounts that your inventory was adjusted by.
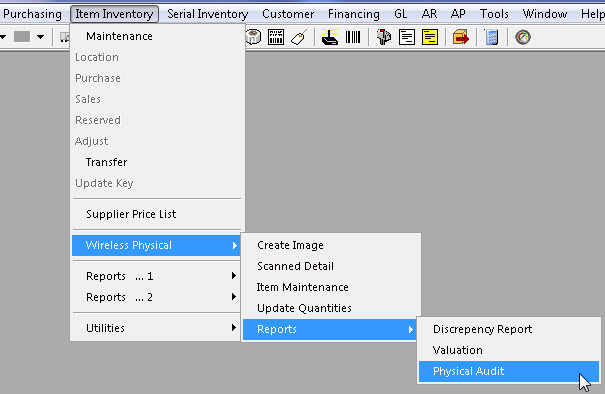
Once the report criteria screen is open, there will be a list of all the days that you have scanned inventory. Just click on the appropriate date, or type in your own date range, then choose the location/bins that were scanned and click OK. The report that follows will list every item that was adjusted along with total quantity/dollar amounts.