Changing Multiple POs
If you need to make changes to a large number of Purchase Orders at once, for example, to change prices due to an increase, you can use the Mass PO Export and Mass PO Import utilities.
PO data is exported to an Excel sheet with the Mass PO Export utility. You can then edit the data in Excel and import it back into EPASS with the Mass PO Import utility. Use these utilities together to cancel model or item lines on a PO by “zeroing” the quantity ordered.
PO Fields That You Can Change
- ETA Date
- Reference
- Quoted Cost
- Quantity Ordered
- Location
- Released (Y/N) – Model POs only
- Receive Location – Model POs only
- Serial Type – Model POs only
- Req Delivery Date – Model POs only
Before Starting
Enable Security Options
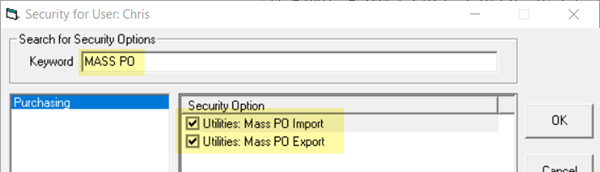
The EPASS user must have the Utilities: Mass PO Import and Utilities: Mass PO Export security options active to use the utilities.
To Enable the Security Options:
-
Go to Tools > System Maintenance.
-
In the Tables tab, locate User Security, and then double-click it.
-
Select a User Group from the list, and then click Security.
-
In the Keyword search box, enter MASS PO. Select Utilities: Mass PO Import and Mass PO Export.
-
Click OK.
Changing Multiple POs with the Import and Export Utilities
Follow this procedure to export current PO data, change it, and then import it back into EPASS.
Exporting PO Data from EPASS:
-
Go to Purchasing > Utilities > Mass PO Export.
-
Select the PO data to export by entering the Mass PO Export parameters:
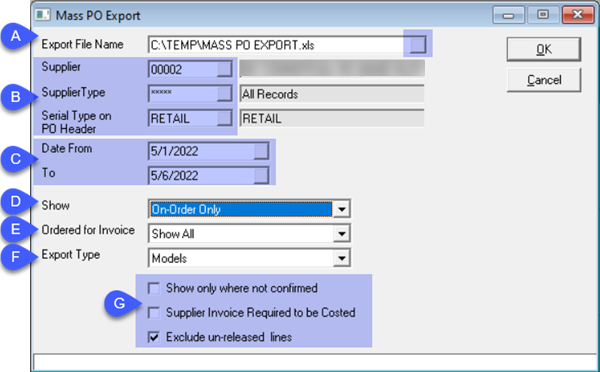
- Export File Name: Click the Browse button (highlighted) and enter the export filename and location.
- Supplier/Supplier Type/Serial Type on PO Header: Expand or narrow your PO selection with these filters. Select a single entry, multiple, or all (default).
- Date From/To: Enter the date range of PO’s you want to include in the export.
- Show: Export PO’s that are On-Order Only, Not Costed Only, or On Order & Not Costed.
- Ordered for Invoice: Export PO’s that are Ordered for an Invoice, Ordered for Stock, or All.
- Export Type: Choose to export Models or Items.
- Select the following options:
- Show Only Where Not Confirmed: If selected, PO’s that have not been confirmed as received by the supplier are exported.
- Supplier Invoice Required to be Costed: If selected, the PO is exported only if the supplier invoice is already costed.
- Exclude Un-released Lines: PO line items that have been unreleased are excluded from the export.
-
Click OK to start the export.
Changing the PO Export Data:
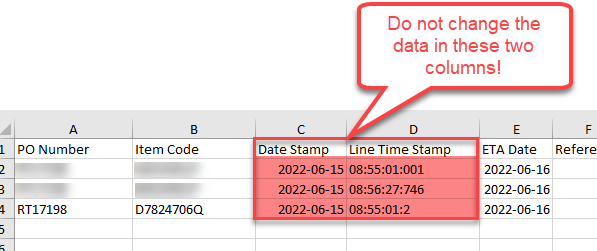
Once the exporter is finished, you can edit the export file in MS Excel. You can change any data in the file EXCEPT data in the DateStamp and LineTimeStamp columns.
Altering the data in the DateStamp and LineTimeStamp columns will result in data errors when the file is imported into EPASS.
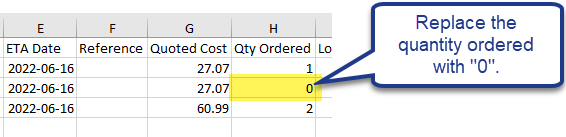
Cancelling Models or Items on a PO:
-
To cancel an ordered model or item, in the QTY Ordered column, replace the amount ordered with a “0”.
Save any changes you make to the export file and move on to the next step: importing the data file back into EPASS.
Importing PO Data into EPASS:
These instructions assume that you are importing an Excel file created by the MASS PO export utility.
-
Go to Purchasing > Utilities > Mass PO Import.
-
Do the following:
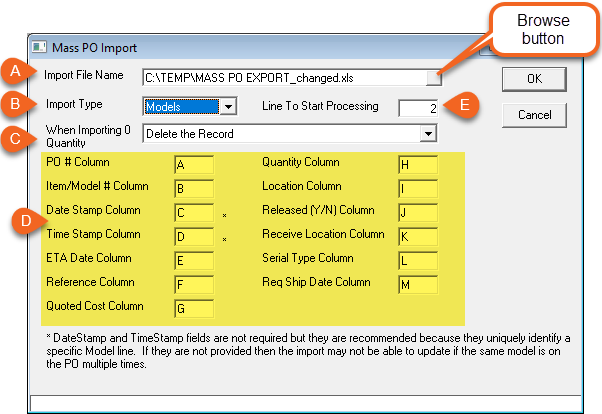
A Enter the file path of the export file or select it using the Browse button. B Import Type: Select Models or Items. C Select what happens when a model with zero quantity is imported: the record is deleted or the quantity is set to '0.' D Map the Excel columns here. E Enter the line number in the export file where EPASS should start processing data. If you didn't change the export file, you can leave this at the default value of '2.' -
Click OK to import the new PO data.
NoteIf PO Default Serial Type is set to anything other than
ALLor a blank value on the model record, then the MASS PO Import will use that value rather than the value on the spreadsheet. See Serial Maintenance: PO Default Serial Type for more info.
See Also:
December 12, 2025