Creating a Warranty Invoice
This topic highlights the differences between a Service invoice and a Warranty invoice.
Invoice Header
After filling out the Service At customer change the Bill To customer to be the warranty billing account. This will change the Invoice Type, Payment Type, Tax 2 and the second Tax Exempt field on the Invoice Cont. tab for you.
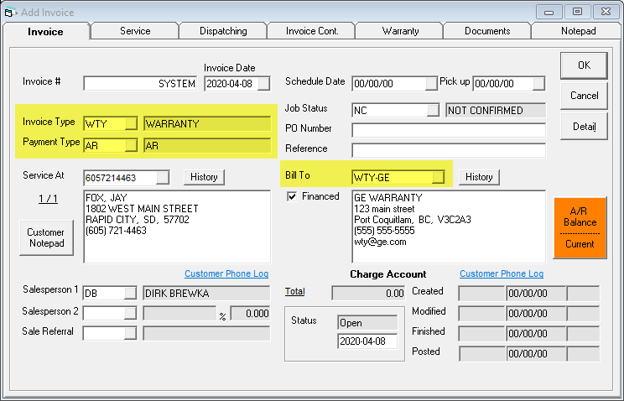
Service and Dispatching tabs are filled out the same as you would with a regular service invoice.
Warranty Tab
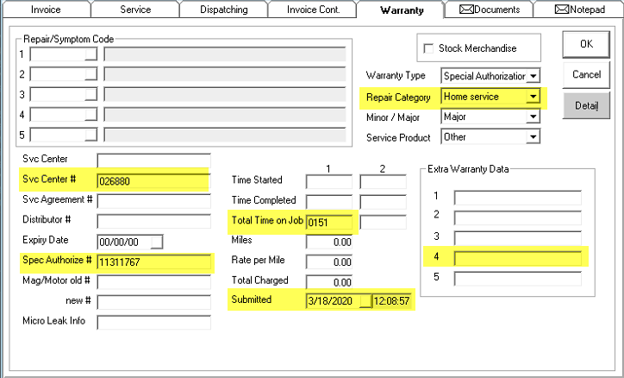
Svc Center
This will populate based on the brand selected on the service tab. You can setup your Authorized Service center Number in Tools > System Maintenance > Tables > Brand.
Spec Authorize
If you are given an authorization number for the job it should be put here so the EDI can add the authorization number into the claim record.
Total Time on Job
Only needed for SubZero claims. The format is HHMM. 1.5 hours would be written as 0130
Submitted
This is the date and time you submitted the claim. This get populated when pressing the Accept button at the top of the report generated by going to Invoicing > Warranty EDI.
Repair Category
This field is used for Service Bench and Service Power claims EDI files.
- Home service: the majority of invoices will use this value. You went to the customers home to do the repair.
- Carry in service: the customer brought the appliance to you.
- Shop service: you brought the appliance back to your company to perform the repair.
Extra Warranty Data
If an Invoice is created using the Service Request module in ePASS the jobID will be passed into the 4th field.
Invoice Detail
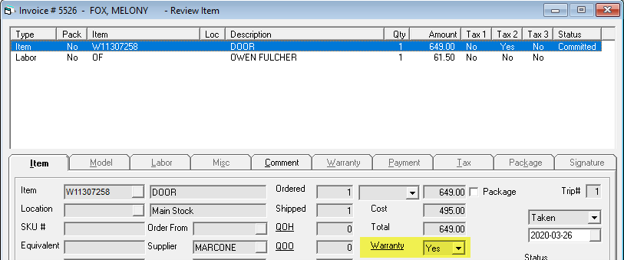
On item, Labor and Misc lines there is a Warranty field which determines if that line is being covered by warranty or not. The Warranty invoice type defaults this value to yes when the line is originally Added, if you switch the Invoice Type from Service to Warranty after lines have been added you will need to review the Warranty field on each line. If only a portion of the Invoice is being covered by warranty the lines not covered should be set to Warranty = No
The Selling Price for an item depends on if you will be receiving a credit memo for the item or money back.
-
Receiving a credit memo for the item: the selling price will be zero. The reason for doing this is we are not receiving any money directly from the manufacturer and we want the invoice total to accurately reflect the amount of money we are expecting to get from the manufacturer. The cost is what is uploaded and used by Service Bench/Service Power not the selling price.
-
Receiving payment for both Items and Labor from the manufacturer: the item will be sold at cost or the agreed warranty re-imbursement price on the invoice. This assumes you will be receiving one payment that covers both Items and Labor for the manufacturer or third party warranty company.
When an Item line is set to Warranty = Yes it will search the Warranty Claims Receive data in ePASS. The search will be filtered by whatever is filed into the Supplier, Supp Inv, and Purchase date fields.

If any or all of these fields are filled in, it will restrict the search. For example, if you have the Supplier filled in, ePASS will only search for Receiving records for that Supplier.
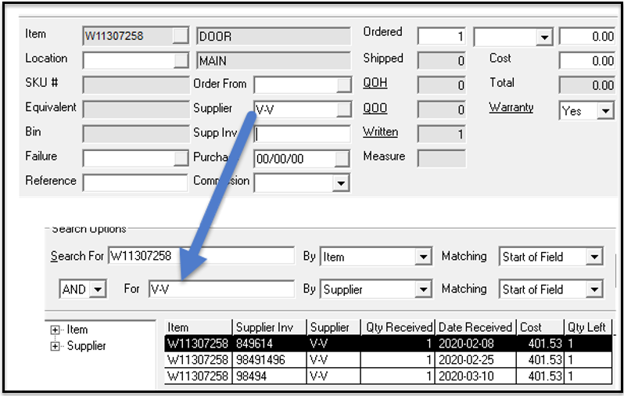
If you have both the Supplier and the Purchase date filled it, it will only search the Receiving for that Supplier on that Purchase date. If nothing is filled in ePASS defaults to the most recent available record of you receiving the item to be claimed against.
To view the available claims that can be made for that item you can click on the Warranty hyperlink or Purchasing - Warranty Claims – Maintenance.
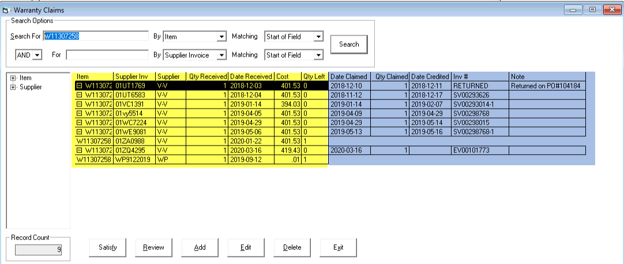
The Section in yellow is the records of the item being received on PO’s. The records in blue are where the item was either claimed on a warranty Invoice or Returned on a PO to the distributor.
If there is a specific receiving record that should be used you can manually populate the Supplier, Supplier Inv, and Purchase fields on the invoice item line and EPASS will attempt to make a claim against that receiving record.
In the image below EPASS will attempt to take the receive record from Marcone as it is the most recent record.
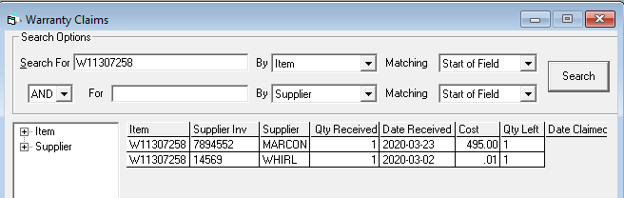
To force EPASS to use the Whirlpool Receive record you would fill out the Supplier, Supplier Inv, and Purchase date using the information for Whirlpool.

Partial Warranty
In the event that the warranty does not cover the entire work order the best practice is to split the invoice in two once the work has been completed. One with the warranty company as the Bill To customer which contains everything being covered by the warranty and the second invoice with the customer as the Bill To which contains the portion that the customer is responsible for paying. This way you can clearly see how much you are expecting from the warranty company and how much the customer is expected to pay.


In the Invoice above the warranty company is only covering the items and the customer will need to pay for the labor. The Warranty box for the items is set as “Yes” and the labor line is “No”.
Splitting the Invoice
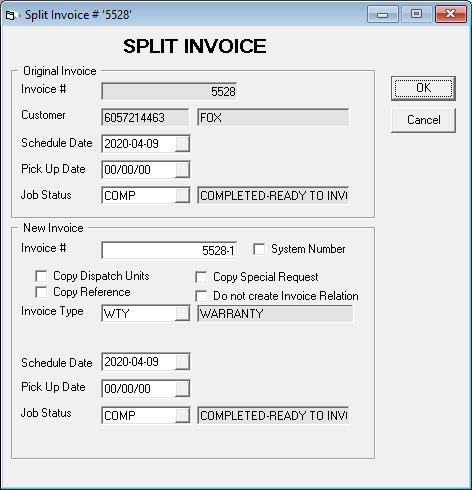
Once the Job has been completed, we will want to use the split invoice function Invoicing > Copy > Split to create the separate invoice that the customer will pay. The original invoice will remain billing the Warranty company and the new ‘-1’ invoice will become the portion belonging to the Customer.
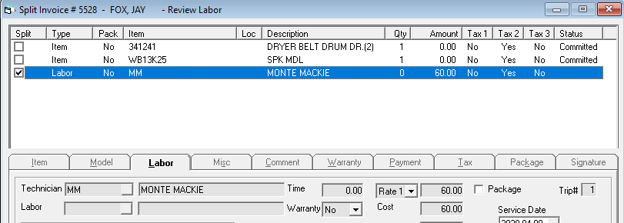
On the left of each line item there is a check box. We want to check the lines being moved over to the Customer’s invoice. This will be the lines that are not warranty, then press the okay button at the bottom of the form.
This will now return to the Invoice Maintenance screen showing both invoice numbers. Notice it has made the same invoice number with a ‘-1’ on the end. This way the invoices are clearly associated to each other.

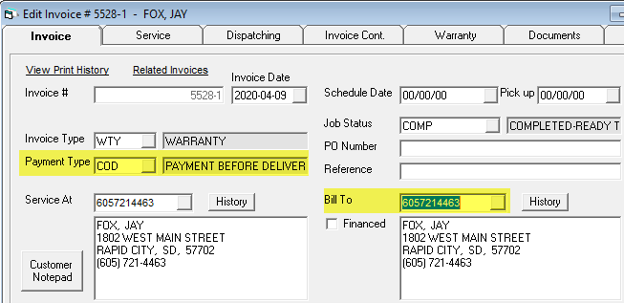
The newly created -1 invoice will need to be edited. Change the Payment Type to be COD and change the Bill To account to be the customer not the warranty company.