Importing and Exporting a Project
You can create new Projects in EPASS by importing a spreadsheet with all of the project data. This may be faster than recreating a large project manually in EPASS.
You can also export current Projects for editing in your preferred spreadsheet app.
Which data fields are included in the export?
| Code | Description | Customer Code | Contact |
| Phone1 | Phone2 | Status | Completed |
| Start Date | End Date | Line Type | Line Code |
| Qty | Selling Price | Cost | Min Qty |
| Max Qty | Reference | Features Code | Features |
| Brand Code | Delivery (Charge) |
Importing a Project
Before Starting
Before importing your project, you need to create a spreadsheet with the following columns. (Column names marked with an * are required.)
| Project Code | Completed | Min Qty |
| Description* | Start Date* | Max Qty |
| Customer Code* | End Date* | Reference |
| Contact* | Line Type;) | Features Code |
| Phone1 | Line Code;) | Brand Code |
| Phone2 | Quantity | Delivery;) |
| Status* | Selling Price |
Spreadsheet example

Importing the Project Spreadsheet:
Once your spreadsheet is created and filled, follow these instructions to import the Project into EPASS.
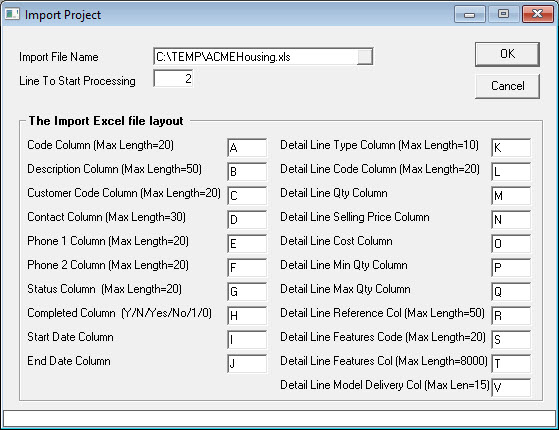
To Import the Project
-
Go to Customer > Utilities > Import Project. The Import Project window opens.
To Export a Project
-
Go to Customer > Utilities > Export Project. The Export Project window opens.
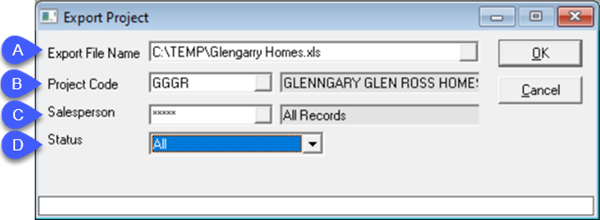
-
Do the following:
A. Enter a path and filename for the export file.
B. Select the Project Code from the list.
C. Select one or multiple Salespersons from the list, or leave All Records selected.
D. Select the Project Status from the list.
-
Click OK. The project file exports and opens automatically in your default spreadsheet app.
See Also
November 20, 2023