Creating a Customer
The details of each of your customers, such as their name, address, phone number, and email, are kept in a customer record in EPASS. Customer records are used throughout EPASS. You can create a new customer record either in Customer Maintenance or when you start a new invoice.
To Create a New Customer Record
-
Do one of the following:
-
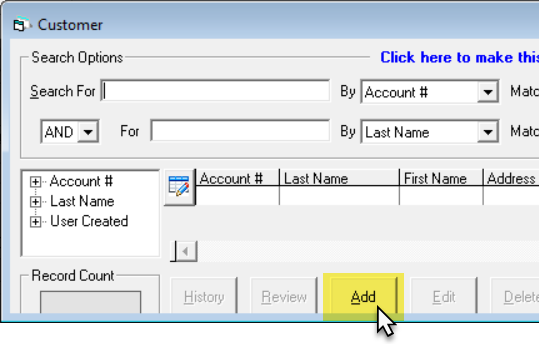
Go to Customer > Maintenance, and then click Add.
-
-OR-
-
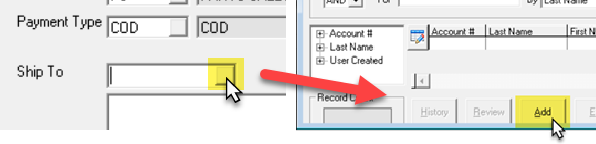
When adding a new invoice, click the Ship To browse button to open the Select Customer window. Click Add located at the bottom of the window.
The Add Customer Window
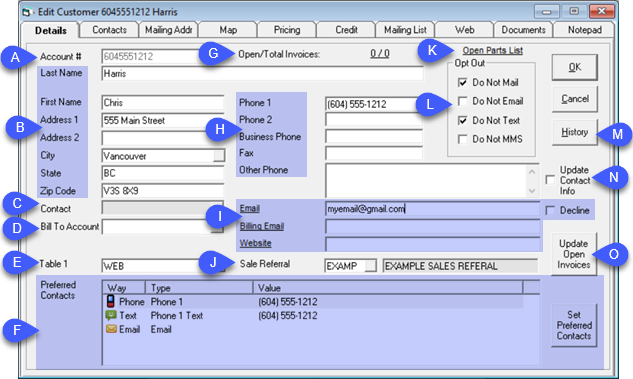
| A | Account#: The customer code can be a maximum of 20 characters. We recommend using the customer phone number without any dashes, slashes, or spaces. For corporate accounts, we recommend a short version of the name. EPASS can assign a system generated number, if you prefer. | I | Emails and Web Address: Enter the customer's email addresses and website. If a customer doesn't want to provide an email, you can click the Decline checkbox. Note: The Decline checkbox is tied to a security option. Users need the security option enabled) on their account to use the Decline checkbox. |
| B | Name and Address: Enter the customer's name and address. Click for additional notes). | J | Sale Referral: Click the browse button and select the referral method. These are populated from the Sales Referral table (Tools > System Maintenance > Sales > Referral). |
| C | Contact: Clicking the Contact Browse button opens the Contacts tab where you can enter multiple contact names and numbers for this customer record. | K | Open Parts List: Clicking this hyperlink opens a list of the customer's open parts invoices. |
| D | Bill to Account: The bill to account is used for a third-party biller, such as a tenant/landlord. Click for additional notes). | L | Opt Out Checkboxes: Select the communication methods that the customer wants to 'opt out' of. Click for additional notes). |
| E | Table 1: Table 1 is typically used to track sales referrals. Click for more info). | M | History: Click to open the customer's invoice history. |
| F | Preferred Contacts: Lists the customer's preferred methods of contact. You can add and arrange these by clicking the Set Preferred Contacts button. | N | Update Contact Info: Select to force the customer record to open in Edit mode the next time you access it. |
| G | Open/Total Invoices: Click this hyperlink to view the customer's current invoices. | O | Update Open Invoices: Allows you to update the customer name and address fields on any or all open invoices for the customer. In large projects you may have many invoices that all have the wrong address due to changes since the original quote or bid was put together. This will let you quickly update all those invoices. |
| H | Phone Numbers: Enter the customer's contact numbers. The titles, such as Home Phone, Cell Phone etc., are defined in Tools > System Maintenance > Variables > Accounts Receivable > Titles tab. This is also where you define if the phone number can be text enabled. |
Customer Window Tabs
- Mailing Address tab
- Mapping tab
- Pricing tab
- Credit tab
- Documents tab
- Notepad tab
Mailing Address Tab
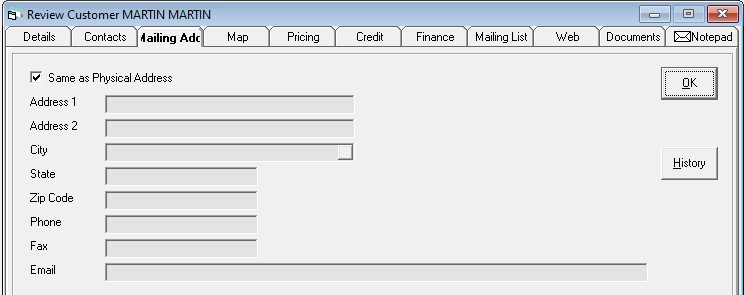
Same as Physical Address (Checkbox)
If this customer would like an alternate mailing address for the bill or communications to be sent to, this can be unchecked and the address, phone, email can be filled in. This is useful for vacation properties where the bill needs to go to the office or the primary residence in the city.
Mapping Tab
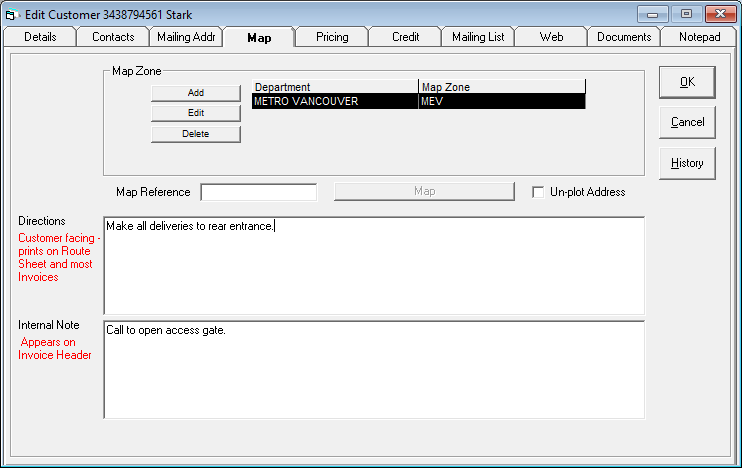
Map Zone
This is the area or map zone for the customer. This is not required and can be filled in during the invoicing process. A different map zone per dispatching department can be defined and EPASS can pre-populate the map zone through the Google Maps integration and Invoicing > Dispatching > Utilities > Define Map Zones.
Map Reference
The cross streets or the page and x/y coordinates, if you provide the same map book to all staff. This is not commonly used anymore since Google Maps integration was introduced.
Map
This will show a map of the address. The dispatching and mapping options of EPASS are required.
Un-Plot Address
If you have previously plotted the address in Google Maps incorrectly, this will erase the Google Mapping coordinates forcing the address to be re-validated.
Directions
Commonly used for difficult addresses or building/gate access codes for apartment buildings or gated communities. Directions can print on route sheets and invoices.
Internal Note
This note doesn’t print on the invoices but appears in the Invoice Header.
Pricing Tab
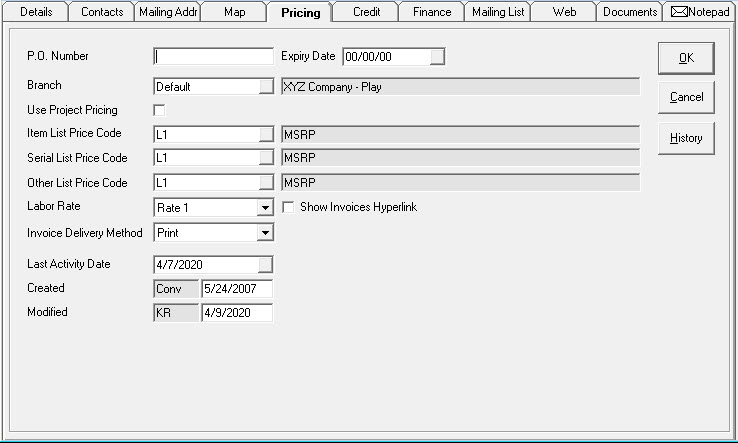
P.O. Number
When filled in, this PO number will appear on invoices until the associated expiry date.
Expiry Date
The expiry date of the standing PO number.
Branch
The branch that this customer belongs to. The branch is used in both invoicing and accounts receivable.
Use Project Pricing (Checkbox)
When checked, this customer will not use regular list prices; it will use project pricing as defined in the project. Customer > Project. When checked, the list price code shown on this tab for models is no longer used. Once checked you can select the project this customer belongs to.
Item List Price Code
The list price level the customer will be given for item lines.
Serial List Price Code
The list price level the customer will be given for model lines.
Other Price List Code
For future use.
Labor Rate
The price level the customer will be given for labor lines.
Invoice Delivery Method
Print, email, or both. Based on this setting, the Invoicing > Batch Print Invoices and Invoicing > Batch Email and Text options will print or email the invoices accordingly.
Show Invoices Hyperlink
It shows the number of open/total invoices for this customer both in Customer Maintenance and in Invoicing. Do you want this hyperlink shown? For high volume accounts, you will want to uncheck this option so it does not take the time to calculate and show the hyperlink every time you add or edit an invoice.
Last Activity Date
The last day anything was posted to the account through invoicing or accounts receivable.
Created
User ID and date of the user who created this customer.
Modified
User ID and date of the last user who edited this customer.
Credit Tab
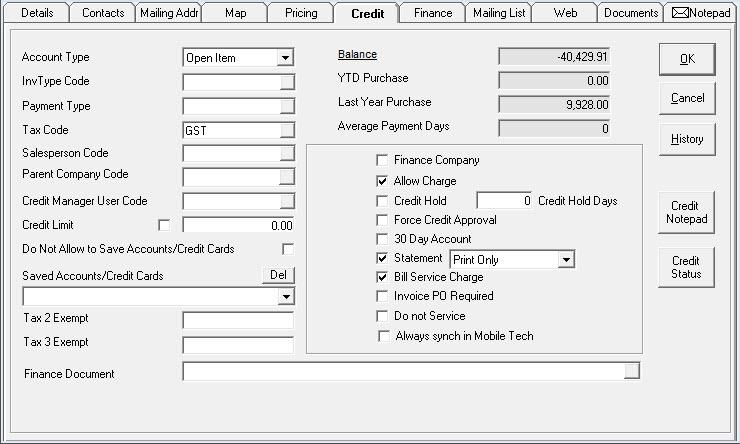
Invoice PO Required (Checkbox)
If checked, invoices cannot be saved unless they have a PO number filled in. Used for corporations that will not pay you for your products or services unless you have a PO number. The user will be told the PO number is required to complete the invoice.
Do Not Service (Checkbox)
When checked you cannot select this customer on an invoice. It will stop the user with no password override. Use this only when you have a customer you never wish to deal with again. It is highly recommended that you fill in the note field on the map tab to explain the past issue.
Always Sync in Mobile Tech
When checked, this customer will always be synchronized in the EPASS Mobile Technician program. Commonly used for warranty companies so they can always be selected on an invoice in Mobile Technician.
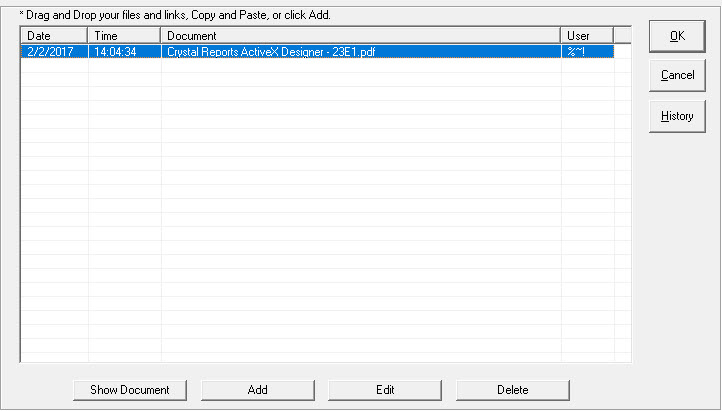
Documents Tab
The Documents tab allows you to attach any form of document, web site, program, etc. for future retrieval. This is simply a link to the document; it is not a copy of the document. The document itself must be saved in a network location that is accessible to all users.
Notepad Tab
The notepad is an internal diary or record of events for this customer. Notes can be added and modified as needed. The system will save the date, time, and user who made the notes. You can print, review, add, edit, and delete notes from this window. You can filter notes or show specific types of notes only:
- TEXTS: displays text messages in the notepad.
- SYSTEM: displays system generated notes in the notepad.
- NOTES: displays regular notes users have entered in the notepad.
- CREDIT: displays credit department notes in the notepad.
- CREDIT ONLY: displays notes that are only for the credit department in the notepad.
Security controls which notes you can see along with add, edit, delete buttons.
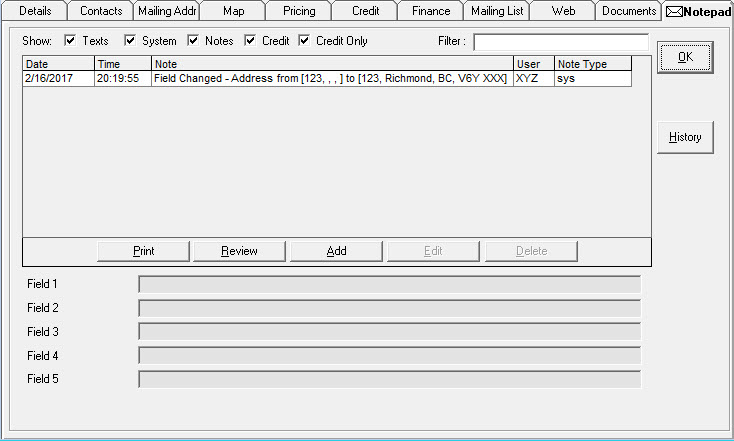
History
This will display the customer's sales and service history.
Field 1–5
These are user defined fields. One or more can be made mandatory. The title and properties can be modified in Tools > System Maintenance > Variables > Accounts Receivable > Titles tab.
See Also
July 3, 2024