Avalara AvaTax Configuration Guide
Avalara AvaTax is a cloud-based solution that automates transaction tax calculations and the tax filing process. Avalara provides real-time tax calculation using tax content from more than 12,000 US taxing jurisdictions and over 200 countries, ensuring your transaction tax is calculated based on the most current tax rules.
For more information and to get started with Avalara AvaTax, visit Avalara.com
- Once you've completed the sign-up process with Avalara, contact EPASS Support. There is a one-time setup fee and several back-end changes that need to be made to EPASS first before starting the integration set up.
- The setup steps in this guide can only be completed by an EPASS User with administrator-level security options.
- AvaTax works in conjunction with EPASS' built-in tax logic and should not be considered as a complete replacement of that system. You still need to regularly maintain your Tax table and make sure that your Tax2 codes are updated and correct, as these codes are used in multiple areas and reports in EPASS, such as the General Ledger.
- The terms Avalara and AvaTax are used interchangeably in this guide to refer to Avalara’s AvaTax product.
Create a Test Environment
- Before "going live" with AvaTax, we recommend that you setup a testing environment first so that you can verify that the AvaTax integration is functioning as expected. Do not test transactions in your LIVE company, as any transactions submitted there will be included in your Avalara tax reporting.
- We recommend setting up the test environment outside of regular business hours, as some steps may require additional time and resources.
Before following the steps below, add a "PLAY" company to your Avalara account that you can use for testing. See Avalara's instructions for adding a company.
Once you have your PLAY company created in Avalara, continue with each following section in order.
Test transactions that you run through your Avalara "PLAY" company will count towards your billing usage. If you need to run extensive testing, it might be worthwhile to subscribe to an Avalara sandbox account instead. Contact your Avalara representative for more details.
Connect AvaTax to EPASS
-
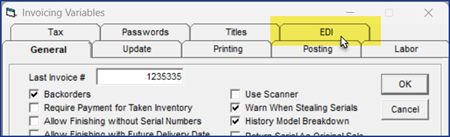
In EPASS, go to Tools > System Maintenance. Click the Variables tab.
-
Select Invoicing, and then click Open.

-
Click the EDI tab.
-
In the Avalara Tax area, do the following:
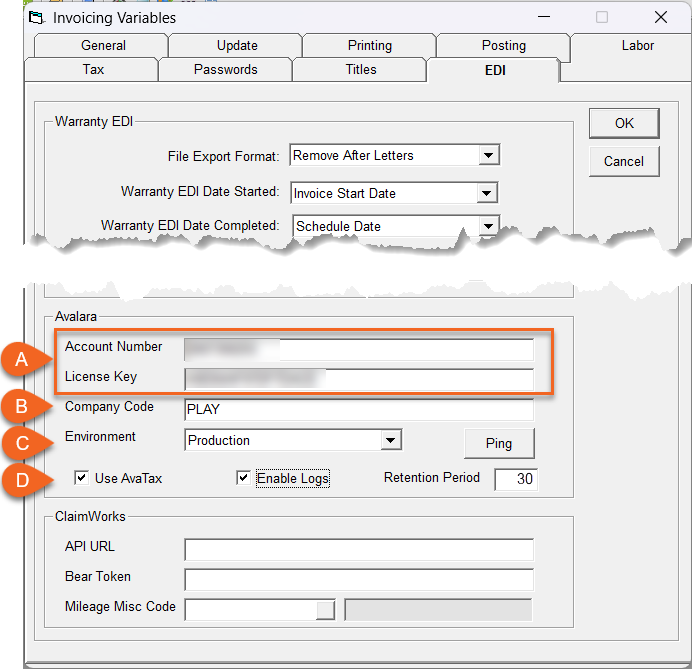
A Enter your Avalara Account Number and License Key (you can get these by logging into your Avalara account.) B Enter the Company Code of the test company you created in Avalara (example, PLAY). You can locate the Company Code in Avalara displayed underneath the Company name or in the Companies section.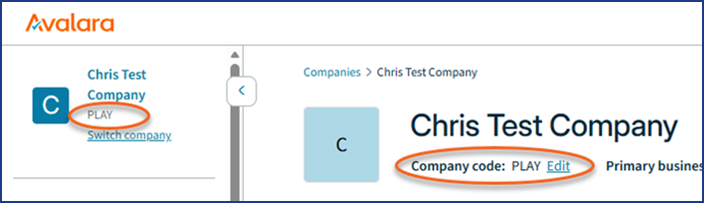
C In the Environment dropdown, select Production. (If you have paid for an AvaTax Sandbox account that you want to use for testing, select Sandbox instead.) D Verify that Use AvaTax and Enabled Logs are selected. NOTE: The Retention Period needs to be at least 30 days. This is an Avalara requirement. Contact EPASS Support if you need access to these log files. -
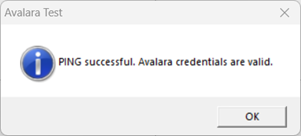
Click the Ping button to test the connection.
-
Click OK to close the Invoicing Variables window.
Activate AvaTax on Invoice Types
-
Go to Tools > System Maintenance.
-
On the Tables tab, select Invoice Type, and then click Open.

-
Select an Invoice Type in the list, and then click Edit.

-
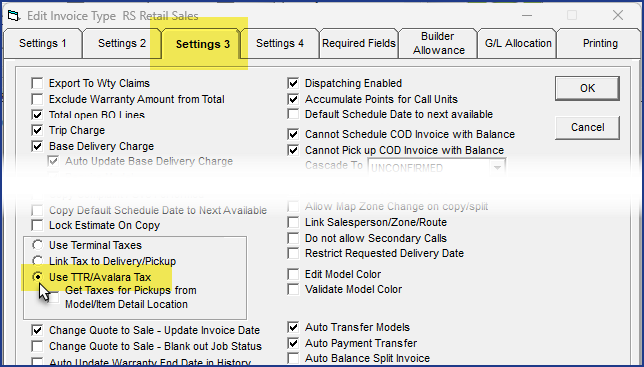
Click the Settings 3 tab.
-
Select Use TTR/Avalara Tax.
-
(Optional) Select Get Taxes for Pickups from Model/Item Detail Location. Selecting this option will use the tax rate based on the location of the model or item for pickup orders, rather than the branch's location.
 Note
NoteAvalara will use the location of the first model listed in Invoice Details when calculating the tax for pickups. If additional models on the invoice are getting picked up from other locations with different tax rates, we recommend that you split the invoice for each pickup location.
-
Click OK.
-
Repeat steps 3–7 for each of your Invoice Types.
With this setting turned on, invoices in EPASS will use tax rates from AvaTax based on the Ship To address or the pick up location.
Run the Update Tax Percentage Utility
This utility updates the Tax2 total for all open invoices with a new total from AvaTax.
- Because this utility may take a significant amount of time to complete, we recommend running it outside of business hours.
- Due to the difference between how EPASS and Avalara calculate taxes, the balances of some invoices may need to be adjusted after running this utility. Refer to the PDF report that the utility creates after it's finished to identify these invoices.
Steps
-
Go to Invoicing > Utilities > Update Tax Percentage.
-
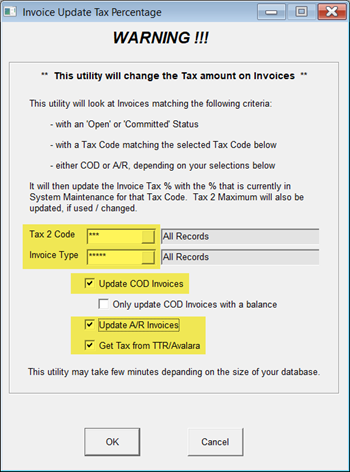
Verify that Tax 2 Code and Invoice Type are set to All Records.
-
Select the Update COD Invoices and Update A/R Invoices checkboxes. Do not select the Only Update COD Invoices with a Balance checkbox.
-
Select the Get Tax from TTR/Avalara checkbox.
-
Click OK to run the utility.
Post "Not Posted" Invoices
Before testing, it is recommended to post all invoices that have the "Not Posted" status. See Posting Invoices for instructions.
(Optional) Modify Default Avalara Tax Codes
Avalara tax codes categorize products and services that are taxed differently depending on location. Assigning the correct code allows AvaTax to automatically calculate the proper tax rate, since Avalara continuously maintains and updates the applicable tax rules.
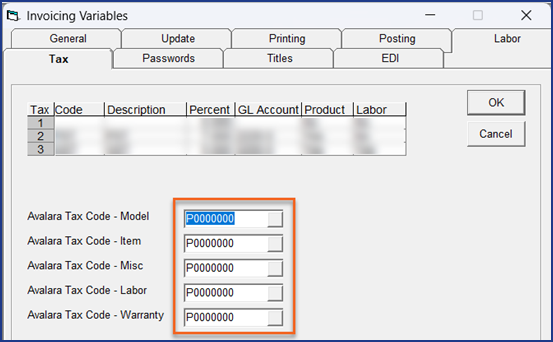
EPASS automatically adds the P0000000 code as the default for models, items, Misc codes, labor, and extended warranty codes.
P0000000 is a generic code that Avalara uses and it applies the full tax rate.
EPASS uses the default tax code whenever a more specific override is not available, for example, when a tax code has not been assigned to a particular model. EPASS will use the tax code attached to the product, then the Inventory Type, and then the default. (See Add and Import Avalara Tax Codes for more info.)
Follow the instructions below to modify the default codes.
Steps
-
Go to Tools > System Maintenance.
-
Click the Variables tab.
-
Click Invoicing, then click Open.
-
Click the Tax tab.
-
Click the Browse button for each default code you want to change, and select the new code from the list. (These codes are populated from Avalara so the list will always be up to date.)

Add or Import Avalara Tax Codes
For models, items, labor, extended warranties, packages, or miscellaneous codes that require a tax code other than the default P0000000 generic code, you'll need to enter the codes manually or by using an import utility.
EPASS will use the tax code attached to the product, then the Inventory Type, and then the default.
Manual Entry
You can enter the tax codes for each product manually.
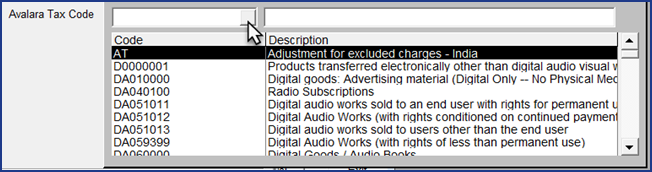
The codes in the dropdown list are populated from Avalara so the list will always be up to date.
This table shows where each tax code entry field is located.
| Product | Location |
|---|---|
| Models Located on the Model cont. tab. | 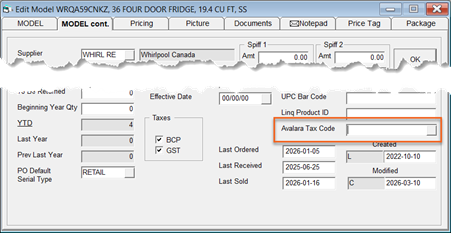 |
| Items Located on the Item cont. tab. | 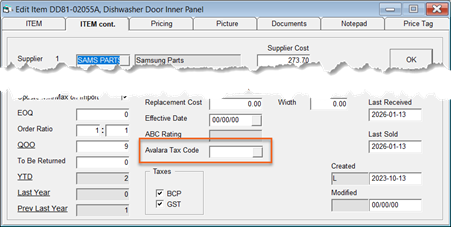 |
| Inventory Type Located in the Inventory Type window. | 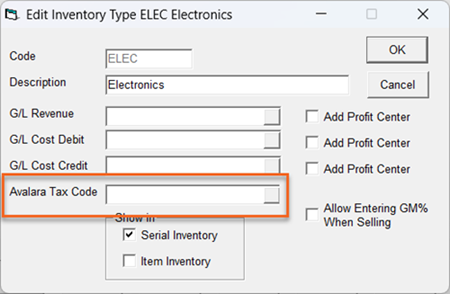 |
| Labor Located at the bottom of the Labor Rate window. | 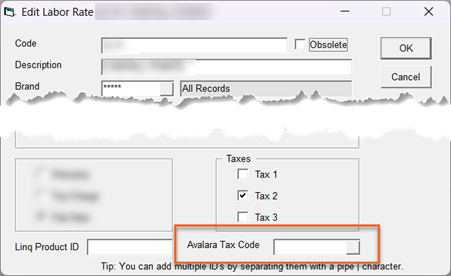 |
| Extended Warranty Located at the bottom of the Extended Warranty window. | 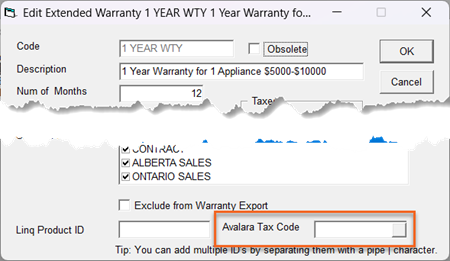 |
| Miscellaneous Located at the bottom of the Misc Charge window. NOTE: When a Miscellaneous product is assigned to a Miscellaneous Type group, this code takes precedence and overrides the Avalara Tax Code associated with that Miscellaneous Type. | 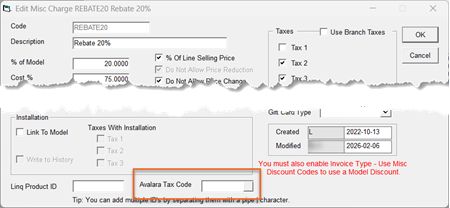 |
| Miscellaneous Type Located at the bottom of the MiscType window. NOTE: This code is used only when a Miscellaneous product in a Miscellaneous Type group does not have its own Avalara Tax Code. | 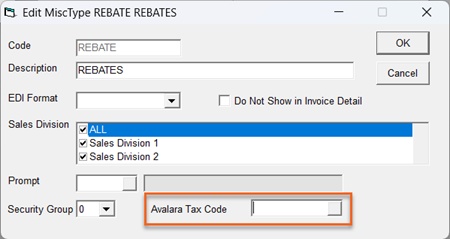 |
| Packages Located in the Package window. | 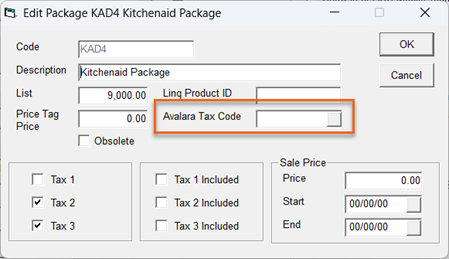 |
Using an Import Utility
Instead of entering tax codes manually, you can use an import utility to update several records at once.
EPASS has import utilities for
- Models and Items (through a Price List template)
- Miscellaneous codes
- Labor
- Extended Warranties
Refer to the table below to access each import utility.
| Import Utility | How to Access |
|---|---|
| Models and Items | Create or Edit an existing Price List Template (Go to Tools > System Maintenance > Tables > Price List Template). Refer to Creating a Price List Template for instructions.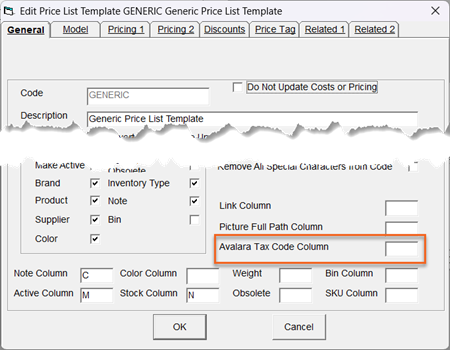 |
| Miscellaneous | Open the Miscellaneous Charge table and click Import. (Go to Tools > System Maintenance > Tables > Miscellaneous)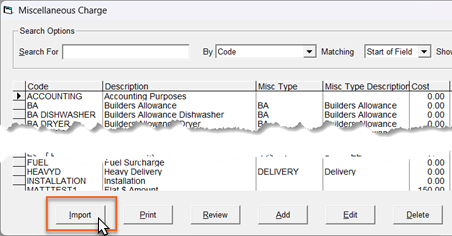 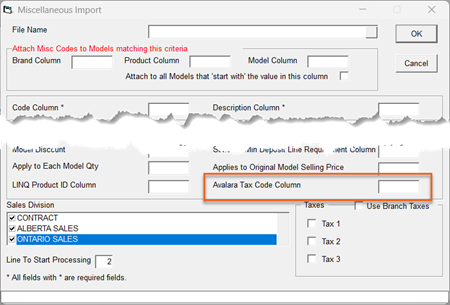 |
| Labor | Open the Labor Rate table and click Import. (Go to Tools > System Maintenance > Tables > Labor Rate)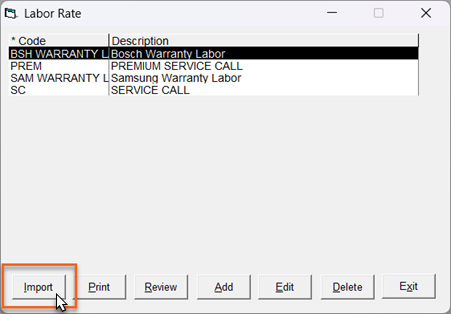 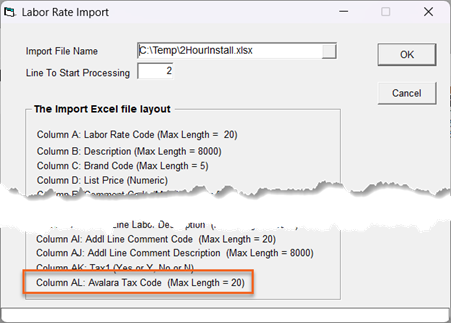 |
| Extended Warranties | Open the Extended Warranty table and click Import. (Go to Tools > System Maintenance > Tables > Extended Warranty)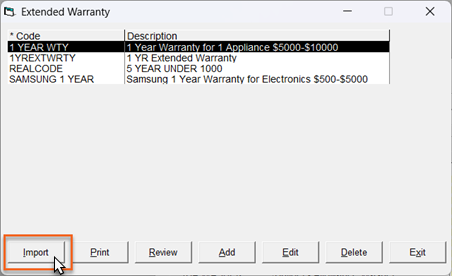 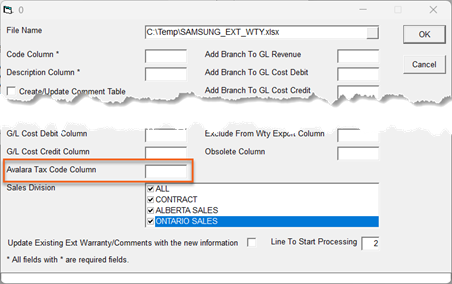 |
Add Avalara Entity Use Codes to Customers and AR Variables
Avalara Entity Use Codes identify how a customer uses or purchases items so the correct tax rules can be applied. They are commonly used when a buyer qualifies for a tax exemption or special tax treatment. Examples include purchases for resale, government use, charitable organizations, manufacturing/industrial production, and agricultural production.
For each of your customers that qualify for a tax-exemption or special tax treatment, you will need to enter the appropriate entity use code to their customer record.
You'll also need to enter a code in AR Variables as a "default" code that AvaTax can fallback to if an entity use code is not present on the Customer record.
You can view the list of entity use codes here.
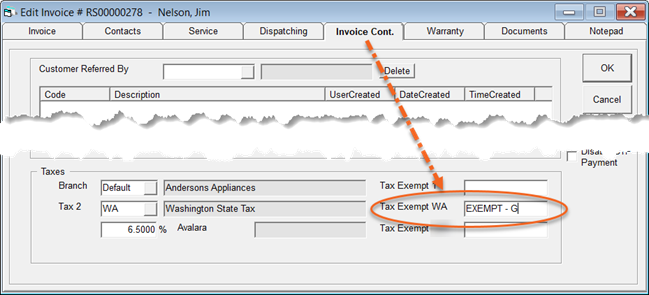
You must ensure that all tax codes are correctly applied to avoid triggering a tax audit. Make sure that each branch has an Avalara Entity Use Code in AR Variables. If a customer on an invoice doesn't have an Avalara Entity Use code, you can still make the invoice tax-exempt by entering an exemption code in the Tax Exempt field on the Invoice Cont. tab. Avalara will then use the code that was entered in AR Variables.
However, if there is no code present in AR Variables, Avalara will apply a generic "Not Taxable (NT)" code to the transaction. If a line item with an NT code is not taxed, it may raise concerns with tax authorities and trigger a tax audit.
To Add Entity Use Codes to Customers
-
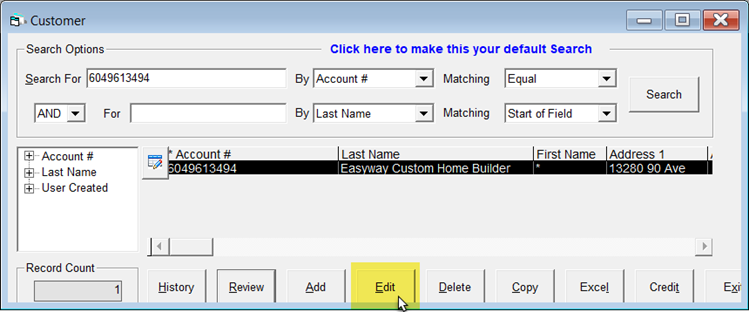
Go to Customer > Maintenance.
-
Search for the customer's record and then click Edit.
-
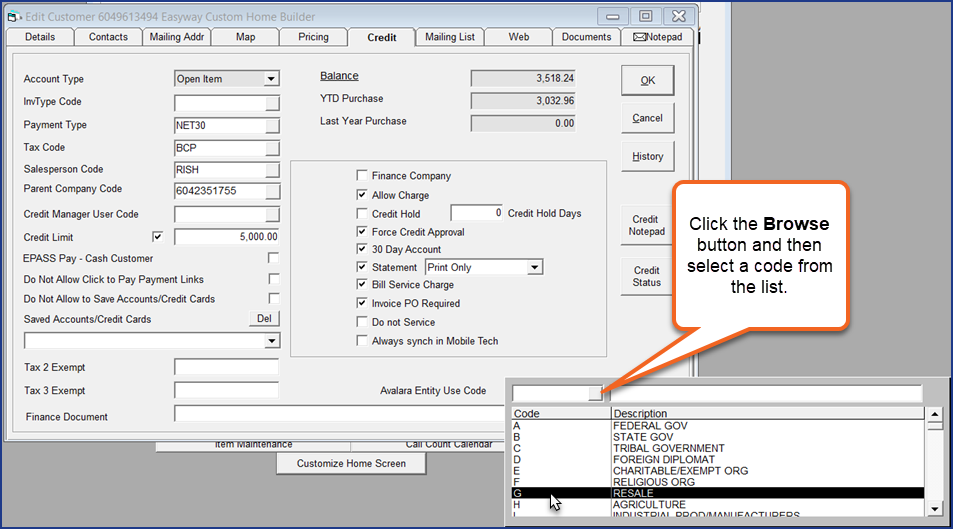
Click the Credit tab.
-
In the Avalara Entity Use Code dropdown, click the Browse button, and then select a code.
-
Click OK.
-
Repeat steps 2–5 for additional customers that require a entity use code.
To Add a Default Code to AR Variables
-
Go to Tools > System Maintenance. Click the Variables tab.
-
Select Accounts Receivable, and then click Open.
-
Select a branch and then click Edit.

-
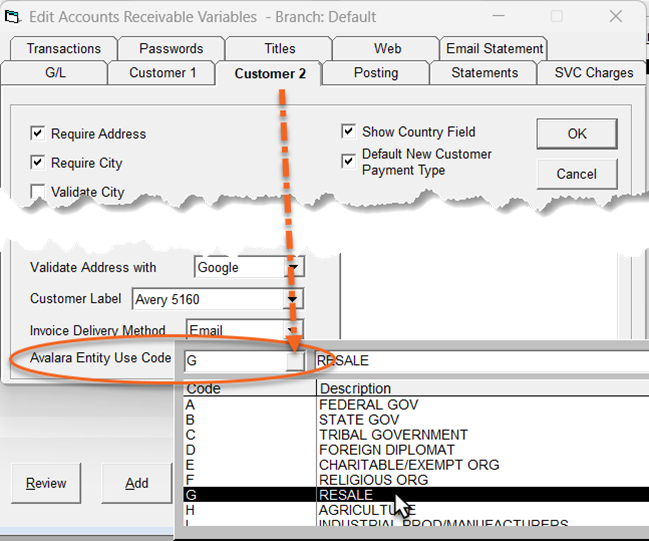
Click the Customer 2 tab.
-
In the Avalara Entity Use Code dropdown, click the Browse button, and then select a code.
-
Click OK.
-
Repeat steps 3–6 for additional branches.
Initial configuration is complete and you can begin testing.
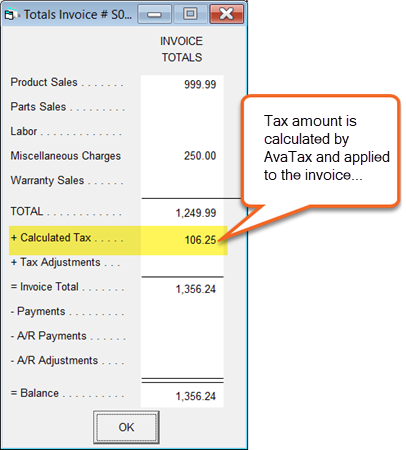
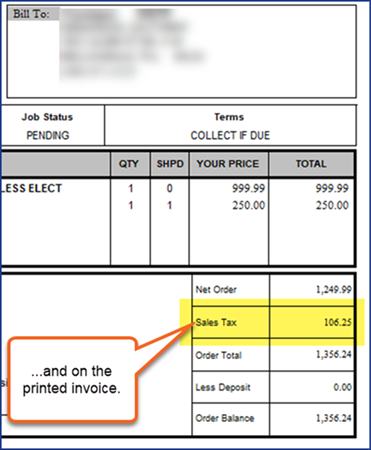
How AvaTax Calculates Tax Amounts
Once you've completed the configuration steps, EPASS will receive tax amount calculations from AvaTax and apply them to new and existing invoices.
AvaTax calculates tax amounts based on the Ship To address for Scheduled invoices, or the location of the branch for Pick-up invoices. (If you enabled the Get Taxes for Pickups from Model/Item Detail Location option, the model or item's location is used instead.)
You can view the tax rate that AvaTax is using for the Invoice on the Invoice Cont. tab.
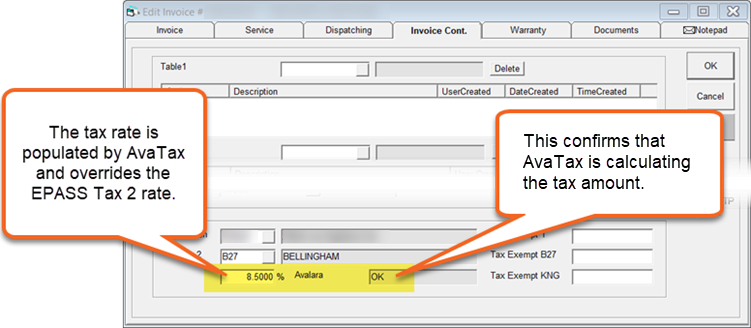
AvaTax recalculates the tax amount whenever the invoice is edited and when the invoice is Finished. This ensures that AvaTax is using the most current tax rate when it's calculating the invoice tax amounts.
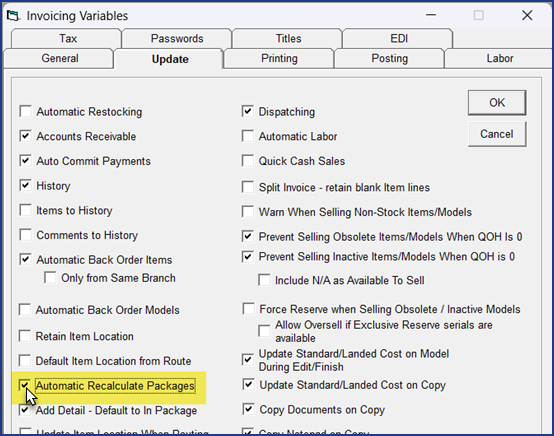
Calculating Taxes on Packages
Taxes on Packages are calculated in two different ways, depending on how the Automatic Recalculate Packages option is set. This option is located on Invoicing Variables > Update.
When the option is enabled:
- The individual package detail lines (items within the package) are used for the tax calculation.
- Each detail line’s selling price is included in the tax calculation.
- The package status is set to Committed.
- AvaTax calculates the tax amount on each line item of the package, based on the line item's own values and tax codes.
When the Option is disabled:
-
The selling prices on the package detail lines are set to $0.00.
-
AvaTax calculates tax using the Package Avalara Tax Code instead of the individual detail lines.

-
Tax is applied to the package as a single total, not to each item within it.
Calculation Difference Between AvaTax and EPASS
AvaTax calculates tax per line item, rounding each line’s tax to two decimal places, and then sums those rounded amounts to determine the total tax.
EPASS calculates tax using this formula: Total Taxable Amount * Tax Rate. This approach applies the combined rate to the entire taxable amount in one step.
The difference between the two methods can result in penny-level differences because of line-by-line rounding.
Example
| EPASS | Avalara |
|---|---|
| Total taxable: $1,000.00 Tax rate: 8.845% Tax amount: $88.45 | Line 1: $500 * 8.845% = $44.23 Line 2: $500 * 8.845% = $44.23 Tax amount: $88.46 (difference of $0.01 due to rounding) |
Loss of Communication with AvaTax (Tax Calculation Fallback Mode)
In the unlikely event of a communication disruption with AvaTax, EPASS automatically switches to it's own tax calculation engine as a fallback. All tax calculations are performed by EPASS until communication with AvaTax is restored. Any invoices with EPASS calculated tax are flagged and a tax recalculation from AvaTax is automatically triggered when the invoice is edited or finished.
If there is a discrepancy between the EPASS and AvaTax amounts, EPASS will require the difference to be reconciled before the invoice can be finished. You'll have to make an accounting adjustment on the invoice to bring the balance to $0.00.
How EPASS Invoices Appear in AvaTax
EPASS sends invoice data to Avalara for tax calculation and the invoice appears in the Transactions section of your Avalara account. All invoice detail is included, such as shipping information and tax codes, as well as a summary of each invoice line item and the taxes applied.
Refer to this article for a detailed overview of Avalara Transactions.
EPASS invoices are entered as Transactions in the Uncommitted status. This means that they are not included in reports or tax fillings. Once the invoice is posted in EPASS, it's marked for upload to Avalara by the EPASS tax upload utility that is scheduled to run daily (see Schedule the Tax Upload Utility in the Going Live section for more information.)
When Avalara receives the invoice from the upload utility, the status is changed to Committed. Committed transactions are included on AvaTax reports and included in the next filed return.
Refer to this article for a detailed overview of transaction status in AvaTax.
Going Live
Once testing is complete, follow the sections below to "go live" with the AvaTax integration.
Schedule the AvaTax Upload Utility
The AvaTax Upload utility needs to be installed and scheduled on your system to perform a daily upload of your posted invoices and commit them to your Avalara account. Contact EPASS Support to have a support agent install and schedule the utility for you.
Invoices that have the Committed status in your Avalara account are included on reports and ready for the next filed return. See Transaction Status in AvaTax for more information on each transaction status.
Change Configuration to Your "Live" Company
Finalize your "go live" with AvaTax by doing the following:
-
In EPASS, go to Tools > System Maintenance. Click the Variables tab.
-
Select Invoicing, and then click Open.
-
Click the EDI tab.
-
In the Company Code field, enter the name of your live company in Avalara (example,
DEFAULT).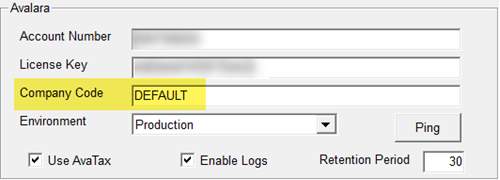
-
Click the Ping button to test the connection.
-
Click OK to close Invoicing Variables.
Avalara AvaTax integration is complete and ready to use.
July 8, 2026