Labor
Provides retail/builder sales divisions the ability to sell labor (installations) on an invoice and then split off the install portion to a dash invoice assigning a technician to the labor line and routing the technician.
Invoicing Variables
Enable Show Labor code (not Technician) in Invoice list in Invoicing variables on the labor tab.
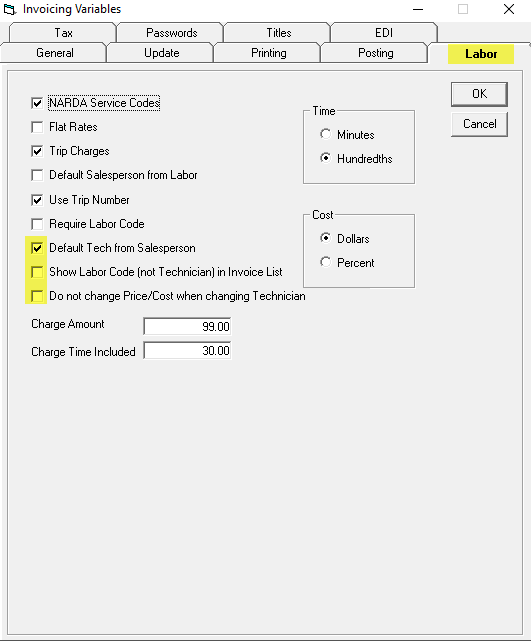
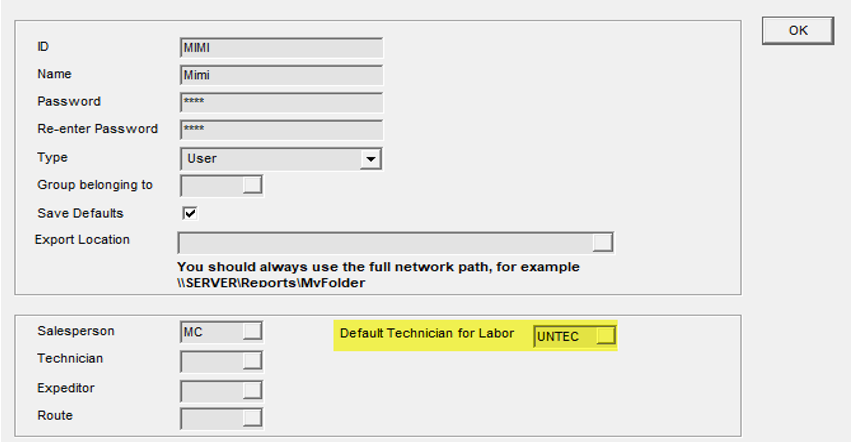
Default Tech from Salesperson
If you don't know who the technician will be at the time of sale and you want the technician field to automatically fill in, you will want this setting enabled.
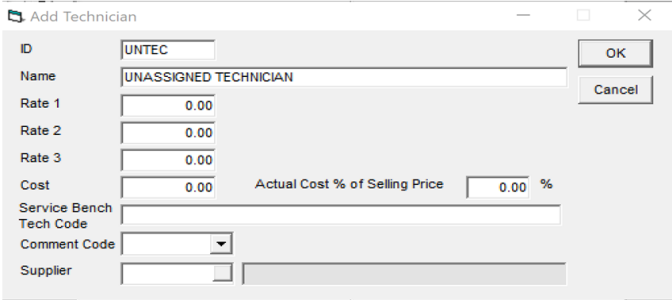
You can create a technician code UNTEC Unassigned Tech that can be attached to a user code/group that are entering sales so that the technician field on the invoice labor line automatically fills in as UNTEC until someone dispatching updates the field with the actual technician code of who is performing the install/service.
Do not change Price/Cost when changing Technician
Whether you want to enable this or not will depend on whether or not you want the list price/cost on the invoice labor line to change when you change or assign the technician.
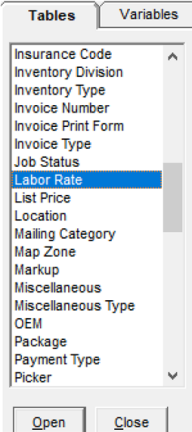
Technician Table
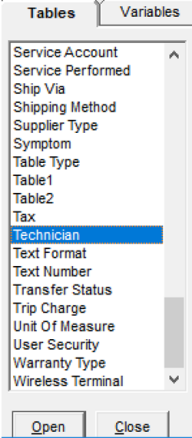
Open the technician table to add, edit, and maintain your technician codes.
You have the option of paying the technician a percentage of the selling price of the labor line sold on a customer invoice. If you choose to do so, you will also fill in the Actual Cost % of Selling Price percentage amount.
If you sold a dishwasher install for $149 and the technician had the below settings, the technician would be paid $89.40 for that install.
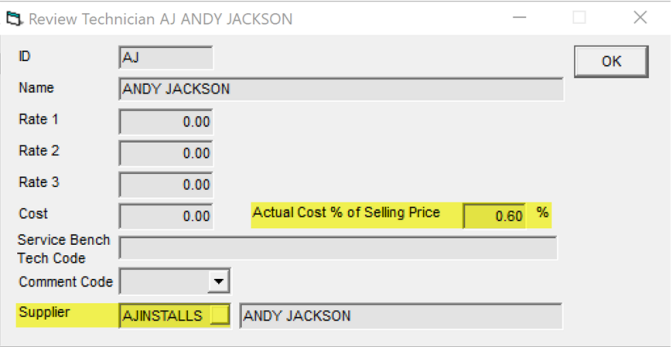
If you have the technician set up as a supplier, you can also fill in the supplier field on the technician code. This helps in AP to reference that technician AJ is actually paid under his company name ‘AJ Installations’. You can run a crystal report referencing the tech code and supplier code and or have it included in the reconciliation reporting.
Labor Rate Table
Open the labor rate table to add, edit, and maintain your labor codes.
In this example, we have created a labor code 'DWINSTL' for a dishwasher install.
List: is the sell price to the customer
Standard Cost: is the cost used to calculate profit on if a user gets commission paid
Actual Cost: is the cost you intend to pay to the technician
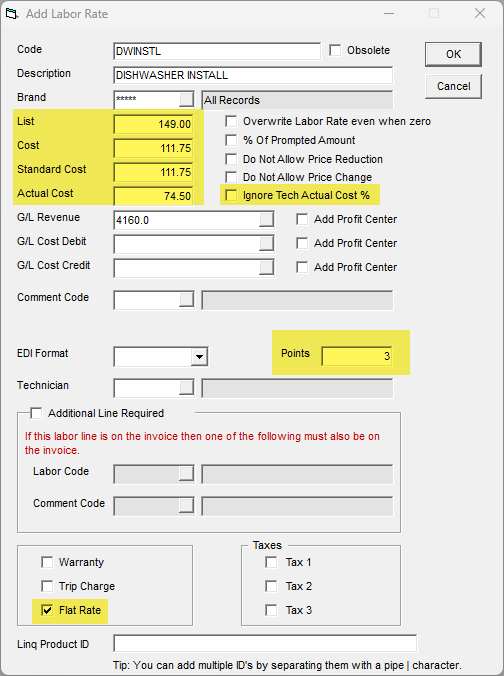
Flat Rate is always used on this setup.
The Technician Actual Cost % of Selling Price will always be the default used in the calculation on the invoice labor detail line.
If you want the technician actual cost to be filled in on the invoice labor line by the actual cost amount on the labor code, you will check the Ignore Tech Actual Cost % box.
If you want the technician actual cost to be filled in on the invoice labor detail line by the Actual Cost % of Selling Price on the technician code then you would NOT have this checked.
You also have options to:
- % of Prompted Amount: Calculates based on a % of List Price
- Do Not Allow Price Reduction
- Do Not Allow Price Change
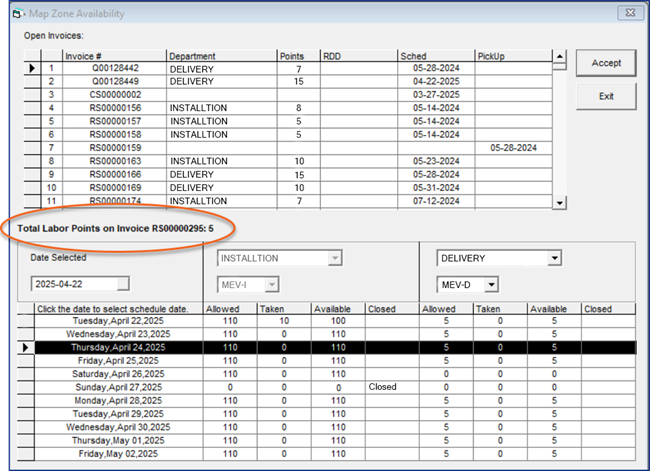
Points are for estimating labor effort by assigning it a numerical value. Labor can be calculated in several different ways. Some businesses use a simple 1-10 scale, where 1 requires minimal effort, and 10 requires the maximum. Some businesses use a more complex calculation based on multiple factors.
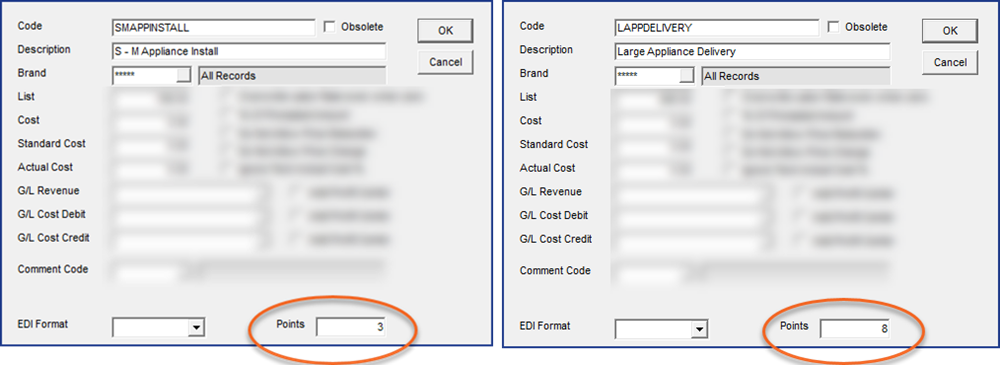
Anderson's Appliance uses a simple 1-10 scale to assign Labor effort to each of their installation and delivery services. The installation of small and medium appliances usually only requires a single technician, so that Labor Rate code is given 3 Points. However, delivery of large appliances usually requires multiple delivery persons for an extended period of time, so that Labor code is given 8 Points.
EPASS does not calculate labor effort for you. The Points field is meant as a way to record estimated effort based on the calculation method you already use.
When using the Schedule Assistant for scheduling service or delivery calls, the total Labor Points for the Invoice are shown.
Route Table
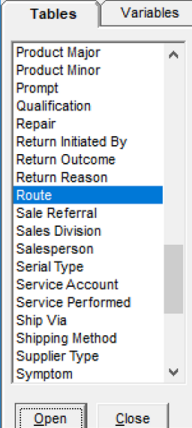
Open the route table to add, edit, and maintain your route codes.
A technician needs to have a route in order to be dispatched. You can identify whether the route sheet prints only, email only or print and email. You can identify the types of installation service work they are not qualified for. If you use departments, you can assign the department the technician belongs to, in this example INSTALLATION.
You can also attach a picture of the technician so the customer can see who they are expecting to come to their home when you contact them.
Selling Labor – Invoicing Process
Original Sales Invoice
An invoice created by Sales allows them to sell both the model and labor code (install) on the same invoice.
The technician on the labor line sold will auto fill in based on the code found on the user if filled in – see Default Tech from Salesperson section above.
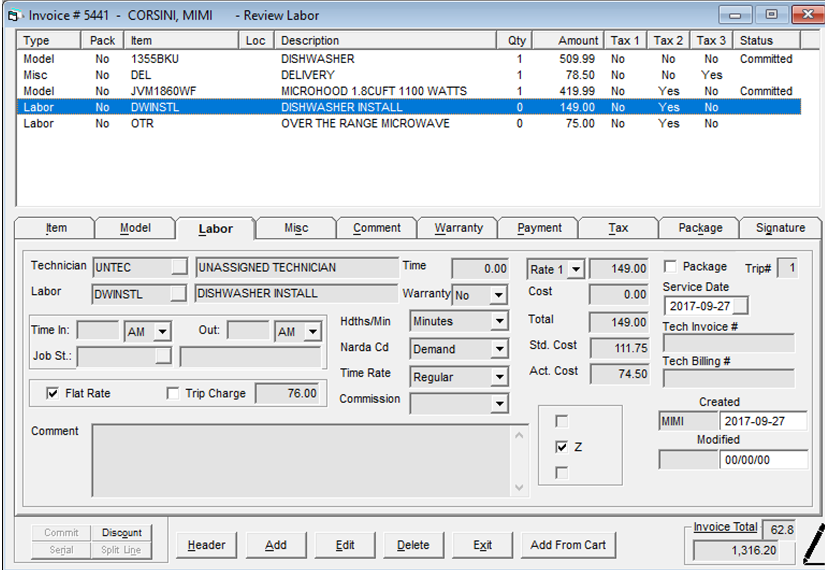
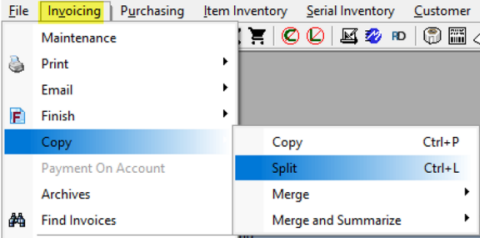
Your install team will review invoices where a labor code has been sold (usually a custom Crystal report based on your company process). They will then create a split invoice (dash to the original) where they will split off the labor lines and assign the technician to the labor line for routing.
It is important to follow this process as it enables you to ship/dispatch product from your original invoice and route the installation from your dash invoice.
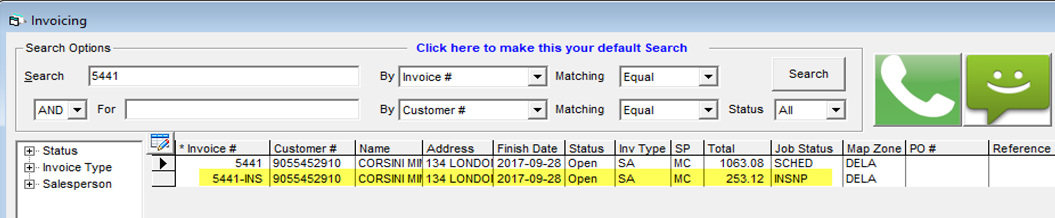
A recommendation to differentiate between the original invoice and possible delivery splits is that you designate the install split invoice as a -INS to the original invoice number. Then, if there is a need for further split outs for installs you could continue the sequence with an -INS1, -INS2 etc. The combination of all these invoices always reference back to the original. An easy way for your delivery and installation departments to see the bigger picture yet treat delivery and installations separate.
Splitting to a -INS Invoice
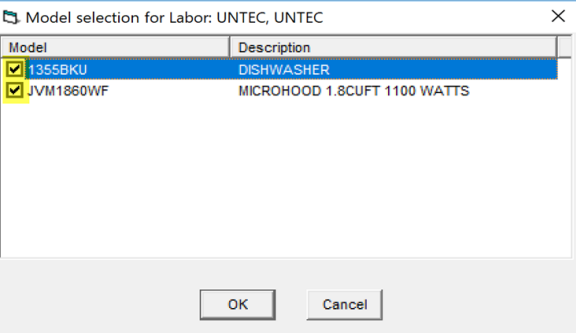
When splitting labor lines from the original invoice to the -INS, you will get a prompt which asks which model is associated to the labor code being split.
This will not split out the model but it will reference the model as a comment line on the -INS invoice to the labor code it belongs to so, when you route the technician, they will see the install service sold and to what model.
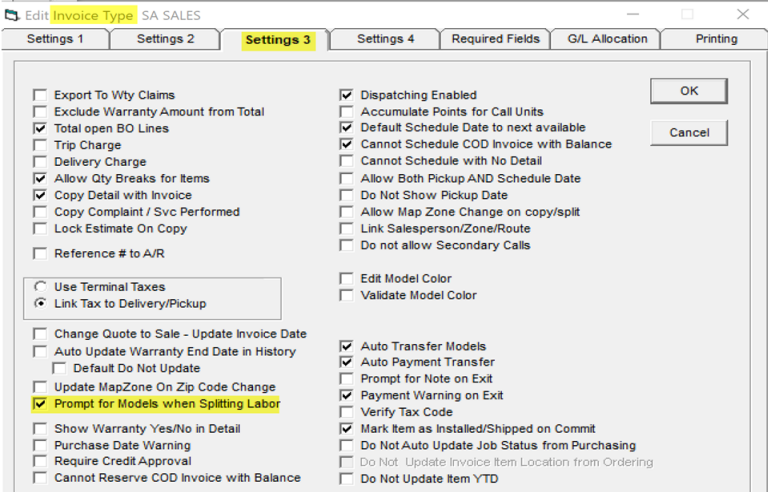
You turn this feature on by invoice type, on Settings 3 tab, ‘Prompt for Models when Splitting Labor’.
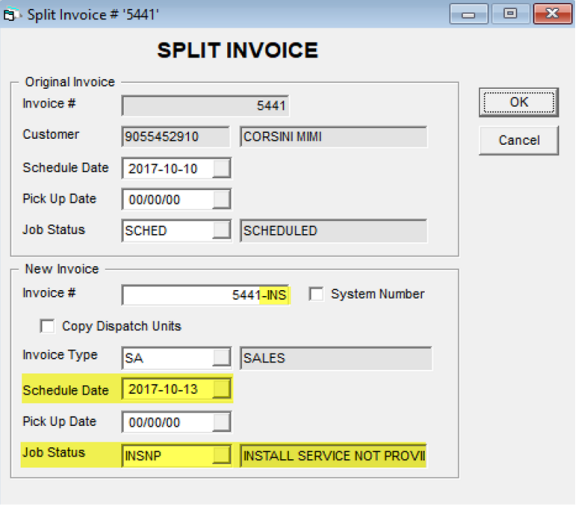
When splitting the original invoice, enter the anticipated schedule date of the install, and update job status, in this case to INSNP (Install Service Not Provided).
Click OK
On the header it is recommended to use a job status for tracking the installation invoice status.
INSNP (Install Service Not Provided): when you first add the invoice and the install service has not yet been provided.
INSP (Install Service Provided): when the invoice has been dispatched and the installation service has been provided.
This could then be used as the trigger that the invoice is ready to be finished.
In the split invoice screen, you will select the labor codes that will be split to the -INS:
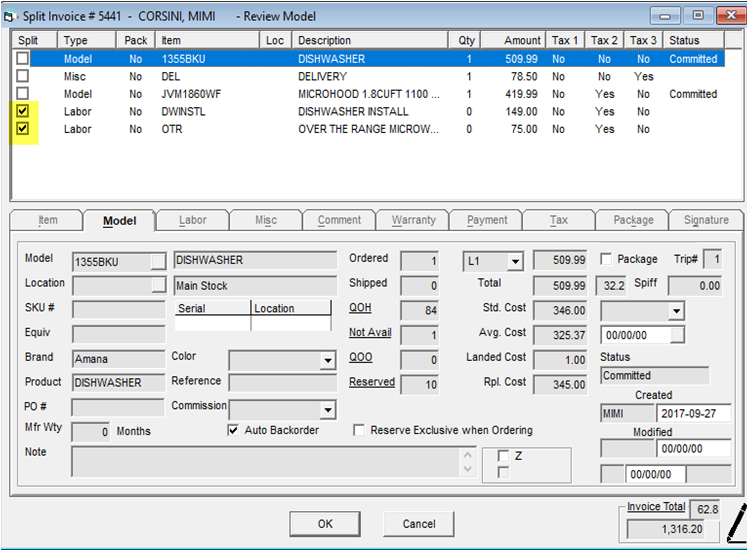
You will get the prompt to select the model(s) that belong to the labor codes. Once selected, EPASS will write a comment to the -INS to indicate this information.
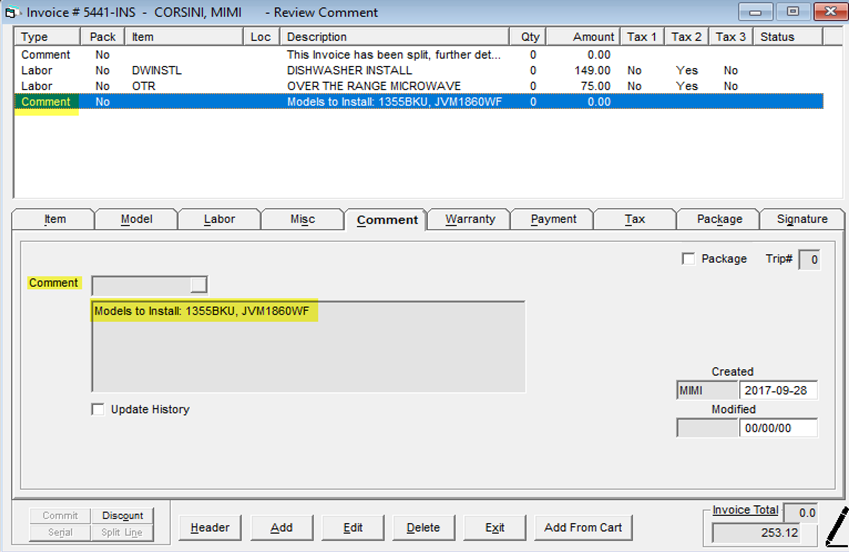
You have now created the install invoice needed to route the installation and complete that portion of the customer's invoice.
You can now update each labor code from UNTEC Unassigned Technician to the actual technician doing the installation.

You will also notice the comment line identifies the models to install.
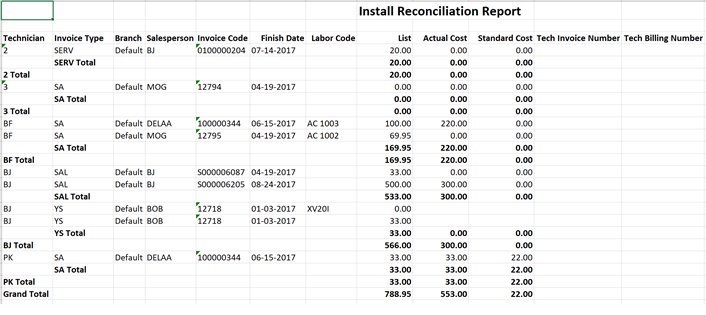
Installation Reconciliation Report
The reconciliation report is an .exe report that enables you to track finished installation invoices that have been paid or not. It is used to pay the technician and provide your accounting department with an accrual (outstanding installation invoices) value.
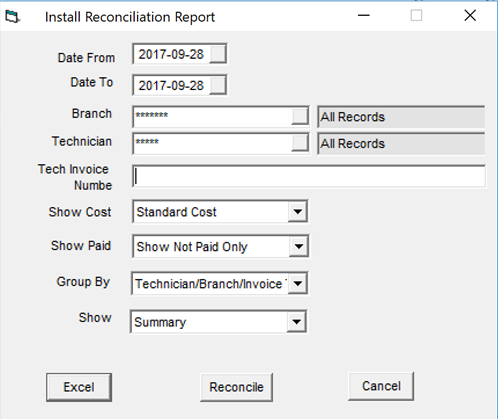
REPORT PARAMETERS
Date From/To: date range to pull all ‘finished’ invoices where a labor line was sold on it.
Technician: you can pull for a specific technician code or all records.
Tech Invoice Number: if you know the actual technician invoice number used on a previous reconciliation report, you can enter it here and search by it (it must be the exact match to what was entered, not a partial number).
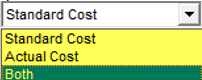
Show Cost: in the drop down, you can select Standard Cost, Actual Cost, or Both. Based on your selection, the report will show the costs selected in separated columns.
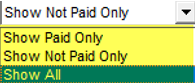
Show Paid: in the drop down, you can select Show Paid Only, Show Not Paid Only, or Show All.
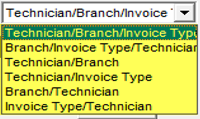
Group By: in the drop down, you can select:
Show: the drop down allows for you to select Summary or Detail.

Excel Button: allows the export to Excel
The Excel report is considered a working paper only. It allows you to review and investigate all labor lines and totals prior to reconciling which will actually write back to EPASS on the invoice labor detail lines. If you need to make changes to the dollar values or the technician code assigned to the labor line, you would go back to the invoice labor detail line and correct it before actually reconciling.
Once you are satisfied with the information on the Excel report, you will run the .exe again with the same parameters and this time select the Reconcile button.
Reconcile Button
Once you are ready to reconcile in EPASS and after selecting your report options, you click on the Reconcile button. It will launch your selection screen, where you will select the lines you want to reconcile/pay the technician.
In this example, we selected to show only the unpaid lines; when you fill in the Technician Invoice Number and click Accept, the next time you run the report and include paid lines this internal note will be displayed in the Tech Invoice Number field on the lines you had selected to reconcile.
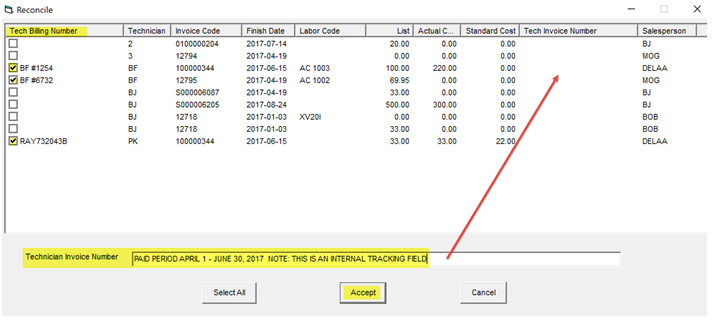
During the reconciliation, if you have the technician's billing information, you can also double click in the Tech Billing Number field and add their billing number.
You can reconcile individual lines or click Select All to have all lines reconciled.
After clicking Accept, an Excel sheet will pop up showing the technicians you selected to reconcile/pay. You can hand in the Excel sheet to your AP department for processing the technicians' pay.
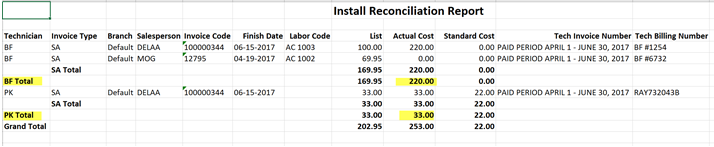
Also upon clicking Accept, it will write the Tech Invoice Number and Tech Billing Number back to the invoice labor detail line fields.

See Also
August 21, 2025