Adding an Item to an Invoice
When adding an item there are a few key fields that must be filled in.

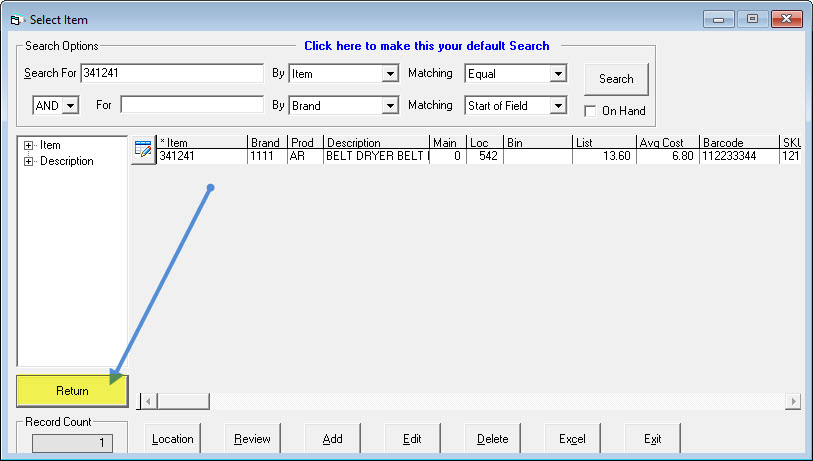
Item: This is where you enter the item # that you would like to sell. If you know the full item number just type it in then hit tab to go to the next field. If you don’t know the item number, you can either hit the F2 button on the keyboard or click the small button ![]() to go to a full item inventory search where you can search by item number, description, etc. Once you have found the item you’re looking for, either double click it on the Item Inventory Maintenance screen, or click the return button in the bottom left corner.
to go to a full item inventory search where you can search by item number, description, etc. Once you have found the item you’re looking for, either double click it on the Item Inventory Maintenance screen, or click the return button in the bottom left corner.
Once the item has been selected, either by typing it in or by using the search, you will now see many of the information fields about the item are filled in.
Ordered: This is the quantity that you are selling. Let’s enter 1 for now.
List Price drop down: This field defaults to the pricing level that this customer is set to get. You can have many different pricing levels, but typically they are coded L1, L2, L3, etc. If you choose a different pricing level here, then it will change the selling price appropriately. This is only used to allow you to easily select a pricing level, it does not save this value with the item line; it only saves the actual price that was entered.
Selling Price: You can change the selling price by typing it in here.
Location: This is the location that the item will come out of. You can set up default delivery and pickup locations for each terminal and you can also override the location by changing it here.
Those are the key fields you’ll need to enter to sell an item.
Additional Fields
| SKU # | If you use your own internal SKU numbers for items, it will show up here. You can enter either the item number of the SKU # into the item field and it will find that item. You can also press the small arrow button |
| Equivalent | If there is an equivalent item number, it will show that item number here. You can also press the small arrow button |
| Bin | The bin location that the item is found in, for the currently selected location. |
| Failure | The failure code, only used for service invoices. |
| Reference | This field is typically used by parts distributors who use EPASS. The customer’s PO number for this item will be filled in here, then it will print on the packing slip/invoice. This typically is filled in by the customer when they order parts online, though it can also just be typed in here. |
| Note | A note that is attached to this item. |
| Order From | If this item is not in stock and you want to order it from a specific supplier then choose that supplier here. When ordering this part will show up to be ordered from that supplier. |
| Supplier | For warranty claims (service). The supplier that this item was purchased from. |
| Supp Inv | For warranty claims (service). The supplier invoice number that this item was purchased on. |
| Purchase Date | For warranty claims (service). The date that this item was purchased. |
| Shipped | The quantity that has been shipped. |
| QOH | The current quantity on hand for the selected location. If auto restocking is turned on then this will always show the Main Stock quantity, regardless of which location is selected. |
| QOO | The current quantity on order for the selected item. |
| Reserved | The total number that have been sold and not yet shipped. |
| Measure | The unit of measure; I.E. each, per dozen, per meter, etc. |
| Auto Restocking | If this is checked then the QOH will only show the quantity on hand for the Main Stock location, regardless of which location is selected. |
| Auto Backorder | If you check this box and there are any of the item on order for stock (not ordered for a specific invoice), then when you click OK to add the item it will attach itself to that open PO line. |
| Installed/Shipped | Determines if the item was installed or shipped. It is very common with items to commit them and have the item come out of stock, even though the customer doesn’t really have the item yet. This is done so that if another person looks up that item they don’t see one as being available. The installed/shipped checkbox is what determines if a committed item has really been given to the customer or not. You can configure on the invoice type whether or not this defaults to checked or unchecked when an item is committed. |
| Cost | The cost of the selected item. |
| Total | The extended selling price. Quantity multiplied by selling price. |
| Warranty Yes/No | This is only used for service invoices, and determines if this is a warranty item or not. |
| Tax (checkbox) | This designates if tax will be charged for this item or not. If there is a tax exemption number on the invoice, that will override this and tax would not be charged. There is a security option that can control whether a person can check/uncheck the tax box. |
| Package | Designates if this model is part of a package or not. This is covered in full in Selling a Package on an Invoice. |
| Trip # | This is only applicable for a service invoices. It designates which trip the item was installed. |
| Status | Open or committed. If the item has not been taken out of stock then the status will be open; this is typical when you need to order the item. If the item has been taken out of stock (but not necessarily shipped, don’t forget about the installed/shipped checkbox) then the status will be committed. |
| Created | The user who created this item line and the date it was created. |
| Modified | The user who last modified this item line and the date it was modified. |