Creating Automatic Delivery Charges
You can automate the adding of delivery charges to an invoice to prevent staff from forgetting to add the charge when creating the invoice.
Automatic delivery charges can be set up so that they are applied when a specific Map Zone is selected (Base Delivery Charge), or when a specific model is added to the invoice detail.
This guide provides instructions for setting up an automatic delivery charge for Map Zones and models, as well as how to use the Model Import/Export utility to add automatic delivery charges to a large number of models at once.
- With automatic delivery charges by Map Zone, only one delivery charge is applied to the invoice. This "Base Delivery Charge" is applied once the first model is added to the invoice. No further charges are applied when additional models are added.
- Models with automatic delivery charges that are added to an invoice always apply their delivery charge, regardless of the amount of delivery charges already on the invoice.
- You can combine the two automatic delivery charge methods: Map Zone and Model. This means that you can have a Base Delivery Charge, as well as a separate charge for each model added.
Before Starting
If you use third-party delivery companies, you will need to make sure that each company in the Ship Via table has delivery charges enabled.
Enable Delivery Charges for Ship Via Companies
-
Go to Tools > System Maintenance. On the Tables tab, select Ship Via and then click Open.
-
Select a Ship Via code from the list, and then click Edit.

-
Select Enable Delivery Charges, and then click OK.

Selecting Enable Delivery Charges triggers the auto delivery charge to attach to the invoice when the delivery company is selected on the Invoice header.
- Repeat steps 2 and 3 for each delivery company. When you’re finished, click Exit to close the Ship Via window.
Setting Up a Base Delivery Charge for a Map Zone
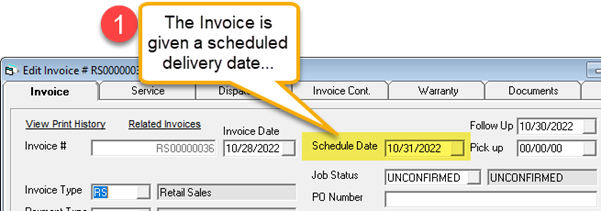
Following this method will cause a delivery charge to automatically attach to an invoice when a specific Map Zone is selected.
Before Starting
To use Base Delivery Charges, you need to make sure that the Invoice Types that are used for delivery orders are set up to apply delivery charges.
Set Up Invoice Types
-
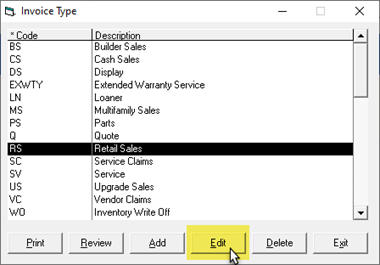
Go to Tools > System Maintenance. On the Tables tab, select Invoice Type and then click Open.
-
Select an Invoice Type in the list, and then click Edit.
-
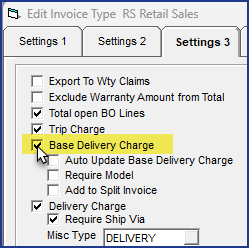
Click the Settings 3 tab.
-
Select the Base Delivery Charge checkbox.
-
Select the following options:
-
Auto Update Base Delivery Charge: With this option enabled, EPASS updates the base delivery charge when the map zone or Invoice Type changes.
ExampleWith the Auto Update Base Delivery Charge option selected, when an invoice that is scheduled for delivery is changed to a customer pick-up, the delivery charge is automatically removed. Otherwise, it would remain on the invoice.
-
Require Model: The default behavior of the base delivery charge is that it is added to the invoice when the invoice is created. With this option selected, the base delivery charge is only added to the invoice after a model is added.
-
Add to Split Invoice: This option is disabled by default. When disabled, the Base Delivery Charge is not added to a split invoice. When enabled, the Base Delivery Charge from the original invoice is also added to the split invoice.
-
-
Click OK. Repeat steps 2–4 for each Invoice Type that applies delivery charges.
Add the Base Delivery Charge to a Map Zone
-
Go to Tools > System Maintenance. Select Map Zone, and then click Open.
-
Select a Map Zone, and then click Edit.

-
Click the Base Delivery Charge link.

-
Click Add.
-
Select the Invoice Type that triggers the base delivery charge and the Misc charge that is applied.
 Example
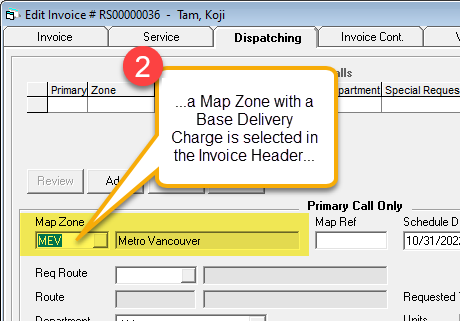
In the screenshot above, EPASS will use the Delivery Fees misc charge as the Base Delivery Charge and apply it to Retail Sales invoices that are within the MEV Map Zone.
-
Click OK.
-
If necessary, repeat steps 4–5 to add additional Invoice Types that trigger a Base Delivery Charge, or click Exit to close the Base Delivery Charge window.
Click to view an example.
Setting Up Automatic Delivery Charges for a Model
Following this method will cause a delivery charge to automatically attach to an invoice when a specific model is added.
This method is suitable to use if you want to add automatic delivery charges to a small number of models. If you want to add automatic charges to a large number of models, use the Export/Import utility described below.
Before Starting
You need to make sure that the Invoice Types that are used for delivery orders are set up to apply delivery charges when a model is added.
Set Up Invoice Types
-
Go to Tools > System Maintenance. On the Tables tab, select Invoice Type and then click Open.
-
Select an Invoice Type in the list, and then click Edit.
-
Click the Settings 3 tab.
-
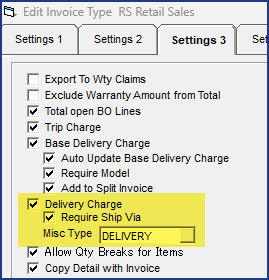
Select the Delivery Charge checkbox. If you use the Ship Via table, you must select Require Ship Via as well.
-
From the Misc Type dropdown, select the misc type that applies when the model is added to the invoice.
-
Click OK. Repeat steps 2–4 for each Invoice Type that applies delivery charges.
When attaching delivery charges to models and the Ship Via table is used, the Delivery Charge and Require Ship Via must be selected and Misc Type must be filled in.
If the Ship Via table is not used, then the Require Ship Via checkbox must be deselected.
The Misc Type controls the adding and removal of delivery charges when the following changes are made:
-
Schedule Date to Pick Up Date
-
Invoice Type
-
Map Zone
-
Ship Via
Add an Automatic Delivery Charge to a Model
-
Go to Serial Inventory > Maintenance.
-
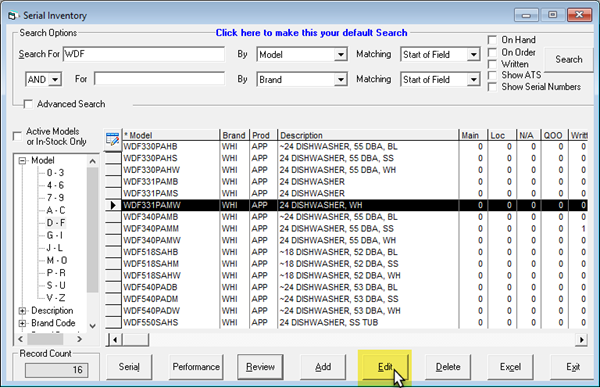
Search for a model. Select it from the search results, and then click Edit.
-
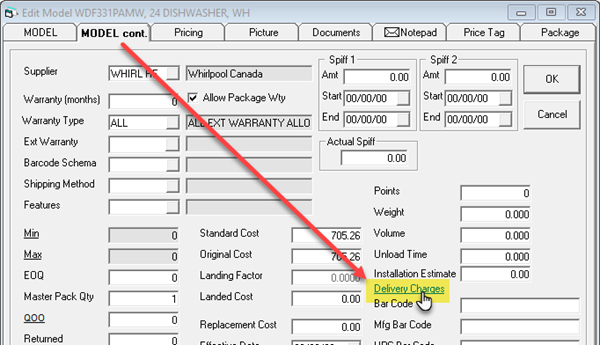
Click the Model Cont. tab, and then click the Delivery Charges hyperlink.
-
Click Add.
-
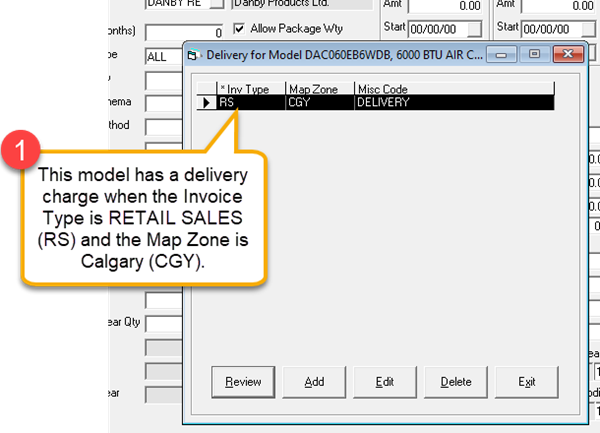
Select the conditions that trigger the auto delivery charge from the dropdowns: Invoice Type and Map Zone. Select the Misc Charge that will be applied from the Misc dropdown.
 Example
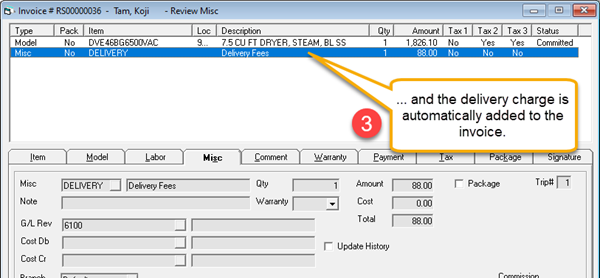
In the screenshot above, the DELIVERY Misc Charge is applied when the model is added to a Retail Sales invoice in the MEV MapZone.
-
Click OK.
-
Add additional Delivery Charges if required. Once you are finished, click Exit.

-
Repeat steps 2–7 for additional models.
Click to view an example.
Adding Automatic Delivery Charges with the Import/Export Utility
If you want to add automatic delivery charges to a large number of models, use the Import/Export utility to add them all at once, rather than manually adding them to each model.
Using the utility is a three-step process: you’ll export your model records as an Excel file, edit the file, and then import it back into EPASS.
Before Starting
There are several security options that you need to enable to use the Import/Export utility:
- Serial Inventory Utilities – Export Model Delivery
- Serial Inventory Utilities – Import Model Delivery
- Serial Inventory Utilities – Import Model Delivery – Delete Checkbox Options
To Enable the Security Options
-
Go to Tools > System Maintenance. On the Tables tab, select User Security, and then click Open.
-
Select a User Group from the list, and then click Security.
-
In the Keyword search box, enter IMPORT MODEL. Select Utilities: Import Model Delivery and Utilities: Import Model Delivery – Delete checkbox options.

-
In the Keyword search box, enter EXPORT MODEL. Select Utilities: Export Model Delivery.

-
Click OK.
Export the Model Records
-
Go to Serial Inventory > Utilities > Export Model Delivery.
-
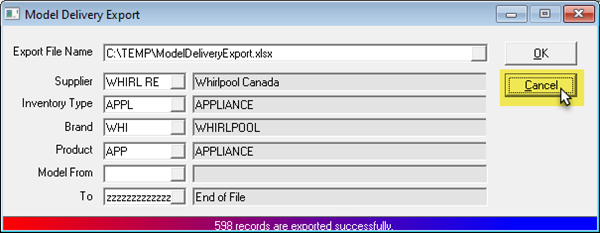
Do the following:
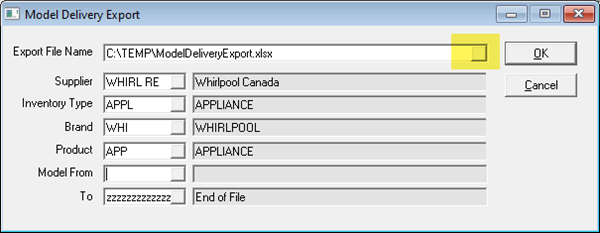
A. Click the Browse button (highlighted) and select where you want to save the export file and what you want to call it.
B. Use the Supplier, Inventory Type, Brand, and Product dropdowns to filter the model selection.
C. Use the Model From and To dropdowns to select a range of models, or leave it as is to include all model records.
D. Click OK. Once the export is complete, click Cancel to close the Model Delivery Export window.
Edit the Export File
-
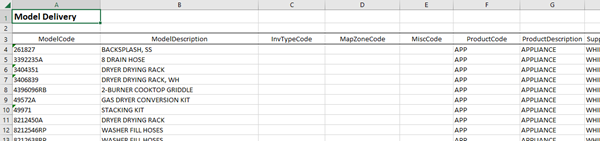
Locate the export file and open it in Excel. It will look similar to this:
-
Do the following:
-
Locate each model that you want to trigger an automatic delivery charge and fill in the InvTypeCode, MapZoneCode, and MiscCode columns.
-
The InvType and MapZoneCode are the conditions that trigger the automatic delivery charge. Enter the InvType code and MapZoneCodes that you want to use.
ExampleIf an automatic delivery charge should be applied to the invoice when ModelCode 261927 is added to a RETAIL SALES invoice type in the MEV Map Zone area, then you would enter the codes in the Excel columns like this:

-
The MiscCode is the misc charge that’s applied to the invoice. Enter its code in the MiscCode column:

-
-
Once you are finished, save and close the Excel file.
Import the Excel File into EPASS
-
In EPASS, go to Serial Inventory > Utilities > Import Model Delivery.
-
Do the following:
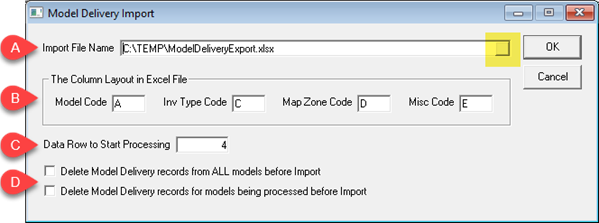
| A | Click the Browse button (highlighted) and select your Excel file. |
| B | Map the Model Code, Inv Type Code, Map Zone Code and Misc Code columns. (If you didn’t adjust the Excel columns, the default column letters are shown in the screenshot.) |
| C | Enter the data row number that the import should start from (default value is 4). |
| D | You can select to delete current model delivery charges before importing the new data. The first option deletes the delivery charges from ALL models in EPASS (even models that are not on the imported Excel file). The second option deletes the delivery charges from only the models that are included in the imported spreadsheet. |
Why would I need to delete current delivery charges?
The import utility only adds or changes existing delivery charges—it won't remove a delivery charge. To completely remove a delivery charge from a model during import, you'll need to select one of the deletion options.
- Click OK. The utility imports the data from the Excel sheet and a PDF report of the results automatically opens when finished. Review the report to identify any errors that need correcting.
If you intentionally left a model’s InvTypeCode, MapZoneCode, and MiscCode blank, the report identifies the row as a "Cannot be found in the database” error. These can be ignored.
Overriding Automatic Delivery Charges
If you don’t want delivery charges to automatically apply to an invoice, you can choose to suppress them with the override feature. This feature prevents all delivery charges from automatically applying to the invoice, regardless of map zone or model. You can still manually add them if you need to.
Before Starting
To use the override feature, you need to enable this security option: Invoicing – Edit Delivery Override.
To Enable the Security Options
-
Go to Tools > System Maintenance. On the Tables tab, select User Security, and then click Open.
-
Select a User Group from the list, and then click Security.
-
In the Keyword search box, enter OVERRIDE. Select Edit Delivery Override.

-
Click OK.
Override the Automatic Delivery Charges
-
Open an invoice.
-
Click the Invoice Cont. tab.
-
Select Delivery Overriden.

Automatic delivery charges won’t be triggered, regardless of the map zone or model.
See Also
November 27, 2025