Scheduling a Sales Invoice
There are various ways that dispatching can be set up, which would affect how you schedule an invoice.
First of all, the job status can determine if you are even able to schedule for delivery. If the invoice you are scheduling is set to a “non-dispatch” job status (typically job statuses such as “estimated”, “future”, “unknown”, etc. are set to non-dispatch) then you can still fill in all of the fields we’re about to cover, but the invoice won’t show up in Dispatching. Usually you can just select an estimated schedule date on the first tab of the invoice when using a non-dispatch job status.
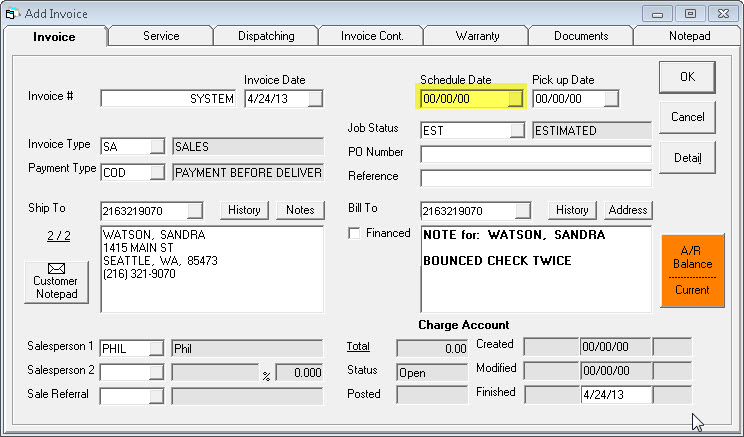
Now let’s assume we’ve selected a dispatch job status, which means we’ll want to go to the Dispatching tab of the invoice header to schedule the invoice for delivery.
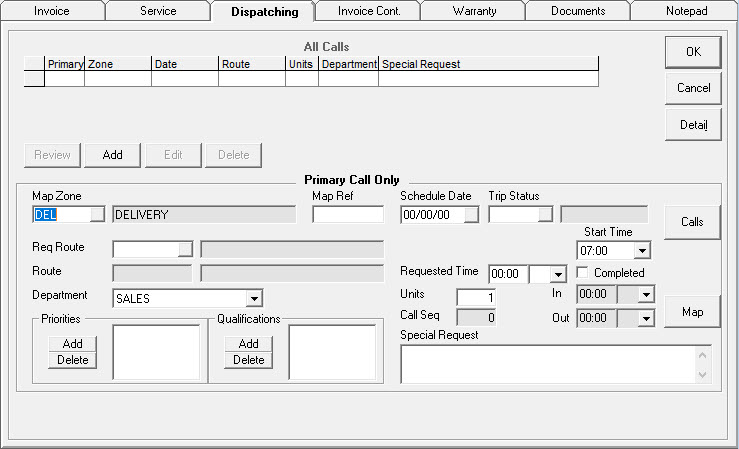
The first time you schedule an invoice, the “All Calls” list in the top half of the screen is empty. After you’ve scheduled it for the first time, or if it’s been rescheduled multiple times, you’ll see a history of all the different delivery dates in that list. We’ll ignore that for now though and just concentrate on the lower half of the screen (Primary Call) where we’ll be scheduling the invoice.
Map Zone: The map zone is usually a geographical area and is defined by each company, depending on how you want to handle your dispatching. If you have drawn map zones out through Invoicing > Dispatching > Utilities > Map Zone Defining, this should have automatically been filled in based on the zone the customer belongs to. The map zone can also be defaulted by the Invoice Type > Settings 1 tab.
Map Ref: If you still use map books, this is a reference for the map book. You can fill it in on the customer, then it will default here automatically.
Req Route: This is the requested route. It’s not typically used for sales invoices, but if you wanted to request a specific delivery truck then you would choose it here.
Route: This is updated when the invoice is dispatched to a truck in dispatching. It cannot be edited here.
Department: If you use departments, this will default to the department of the current invoice type. If you do not use departments it will just say ALL.
Schedule Date: This is the date of the delivery. Typically, you would first click on the calls button (discussed below) to see which days have availability, but you could also just select a date and, if the date is full, the system will tell you it cannot select that date. The Invoice Type > Settings 3 controls whether it would then select the next available date.
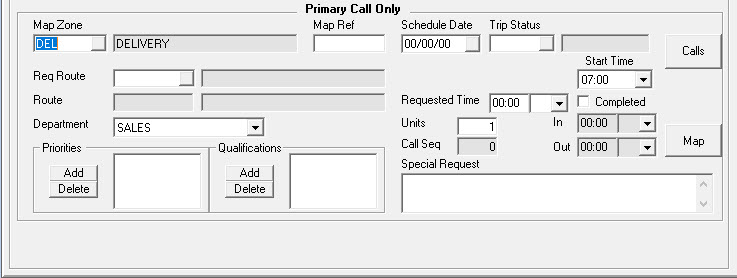
Trip Status: If you want to track the status of each and every delivery, then you have the option to choose a trip status here.
Trip Charge: This trip charge is mainly used for service, though it could be used as an informational field on a sales invoice. The trip charge can be tied to a map zone so that it will display the charge amount for that zone. It will automatically apply to labor lines on a service invoice.
Start Time: This is available if you have enabled start times, which probably means you are using the calendar-style Route Board. In that case, you need to set start times for each call, but it is typically done in dispatching and in each invoice individually. The main purpose for displaying it here is to let you know the start time.
Requested Time: This time will be displayed in dispatching. It is a way for the person scheduling the invoice to request a time, but it does not mean that time will be accommodated. It is only a request. Some companies only use the AM/PM drop down and not the time field.
Completed: If this is checked, it means the dispatcher has signified that the delivery is complete.
Units: Units can be used multiple ways; they usually relate to an amount of time. Tools > System Maintenance > Variables > Dispatching Variables allows you to define the amount of time (15, 30, 60 minutes, etc), or it can be the number of “points” on this invoice (accumulated based on the models on this invoice), or it can simply be that 1 is a typical delivery and 2 or more is a delivery that takes a bit longer. This is usually determined when initially configuring dispatching, usually with the assistance of an EPASS representative. Make sure you choose the units appropriately based on how your company has decided to use them.
Call Seq: This is the sequence of this delivery on the truck. If it is zero, it means it has not been dispatched. If it is anything else, then that’s the order in which this delivery will happen. For example, a call sequence of 2 means it’s the second delivery of the day for the truck that it is assigned to.
In/Out: Time in and time out. These are optional, but if you wish to track these times they are available for you to do so.
Special Request: This is a request by the customer that needs to be relayed to the delivery team. For example, “call 30 minutes ahead”, “use the side door”, “watch out for dog”, and so on.
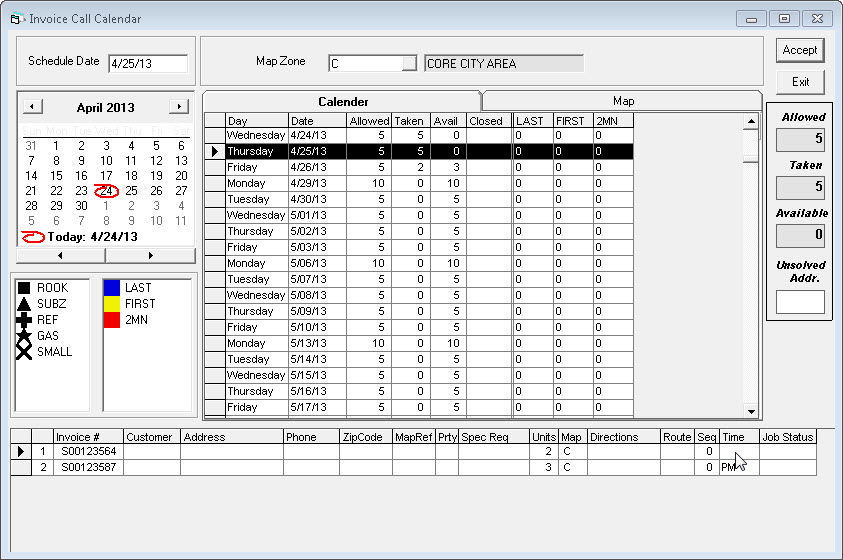
Calls button: This is where you can view availability for each zone. It will show you all of the upcoming days where you allow delivery to this zone, and will display the number of units allowed/taken/available. Use this screen to quickly find out a delivery date that works for the customer.
Priorities: These are used to designate something important about an invoice, and is totally defined by you. Some examples are “REPEAT”, “AM”, “PM”, “2 MAN”, etc. Some companies even use the priorities as their time windows so you see how many calls are in that time window, when looking at the calls screen. The dispatcher will see these when routing, and if you use mapping they will change the color of the icon for this delivery.
Qualifications: If not all of your delivery crew can do all deliveries, then you’ll want to set up qualifications. That way you can designate that certain qualifications are required to do this delivery. As long as your route qualifications are set up in System Maintenance, dispatching will prevent this invoice from being dispatched someone who is not qualified. If you use mapping, qualifications will change the shape of the icon for this delivery.